
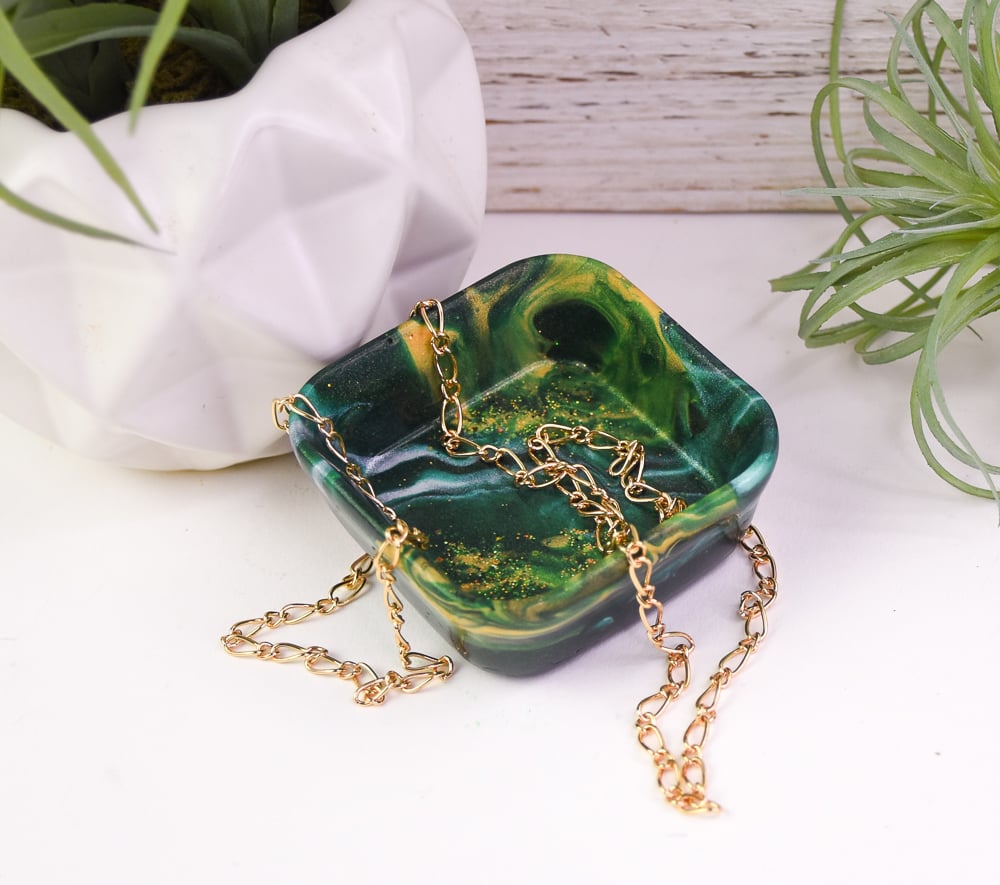
Liquid Sculpey® Emerald Trinket Dish
Liquid Sculpey® Emerald Trinket Dish
Designed by Amy Koranek
Read More
Emerald is glamorous in this combination of gold, pearl, and glitter all poured into a trinket mold.
TIME TO COMPLETE:
45 Minutes to make and bake
Read Less
ADDITIONAL SUPPLIES
- Paper towel
- 1 oz. Silicone baking cups (2)
- Silicone square shaped trinket dish mold
- Chunky glitter - I’m using Mr. Nola’s Glitter in the color Ellen
Project Instructions
- Getting Started with Liquid Sculpey®:
- Baking:
- It is important to use oven thermometer when you bake the liquids so that you can ensure your oven is at the correct temperature.
- Do not microwave the liquids. They must be baked in a Preheated oven at 275 ºF (130 ºC) for liquid colors and 300 ºF (149 ºC) for Clear – Do not exceed baking temperatures.
- If your piece is less than 1/4” bake for 15 minutes. For thicker pieces that are 1/4” or above bake for 30 minutes.
- If your liquid project has become yellowed or discolored in the oven, when you remake it, tent it by placing either – folding an index card in half and placing your project under it or by using aluminum foil over your project.
Fill the bottom of a 1-ounce silicone baking cup with a thin layer half of Emerald Metallic Liquid Sculpey® and half of Pearl Liquid Sculpey® (LS).

Layer the Emerald on top of the Pearl and Pearl on top of the Emerald in the cup. Then another layer of Emerald on top of Pearl and Pearl on top of Emerald.
Fill the bottom of a second 1-ounce silicone baking cup with a thin layer half of Emerald Metallic LS and Gold Metallic LS.

Layer Gold over the Emerald side and Emerald over the Gold side.

Layer once again Emerald over the Gold and Gold over the Emerald. Now both the Emerald/Pearl and the Emerald/Gold are ready to be poured into the mold. This is called a dirty pour because we are pouring multiple layers of color at the same time from one cup. The outcome will be completely random but really pretty.

Sprinkle a bit of glitter on the flat surface of the square mold in the corners as shown. The glitter I’m using is iridescent and so it looks kind of green in this photo.

Pinch the silicone cup of Emerald/Pearl to form a pour spout in line with the intersection of the two colors.

Pour the contents of the Emerald/Pearl cup into the center of the mold spreading the liquids diagonally from corner to corner.

Pinch the silicone cup of Emerald/Gold to form a pour spout in line with the intersection of the two colors.

Pour half of the contents of the Emerald/Gold cup in one corner and half of the contents in the other corner. It’s fine to empty all the blended LS into the edge area of the mold to help fill this deep part.

Squirt more Emerald LS directly from the bottle into the cavities that form the sides of the dish.

Keep adding Emerald LS to the mold to fill it covering up the area that has the blended colors.

Make sure the mold is filled to level with Emerald LS. Tap the mold gently on the work surface to release air bubbles.

Bake the mold following the baking instructions for Liquid Sculpey®. Allow the mold to cool completely before de-molding. This type of mold can be almost completely turned inside out to release the baked piece.

Appreciate the beauty!

- Getting Started with Liquid Sculpey®:
- Baking:
- It is important to use oven thermometer when you bake the liquids so that you can ensure your oven is at the correct temperature.
- Do not microwave the liquids. They must be baked in a Preheated oven at 275 ºF (130 ºC) for liquid colors and 300 ºF (149 ºC) for Clear – Do not exceed baking temperatures.
- If your piece is less than 1/4” bake for 15 minutes. For thicker pieces that are 1/4” or above bake for 30 minutes.
- If your liquid project has become yellowed or discolored in the oven, when you remake it, tent it by placing either – folding an index card in half and placing your project under it or by using aluminum foil over your project.
Fill the bottom of a 1-ounce silicone baking cup with a thin layer half of Emerald Metallic Liquid Sculpey® and half of Pearl Liquid Sculpey® (LS).
Layer the Emerald on top of the Pearl and Pearl on top of the Emerald in the cup. Then another layer of Emerald on top of Pearl and Pearl on top of Emerald.
Fill the bottom of a second 1-ounce silicone baking cup with a thin layer half of Emerald Metallic LS and Gold Metallic LS.
Layer Gold over the Emerald side and Emerald over the Gold side.
Layer once again Emerald over the Gold and Gold over the Emerald. Now both the Emerald/Pearl and the Emerald/Gold are ready to be poured into the mold. This is called a dirty pour because we are pouring multiple layers of color at the same time from one cup. The outcome will be completely random but really pretty.
Sprinkle a bit of glitter on the flat surface of the square mold in the corners as shown. The glitter I’m using is iridescent and so it looks kind of green in this photo.
Pinch the silicone cup of Emerald/Pearl to form a pour spout in line with the intersection of the two colors.
Pour the contents of the Emerald/Pearl cup into the center of the mold spreading the liquids diagonally from corner to corner.
Pinch the silicone cup of Emerald/Gold to form a pour spout in line with the intersection of the two colors.
Pour half of the contents of the Emerald/Gold cup in one corner and half of the contents in the other corner. It’s fine to empty all the blended LS into the edge area of the mold to help fill this deep part.
Squirt more Emerald LS directly from the bottle into the cavities that form the sides of the dish.
Keep adding Emerald LS to the mold to fill it covering up the area that has the blended colors.
Make sure the mold is filled to level with Emerald LS. Tap the mold gently on the work surface to release air bubbles.
Bake the mold following the baking instructions for Liquid Sculpey®. Allow the mold to cool completely before de-molding. This type of mold can be almost completely turned inside out to release the baked piece.
Appreciate the beauty!