
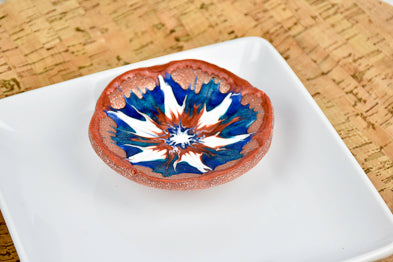
Liquid Sculpey® Copper Cling Dish
Liquid Sculpey® Copper Cling Dish
Designed by Amy Koranek
Read More
Read Less
This is a technique that I came up with to place Liquid Sculpey® designs onto curved surfaces without the design dripping or running. Once you have a grasp of this technique, you can easily make pieces as clings that can be wrapped around surfaces or as in this project, draped onto a curve and then baked into place.
TIME TO COMPLETE:2 Hours to make and bake (3 times)
ADDITIONAL SUPPLIES
- Paper towel
- 4” Silicone round coaster mold or other circle shaped piece of silicone
- 4”-5” Diameter metal or glass bowl form - I like to use brushed aluminum half hemisphere shaped bowls because the surface does not leave shiny spots on the clay during baking
Project Instructions
Getting started:
Please make sure your work area is covered and you are not working on an unprotected surface. We recommend working on the Sculpey® Oven Safe Work Mat, wax paper, metal baking sheet, or disposable foil. Uncured Liquid Polymer Clay may damage unprotected furniture or finished surfaces. Be sure to cover your crafting area appropriately.
Stir Liquid Sculpey® completely. Thin with Sculpey® Clay Softener & Thinner as needed. Wash hands after use (we have found that baby wipes work best).
Baking:
It is important to use an oven thermometer when you bake the liquids so that you can ensure your oven is at the correct temperature. Do not microwave the liquids. They must be baked in a Preheated oven at 275 ºF (130 ºC) for liquid colors and 300 ºF (149 ºC) for Clear – Do not exceed baking temperatures. If you are using the liquids as a glaze or in thin pieces less than ¼ inch bake for 15 minutes. For thicker pieces that are ¼ or above bake for 30 minutes. If you are baking on a ceramic tile then you will also need to bake at 30 minutes since it will take longer for the tile to heat up. This will ensure the proper fusing of the liquid material. When baking these liquids you may experience some vapors or a slight odor. This is not harmful and will not affect your creation.
It’s important to work out your design on something that is made of silicone. In this tutorial, I am using a silicone coaster mold because it is round and flat - even though I’m not actually making a coaster. The silicone provides enough traction that the Liquid Sculpey® doesn’t run and spread but instead, stays really well right where you put it. That way you can draw and doodle and not worry about your design being distorted by running and spreading. When the design is done, we will bake it. Then it can be peeled off of the silicone like a window cling, and applied to our clay bowl base and baked again. So, in a way, we are really just making a cling but then the cling becomes the featured design in a curved dish. I think this is brilliant... even if I do say so myself!
Start in the very center of the design with a drop of White Liquid Sculpey® (LS). Surround it with six equal sized Copper Metallic LS teardrop petals.
Start in the very center of the design with a drop of White Liquid Sculpey® (LS). Surround it with six equal sized Copper Metallic LS teardrop petals.

Place V’s of Peacock Pearl LS at the tip of each of the Copper petals.

Add teardrops of White LS in between each Copper petal.

Add half circles of Navy Metallic LS to the tip of each White line.

Place a dot of Navy Metallic LS into each of the Peacock Pearl V’s.

Place a drop of Navy Metallic in the very center.

Dip the tip of the Needle Tool into the very center and without lifting it, drag it outward through all the colors.
When you reach the outermost tip, carefully lift the tool and clean it with paper towel.
When you reach the outermost tip, carefully lift the tool and clean it with paper towel.

Repeat to drag the Needle Tool through all twelve of the points.

Drag short radiating lines from the innermost circle out through just the White areas.

Drag longer radiating lines from the innermost circle out through the Peacock Pearl areas.

Add another drop of White to the very center.

Drag little radiating lines from the White center just out through the Navy center ring.

Very carefully, add a border of Copper Metallic all the way around the outside, just barely joining the White tips.

Drag really short little lines from the Copper border into the blank spaces between the tips. This would be into the areas where there is no LS.
Bake the cling on the silicone mold following the baking instructions for LS.
Bake the cling on the silicone mold following the baking instructions for LS.

When the mold is completely cool, carefully peel the cling design away from the silicone.

From the block of Rose Gold Glitter PremoTM make a circle at least 1/8” thick and a diameter that is proportionate to the size of your design.

Position the design on top of the Rose Gold disc.

Roll over the design gently with the Acrylic Clay Roller to help it embed just slightly into the clay background.

Carefully place the design in the bottom of the bowl form. Please note that if your bowl form is glass or shiny metal that the clay will take on this sheen during baking. My bowl form is brushed aluminum so no sheen will show on the surface of the clay after baking.
You want to take your time and make sure that the clay dish is sinking all the way down into the bottom of the bowl so air is not trapped between the clay and the form.
You want to take your time and make sure that the clay dish is sinking all the way down into the bottom of the bowl so air is not trapped between the clay and the form.

Trim the excess Rose Gold away from the edges using the Knife Tool.

Smooth any rough areas around the edges with your fingertips.
Bake the dish in the bowl form following the baking instructions for Sculpey PremoTM.
Allow the bowl form to cool completely before carefully removing the clay dish.
Bake the dish in the bowl form following the baking instructions for Sculpey PremoTM.
Allow the bowl form to cool completely before carefully removing the clay dish.

Use the clay that you trimmed away in Step 21 to create a foot for the dish. Form the scrap clay into a round patty and press it to the middle of the bottom of the baked dish.

Use your fingertips to push the sides of the foot neatly to the bottom of the bowl.

Use your fingertips to smear the edges of the foot onto the sides of the bowl. Make sure the seam between the foot and the dish disappears completely.

Carefully press the foot flat to your work surface to make sure the dish will sit nicely.
Loosely place the dish this time upside down on the outside of your bowl form so that the shape of the bowl is supported by the form. Bake the dish one more time to cure the foot into place.
Loosely place the dish this time upside down on the outside of your bowl form so that the shape of the bowl is supported by the form. Bake the dish one more time to cure the foot into place.

When the form is completely cool, carefully remove the dish.

- Choosing a selection results in a full page refresh.
- Opens in a new window.