
Liquid Sculpey® Confetti Barrettes
Liquid Sculpey® Confetti Barrettes
Designed by Amy Koranek
Read More
You can make the perfect style hair accessory for every occasion with Liquid Sculpey® and your favorite mix ins.
TIME TO COMPLETE:
60 Minutes to make and bake
Read Less
ADDITIONAL SUPPLIES
- Paper towel
- Mix ins of your choice - metallic foil, iridescent chunky glitter, foil dots
- Small sharp scissors
- Knitting needle
- Silicone barrette mold with matching barrette shapes
- Heat gun - optional
- E6000 or other silicone glue
Project Instructions
- Getting Started with Liquid Sculpey:
- Baking:
Place a bead of Translucent Turquoise Liquid Sculpey® (LS) in one of the barrette shapes in the silicone mold. Don’t fill completely.

Sprinkle copper colored foil glitter on top of the LS. You can use tweezers to help you pick up the pieces and place them in the LS.

Use a knitting needle or dull tipped tool to help the foil glitter submerge. Using a dull tipped tool will help to protect the mold from scratches. Once the foil pieces are all submerged, back fill the mold to level with more Translucent Turquoise. Tap the mold on the work surface to release air bubbles.

If you like, you can fill the remaining barrette shapes with more LS and foils. Bake the mold following the baking instructions for Liquid Sculpey®.
Anytime I work with any of the translucent or Clear colors of Liquid Sculpey®, I like to pump the colors up a notch by hitting them with my heat gun. While the mold is still hot from the oven, I use hand protection to transfer the baking sheet with the baked items on it to my heat gun area. Once again, I do this while the mold is still hot to take advantage of the heat that is already in place from the oven. Then I turn my heat gun to the hi setting and I apply heat to the molded pieces until the Clear areas turn really clear and shiny and the translucent areas deepen in color. Then I remove the heat.
When the mold is completely cool, gently flex it to release the shapes.

Glue the baked pieces to the barrette findings.

Next make sure the Clear LS is stirred completely well. Clear LS will have a layer of sediment that naturally forms in the bottom of the bottle. This sediment layer needs to be mixed completely back into the liquid layer in order for the Clear LS to be ready to use.
To make the “confetti” style barrettes, place a small amount of Clear LS in each of the cavities. Don’t fill the cavities completely full to have space to work with the confetti.
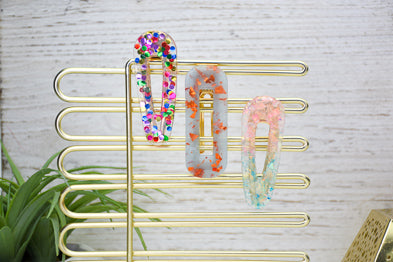
Add some bright dot foil glitter or other foils of your choice to one or more of the shapes. I’m going to add the bright dots to both the far left and far right shapes.
To make the “confetti” style barrettes, place a small amount of Clear LS in each of the cavities. Don’t fill the cavities completely full to have space to work with the confetti.
Add some bright dot foil glitter or other foils of your choice to one or more of the shapes. I’m going to add the bright dots to both the far left and far right shapes.

Move the dots around with the tip of a dull tool to distribute them evenly.

Back fill the bright dots to level with more Clear LS.
The middle barrette shape will be pink and blue chunky glitter. Use tweezers to add pink chunky glitter to the bottom half of the shape.
The middle barrette shape will be pink and blue chunky glitter. Use tweezers to add pink chunky glitter to the bottom half of the shape.

Use tweezers to add blue chunky glitter to the top half of the barrette. Back fill the shape with Clear LS to level.
Bake the filled mold following the baking instructions for Liquid Sculpey®.
Anytime I work with any of the translucent or Clear colors of Liquid Sculpey®, I like to pump the colors up a notch by hitting them with my heat gun. While the mold is still hot from the oven, I use hand protection to transfer the baking sheet with the baked items on it to my heat gun area. Once again, I do this while the mold is still hot to take advantage of the heat that is already in place from the oven. Then I turn my heat gun to the hi setting and I apply heat to the molded pieces until the Clear areas turn really clear and shiny and the translucent areas deepen in color. Then I remove the heat.
When the mold is completely cool, gently flex it to release the shapes.
Glue the baked shapes to barrette findings with silicone glue and allow to dry completely.

- Choosing a selection results in a full page refresh.
- Opens in a new window.