Liquid Sculpey® Christmas Tree Tag & Cling
Liquid Sculpey® Christmas Tree Tag & Cling
Designed by Amy Koranek
Read More
Read Less
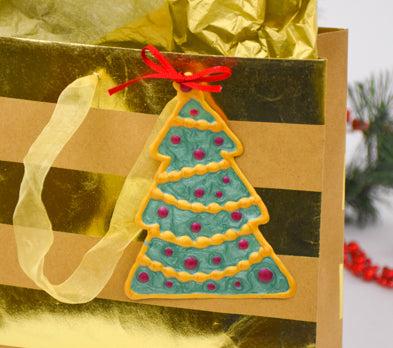
This lovely little tree makes a fun gift tag that can be used as a window cling.
TIME TO COMPLETE:90 Minutes to make and bake
ADDITIONAL SUPPLIES
- Tree template
- Paper towel
- Clean clear glass large enough to accommodate your tree shape
- Mica powder in bright green, blue, and brown
- 2 Ounce plastic cup
- 8” Ribbon
- Small sharp scissors

Project Instructions
- Getting Started with Liquid Sculpey:
- Baking:
Here’s a quick tip for working with Liquid Sculpey® (LS) for drawing outlines on glass. Allowing the LS to age will cause it to be thicker which is ideal for drawing outlines. You can age your LS by pouring it out into an open glass or metal dish and let it sit for a few days. Then you can put it back into the bottle so that it can be easily squirted. The LS can age and thicken in the bottles over time, but this can take quite a while. I intentionally keep both new and old bottles of the same colors in my studio so that I can use the older ones for outlines and the newer ones which are thinner for filling in large areas.
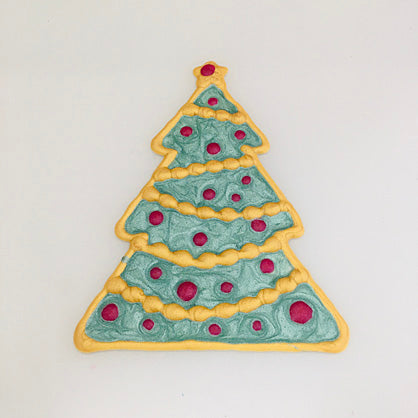
Place the clean clear glass over the template of the tree. Trace the outline of the tree onto the glass with thick Gold LS. Add a star to the top of the tree freehand.
Place the clean clear glass over the template of the tree. Trace the outline of the tree onto the glass with thick Gold LS. Add a star to the top of the tree freehand.

Add rows of Gold LS garland across the tree. I did this by squirting a lump out, then lifting the tip while moving over to the next lump. This gave me a cute thick and thin garland.

Squirt dots of Red Garnet randomly into the empty spaces for ornaments.
Bake the tree outline on the glass following the baking instructions for LS.
Bake the tree outline on the glass following the baking instructions for LS.

Allow the glass to cool completely before going on.
Next we will flood the empty spaces with Pearl LS tinted green. Pour 1/4 of the bottle of Pearl LS into the bottom of a plastic cup. Add some bright green mica powder to the Pearl.
Next we will flood the empty spaces with Pearl LS tinted green. Pour 1/4 of the bottle of Pearl LS into the bottom of a plastic cup. Add some bright green mica powder to the Pearl.

Stir completely with one of the Clay Tools.

Add a sprinkle of blue mica powder to make it more evergreen. Stir completely. Tools can be wiped clean with paper towel.

Add brown mica powder if desired to make the colors a bit darker. Stir completely.

Use one of the Clay Tools to place the green Pearl LS in the empty spaces of the tree.

Spread the green Pearl LS into all the little nooks and crannies with one of the Clay Tools. Bake the tree on the glass again.

When the glass is completely cool, carefully peel the tree from the glass using your fingernail.
Poke a hole in the middle of the star using the Needle Tool. You may need to clip the little hole open wider with scissors so that you can insert a ribbon.

- Choosing a selection results in a full page refresh.
- Opens in a new window.