Liquid Sculpey® Celestial Fox Key Chain
Liquid Sculpey® Celestial Fox Key Chain
Designed by Amy Koranek
Read More
In this tutorial we will fill an open bezel with Liquid Sculpey®. Open bezels work really well with the liquids because the design can be showcased from two different sides.
TIME TO COMPLETE:
1 Hour to make and bake
Read Less
ADDITIONAL SUPPLIES
- Paper towel
- Clean and clear piece of glass
- Fox shaped open bezel
- Silver glitter
- Key ring
- Flat nose pliers

Project Instructions
- Getting Started with Liquid Sculpey®:
- Baking:
- It is important to use oven thermometer when you bake the liquids so that you can ensure your oven is at the correct temperature.
- Do not microwave the liquids. They must be baked in a Preheated oven at 275 ºF (130 ºC) for liquid colors and 300 ºF (149 ºC) for Clear – Do not exceed baking temperatures.
- If your piece is less than 1/4” bake for 15 minutes. For thicker pieces that are 1/4” or above bake for 30 minutes.
- If your liquid project has become yellowed or discolored in the oven, when you remake it, tent it by placing either – folding an index card in half and placing your project under it or by using aluminum foil over your project.
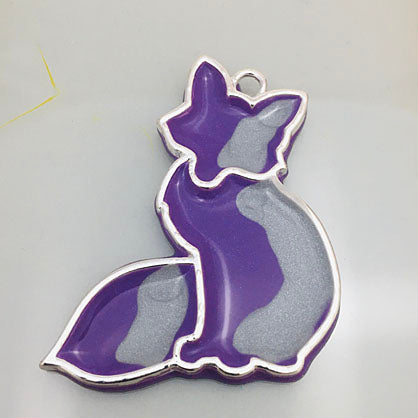
Lay the bezel on a piece of glass level on the work surface. The glass will make the baked Liquid Sculpey® (LS) easy to remove later and give the back side of the bezel a super shine.
Fill the bezel shape with Color-Shifting Purple LS. But do not fill all the way to level. Leave a bit of space for adding more colors.
Fill the bezel shape with Color-Shifting Purple LS. But do not fill all the way to level. Leave a bit of space for adding more colors.

Add a streak of Silver LS along one side of each of the parts of the bezel.
Add a streak of Black LS along the edge of the Silver LS.

Add small dots of Navy Metallic LS along the line where the Black and the Silver meet.

Use the Needle Tool to drag back and forth through the colors in each area. Dip the tip of the Needle Tool into the liquid and drag it through each line of color and through each dot, but do not lift the tool out until you are completely through with that area. Then wipe the tool clean with paper towel before going onto the next area.

Sprinkle silver glitter sparingly over the liquids.

Bake the bezel on the glass following the baking instructions for Liquid Sculpey®. Allow the bezel and the glass to cool completely. My bezel was still not filled completely, so I coated each area with a thin layer of Clear LS to bring it up to level. Then baked again following the baking instructions for LS.

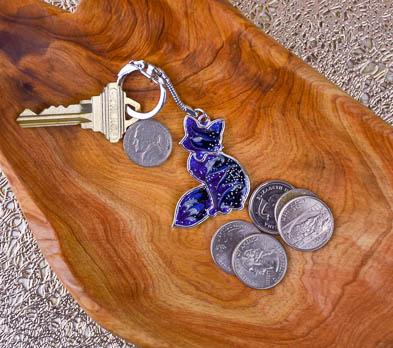
When the bezel and the glass are completely cool, remove the bezel from the glass by peeling up the edge with your fingernail or a thin tool like the Knife Tool. Carefully peel the bezel up. Then peel any excess baked LS from the outside edges of the bezel. Assemble as shown using flat nose pliers to open and close the jump ring on the end of the key chain.

- Choosing a selection results in a full page refresh.
- Opens in a new window.