
Liquid Sculpey Candy Stained Glass Miniature Gingerbread House
Liquid Sculpey Candy Stained Glass Miniature Gingerbread House
Read More
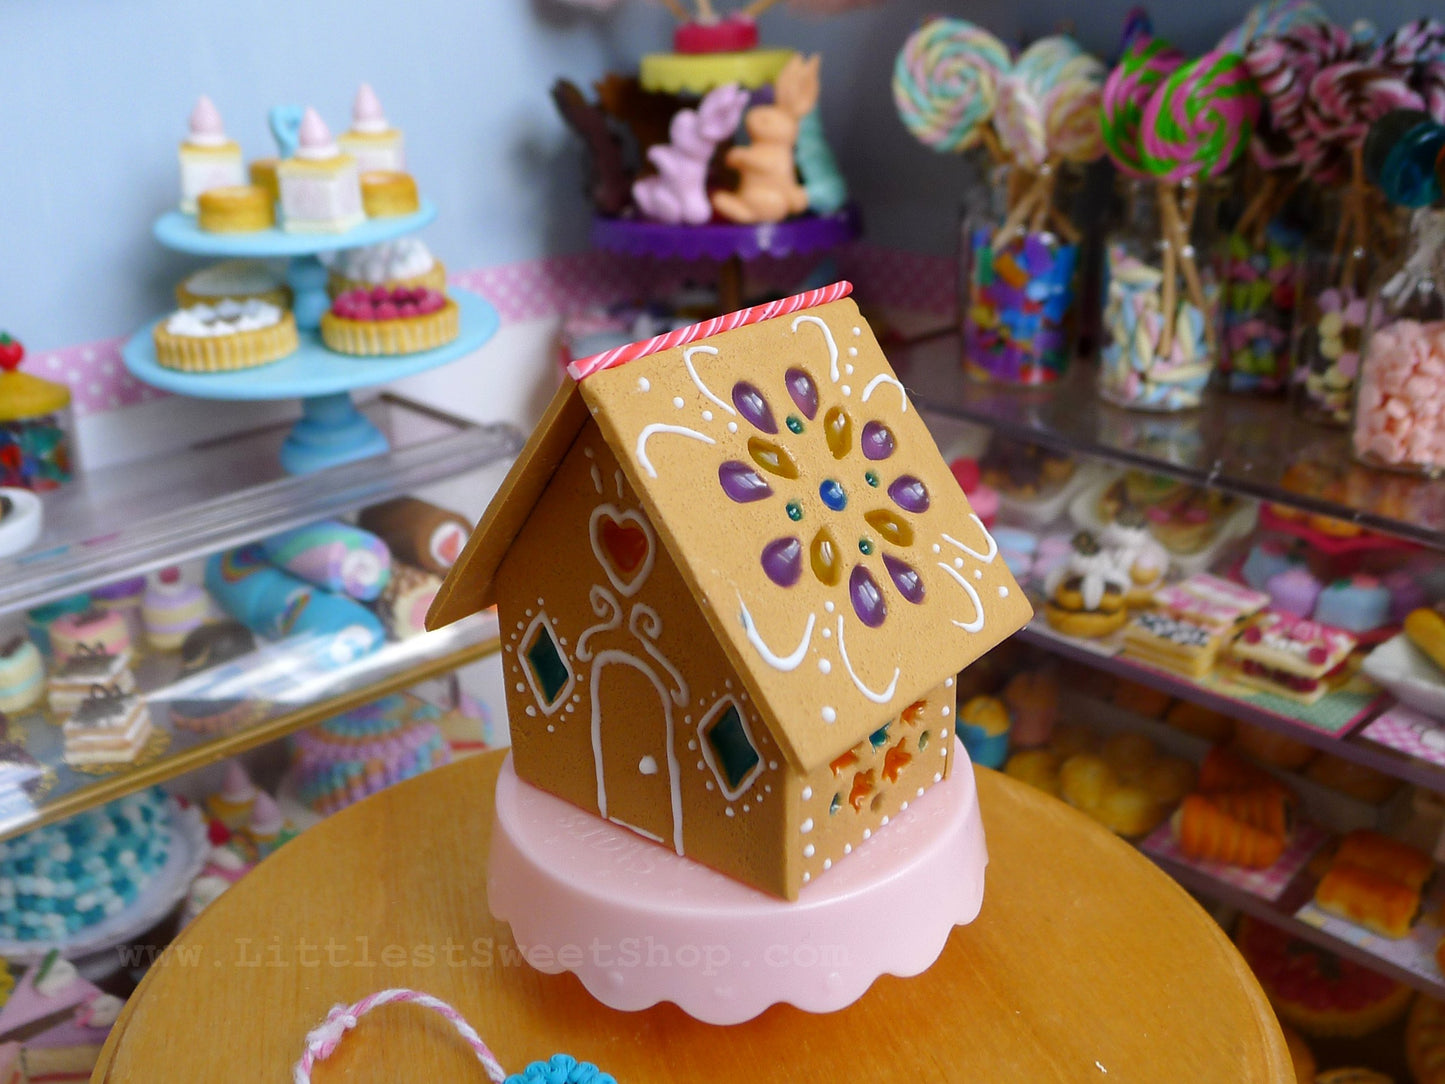
This delicious looking miniature is simple to make and will illuminate in the dark! Imagine crispy Gingerbread house with candy stained-glass windows tinted in rainbow colours. Try this technique on other Gingerbread House designs to create bespoke ones for the different seasons and holidays.
Design by Nadia Michaux
Read Less
ADDITIONAL SUPPLIES
PVA glue, LED Balloon light (optional), Alcohol inks in various colours, Toothpicks, Toothbrush,Gingerbread house template (any), scaled down to the size for your miniature, cutters sized for the scale of your gingerbread house, bakeable smooth ceramic tiles
Project Instructions
PREMO:Getting StartedPolymer clay may stain. CLAY MAY DAMAGE UNPROTECTED FURNITURE OR FINISHED SURFACES. DO NOT USE polymer clay on unprotected surfaces. We recommend working on the Sculpey clay mat, wax paper, metal baking sheet, or disposable foil. Start with clean hands and work surface area. Knead clay until soft and smooth. For best results, clean your hands in between colors. Shape clay, pressing pieces together firmly. Bake on oven-proof glass or metal surface at 275°F (130 °C) for 30 minutes per ¼" (6 mm) thickness. For best baking results, use an oven thermometer. DO NOT USE MICROWAVE OVEN. DO NOT EXCEED THE ABOVE TEMPERATURE OR RECOMMENDED BAKING TIME. Wash hands after use. Baking should be completed by an adult.Begin by preheating oven to 275 °F (130 °C). Test temperature with oven thermometer for perfectly cured clay. For best results, condition all clay by running it through the Clay Conditioning Machine for several passes on the widest setting. Fold the clay in half after each pass and insert the fold side into the rollers first.LIQUID BAKEABLE SCULPEY: Getting StartedDO NOT USE on unprotected surfaces. We recommend working on the Sculpey clay mat, wax paper, metal baking sheet, or disposable foil. Start with clean hands and work surface area. Bake on oven-proof glass or metal surface at 300 °F (150 °C) for 20 minutes For best baking results, use an oven thermometer. DO NOT USE MICROWAVE OVEN. DO NOT EXCEED THE ABOVE TEMPERATURE OR RECOMMENDED BAKING TIME. Wash hands after use. Baking should be completed by an adult. Begin by preheating oven to 300 °F (150 °C). Test temperature with oven thermometer for perfectly cured clay.
Download any Gingerbread House template online and scale it down to the size you want. Print it and cut the template out. Mix some Sculpey Ultralight with Raw Sienna and Cadmium Yellow Hue until you get a Gingerbread colour. Roll the clay out using the Sculpey Clay Conditioning machine on the second widest setting. Press down so it will stick onto the tile. Use the templates to cut out the Gingerbread House shapes.


Use a toothbrush and texture all-over by tapping it lightly on the clay surface. Make sure not to press too hard.

Using small cutters, cut out shapes from the clay. This is the fun part where you get to be creative. Make simple eyelet patterns with a few cuts. Cut all the way through and do not leave any bits of clay on the tile. Make patterns on all of the walls and roof. Bake the pieces at 275 degrees for 30 minutes.

Mix Sculpey Liquid Clear with alcohol inks. Don't put in too much but enough to tint the clay. Fill up the holes to the top. The liquid clay will shrink slightly when it is cured so keep this in mind.

Finish off by adding some accents to the house. Mix white clay with Sculpey TLS until you get a very thick but smooth paste. Use it to draw on the gingerbread. Keep it minimal with swirly patterns and dots. Bake in the oven to cure the Sculpey Liquid at 300 degrees for 30 minutes.

Glaze the baked 'windows' with gloss varnish to give it a sugary sheen and make it look like candy.
Assemble using PVA glue and decorate it further with more miniature candy if you wish to.

Balance 2 LED Balloon lights on some Blu Tac. Insert it into the house. Your house will now illuminate through the stained-glass windows we have just made!

