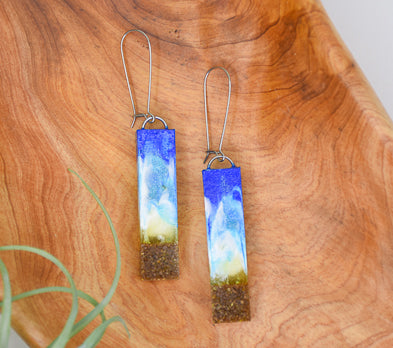
Liquid Sculpey® Beach Earrings
Liquid Sculpey® Beach Earrings
Designed by Amy Koranek
Read More
Make a pair of beach inspired earrings using Liquid Sculpey®. Adding real sand to the mix completes the look. You could even incorporate sand that you have collected on a memorable trip to turn this fashion statement into a keepsake.
TIME TO COMPLETE:
90 Minutes to make, bake (two times), and assemble
Read Less
ADDITIONAL SUPPLIES
- Paper towel
- Sand
- Glass or silicone mixing cup
- Cotton swab - as needed
- Rubbing alcohol - as needed
- 6mm Silver tone jump rings (2)
- Silver tone ear wires (2)

Project Instructions
- Getting Started with Liquid Sculpey®:
- Baking:
- It is important to use oven thermometer when you bake the liquids so that you can ensure your oven is at the correct temperature.
- Do not microwave the liquids. They must be baked in a Preheated oven at 275 ºF (130 ºC) for liquid colors and 300 ºF (149 ºC) for Clear – Do not exceed baking temperatures.
- If your piece is less than 1/4” bake for 15 minutes. For thicker pieces that are 1/4” or above bake for 30 minutes.
- If your liquid project has become yellowed or discolored in the oven, when you remake it, tent it by placing either – folding an index card in half and placing your project under it or by using aluminum foil over your project.
After making sure that the Clear Liquid Sculpey® (LS) is stirred completely,
pour a quarter sized amount in the bottom of a glass dish or silicone baking cup. Add approximately 1/8
teaspoon of sand.

Stir the sand into the LS completely. This mixture should be very saturated
with sand so if your mixture seems runny, add more sand gradually.

Using the tip of the Knife Tool, drip the Clear/sand mixture into the bottom
of the deep square shape. Don’t worry if the Clear/sand gets a little stuck to the inside of the mold up
higher than you would like, the other colors will help pull it down. However, if you don’t like drips of the
Clear/sand along the insides of the shape, you can easily clean it away with a cotton swab doused in rubbing
alcohol.

Next add White LS on top of the sand in a thick layer.

On top of the White layer add a thick layer of Peacock Pearl LS.

Use the tip of the Needle Tool or the Blunt Point Tool to swirl the Peacock
Pearl and the White together inside the mold. Try not to incorporate the sand area in the swirling. We just
want the Peacock and the White to swirl together like ocean waves hitting the beach. Wipe tools clean with
paper towel.

Add a thick layer of Blue LS on top. Don’t fill all the way to level yet.
Swirl the Blue into the colors below as in Step 7. Wipe tools clean with paper towel.

Make sure all air bubbles are released by tapping the sides of the mold with
the 12mm Ball Tool. If you don’t have this tool, you can tap the mold with a pencil or other small household
item.
When it appears that the bubbles have been released, fill the mold to level with more Blue LS
When it appears that the bubbles have been released, fill the mold to level with more Blue LS

Slide a jump ring onto one of the metal rods included in the 3D Jewelry Mold
Set.

With the jump ring suspended from the rod, carefully dip the jump ring into
the liquid filled shape. Line the rod up on the brackets on top of the mold to hold the jump ring as it
dangles down into the LS.

Bake the mold following the baking instructions for Liquid Sculpey®. Allow the
mold to cool completely before de-molding. To easily release the molded shape, pinch a gap between the
molded shape and the sidewall of the mold. Drip one drop of Sculpey® Clay Softener and Thinner into the gap.
Dip the Needle Tool into the drip of Softener and drag it around the edges between the baked piece and the
sidewalls of the mold. Pinch the mold from the bottom and the baked piece should slide right out.
Follow Steps 2-12 to create a second piece for a pair of earrings.
Follow Steps 2-12 to create a second piece for a pair of earrings.

Add findings as shown.

- Choosing a selection results in a full page refresh.
- Opens in a new window.