
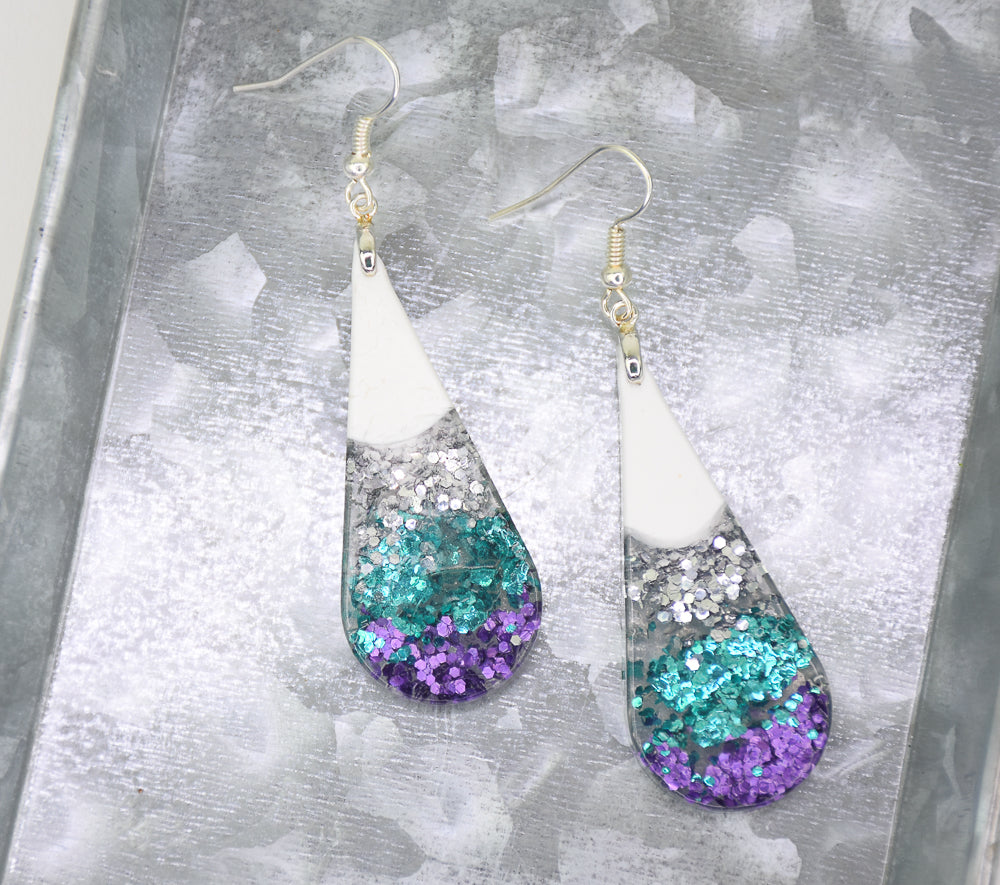
Liquid Sculpey® + Glitter My World Ombré Sparkle Teardrops
Liquid Sculpey® + Glitter My World Ombré Sparkle Teardrops
Designed by Amy Koranek
Read More
Liquid Sculpey Clear teams up with Glitter My World glitters to create these multicolored sparkling earrings perfect for a special night out!
TIME TO COMPLETE:
75 Minutes to make, bake, and assemble
Read Less
ADDITIONAL SUPPLIES
- Paper towel
- Glitter My World .040 chunky glitters in Silver Sparkle, Teal, and Discotheque
- Crimp bails (2)
- Silvertone ear wires (2)
- Flat nose pliers
- Heat gun - optional
Project Instructions
- Getting Started with Liquid Sculpey®:
- Baking:
- It is important to use oven thermometer when you bake the liquids so that you can ensure your oven is at the correct temperature.
- Do not microwave the liquids. They must be baked in a Preheated oven at 275 ºF (130 ºC) for liquid colors and 300 ºF (149 ºC) for Clear – Do not exceed baking temperatures.
- If your piece is less than 1/4” bake for 15 minutes. For thicker pieces that are 1/4” or above bake for 30 minutes.
- If your liquid project has become yellowed or discolored in the oven, when you remake it, tent it by placing either – folding an index card in half and placing your project under it by using aluminum foil over your project.
Here’s a tip for baking perfectly in silicone molds. Dampen a dish towel with water and wring out as much of the water as you can. Fold the damp towel so that the molds can sit level on top of it. The damp towel will slow down the curing process so that the LS will cure evenly throughout and avoid warping.
Please make sure that your Liquid Sculpey® (LS) liquids are each stirred really well. ESPECIALLY the Clear LS.
Designer’s Note - Clear Liquid Sculpey has a tendency to separate into a liquid part and a lumpy part when left alone over time. If using Clear LS from the bottle, you can insert your favorite stirring stick into the bottle and really scrape the lumps from off the bottom and the sides and stir until the lumps are re-incorporated into the liquid. Then continue stirring until smooth. This is super important because if the liquid is not stirred until smooth, it will not clear completely during heating. Clear LS can also be decanted into a small silicone, glass, metal, or the Sculpey Silicone Mixing Set Measuring Cup. This makes it easier to stir the liquid completely. Just remember to cover the Clear LS when decanted and not in use, to keep dirt and lint out of the liquid.
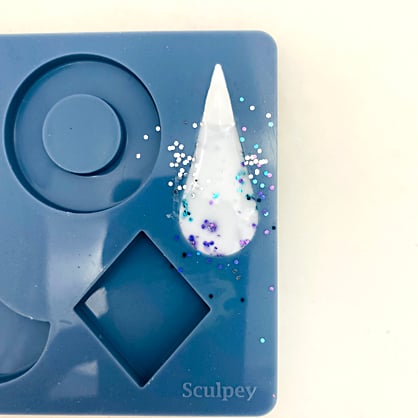
Fill the top 1/3 of the Elongated Teardrop with White LS.
Designer’s Note - Clear Liquid Sculpey has a tendency to separate into a liquid part and a lumpy part when left alone over time. If using Clear LS from the bottle, you can insert your favorite stirring stick into the bottle and really scrape the lumps from off the bottom and the sides and stir until the lumps are re-incorporated into the liquid. Then continue stirring until smooth. This is super important because if the liquid is not stirred until smooth, it will not clear completely during heating. Clear LS can also be decanted into a small silicone, glass, metal, or the Sculpey Silicone Mixing Set Measuring Cup. This makes it easier to stir the liquid completely. Just remember to cover the Clear LS when decanted and not in use, to keep dirt and lint out of the liquid.
Fill the top 1/3 of the Elongated Teardrop with White LS.

Next, fill the bottom 2/3 of the Elongate Teardrop with Clear LS. Don’t fill the mold to level yet. We need extra space for adding the sparkles.

Allow the White and the Clear to merge together as they spread.

Just under the White, add a layer of Silver Sparkle glitter. It’s okay if some glitter gets onto the mold. This can easily be cleaned away later.

Under the Silver Sparkle, add a layer of Teal glitter.

Finally add a layer of Discotheque to fill in the bottom.

Add enough White LS on top of the previous area of White LS to fill the mold to level.
Add enough Clear LS on top of the glitter area to fill the mold to level. Use the tip of the Needle Tool to help the glitter submerge just into the Clear LS.
Add enough Clear LS on top of the glitter area to fill the mold to level. Use the tip of the Needle Tool to help the glitter submerge just into the Clear LS.
Bake the mold following the baking instructions for Liquid Sculpey® above with great tips on using molds. Allow to cool completely and then demold by gently flexing the mold.
Repeat the process to make a second Elongated Teardrop matching the first.
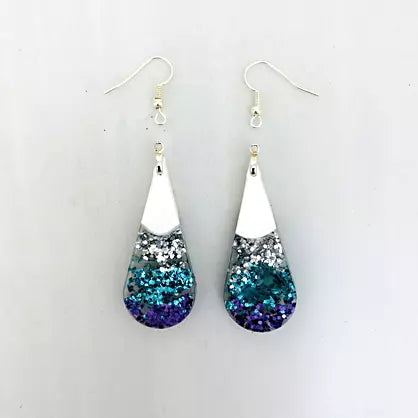
I also made a pair of earrings with Black LS instead of White LS just for fun. The results are shown in this photo.
Designer’s Note - to really pump up the Clear and make it super shiny, you can use a heat gun. Place the baked liquid pieces on a heat safe plate. Turn the heat gun on “HI” and move it slowly back and forth across the pieces. You will see the Clear areas go really clear and turn shiny. When this happens, turn off the heat gun and allow to cool completely.
Repeat the process to make a second Elongated Teardrop matching the first.
I also made a pair of earrings with Black LS instead of White LS just for fun. The results are shown in this photo.
Designer’s Note - to really pump up the Clear and make it super shiny, you can use a heat gun. Place the baked liquid pieces on a heat safe plate. Turn the heat gun on “HI” and move it slowly back and forth across the pieces. You will see the Clear areas go really clear and turn shiny. When this happens, turn off the heat gun and allow to cool completely.

To finish the pieces into earrings, you will need 2 pinch bails and two ear wires.

Poke a hole front to back through the baked pieces using the Needle Tool. Make sure the hole is down far enough, about 1/8”, so that the margin remaining will be strong enough to support the hole. This hole is just a pilot hole to help position the pinch bail exactly where you want it. Repeat by poking a pilot hole in the second piece.

Position the prongs of the pinch bail into the pilot holes. You can use your fingers to apply enough pressure to help the prongs close in and find the pilot holes.

Once you have the pinch bails in perfect position, close them further using flat nose pliers.

The ear wires are now ready to be attached to the eyes in the pinch bails. Since the eyes of the pinch bails are facing forward, the ear wires will be in perfect position - perpendicular to the pinch bails.
Attach the ear wires by opening and closing the eye hook in each wire with flat nose pliers.

Both the White and the Black earring sets look so sparkly and fabulous for an evening out.

- Choosing a selection results in a full page refresh.
- Opens in a new window.