Sculpey® III Pet Rocks
Sculpey® III Pet Rocks
- Rocks
- White Craft Glue

- Getting Started:
Please make sure your work area is covered and you are not working on an unprotected surface. We recommend working on the Sculpey® Oven-Safe Work Mat, wax paper, metal baking sheet, or disposable foil. Uncured clay may damage unprotected furniture or finished surfaces. Be sure to cover your crafting area appropriately.
Start with clean hands, unwrap and knead clay until soft and smooth, or condition by running clay though a Pasta Machine. We recommend using a designated machine for clay purposes only. When working with multiple colors, clean hands with soap and water or baby wipes (we have found that baby wipes work best) before switching colors. Shape clay, pressing pieces firmly together. Wash hands after use.
- Baking:
Begin by preheating oven to 275 °F (130 °C). After you are done creating; for best results bake clay on an oven-proof surface such metal, aluminum foil, an index card or the Sculpey® Clay Mat at 275°F (130 °C) for 30 minutes per 1/4" (6 mm) thickness according to package directions. Oven safe glass or ceramic surfaces are also acceptable for baking; however please note that the baking times may take longer as the glass or ceramic surfaces take longer to heat up. For best baking results, use an oven thermometer. DO NOT USE MICROWAVE OVEN. DO NOT EXCEED THE ABOVE TEMPERATURE OR RECOMMENDED BAKING TIME.>
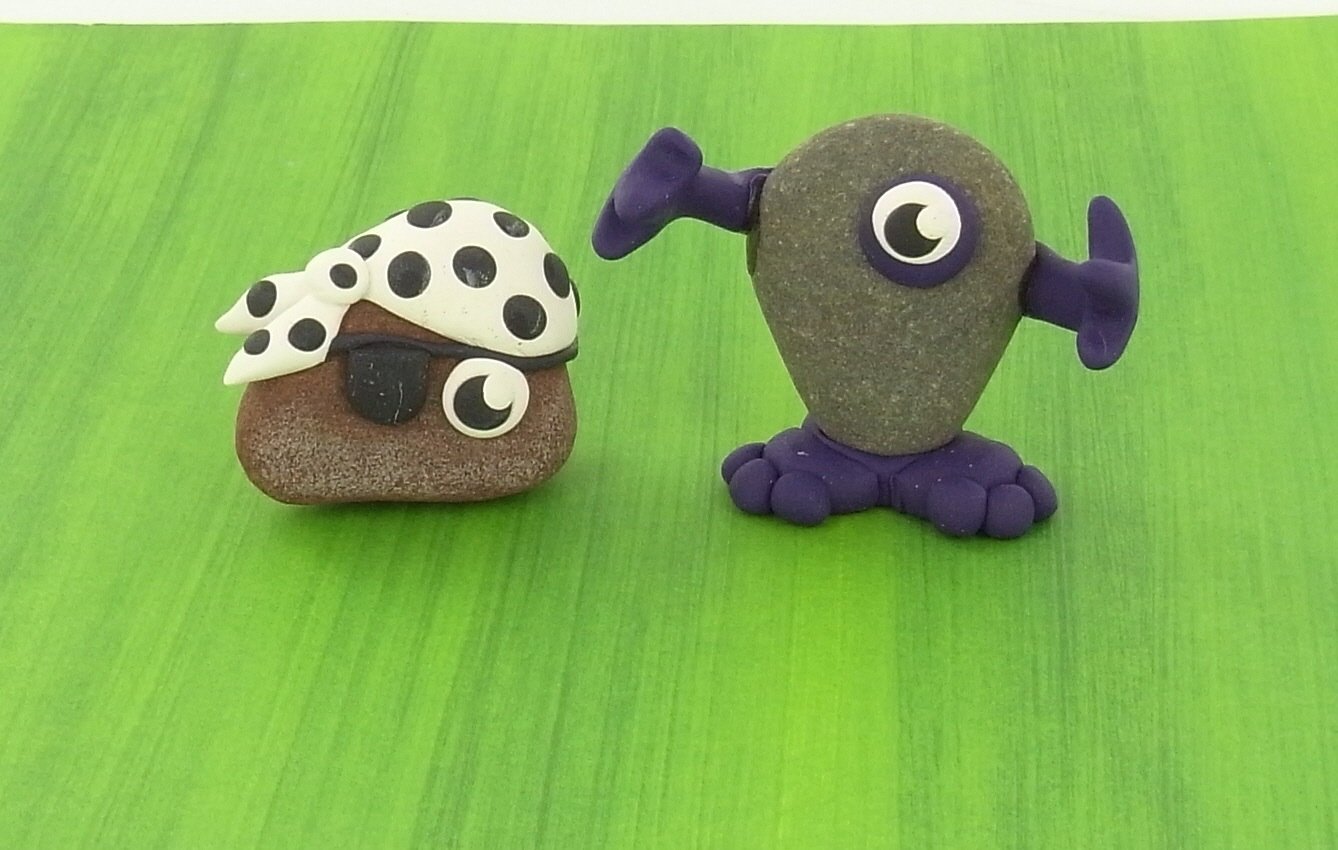
To create the bandana- shape a large white dome about 1” long and 5/8” high. Make a small ball for the knot and 2 teardrop shapes for the ties. Press the little white ball to the dome and the two teardrop shapes off of the little ball. Decorate the bandana with flat black dots. Press into place on your rock.
To create the eye patch- Make a thin black log snake and a flat black half circle about 3/8”wide. Attach the half circle to the bottom of the rope.
To create the eye- Make a flat white circle about 3/8” round and to the rope. Layer a smaller black disc and then a tiny white highlight to the eye. Press the eye and eye patch to the rock.

To create the arms- Make a purple club about 1 1/8” long. Flatten the club part to form the hand. Divide the flattened part into three sections to make fingers. Shape the fingers as desired. Press the arms onto the rock and pose.
To create the feet- Make a Purple pancake about 1/2” round and 1/2” thick for the base area between the feet. Shape another purple pancake about 3/4” round and 1/2” thick. Cut it in half for the foot shapes. Add these onto the sides of the round base. Make 6 little balls for toes and add 3 on the front of each foot. Press the rock body into place on the base between the feet. Make a purple pancake about 1/2” round and 1/2” thick for the base area between the feet. Shape another purple pancake about 3/4” round and 1/2” thick. Cut it in half for the foot shapes. Add these onto the sides of the round base. Make 6 little balls for toes and add 3 on the front of each foot. Press the rock body into place on the base between the feet.
To create the eye-make a flattened disk about 3/8” from black or purple, a slightly smaller flattened white disc, an even smaller black disk and then a tiny white dot. Layer these colors up to form an eye as shown. Press each layer firmly into place before adding the next.

Bake the clay and the rock together according to manufacturer's instructions.
Every rock is a unique size and color. You can use these designs and adapt them to fit the shape and size of your own rock. Start out with rocks that are clean. Rocks with a little texture on them will probably help the clay stick to it better. You can glue your clay pieces onto the rocks as well if you like. Just glue each piece onto the rock with a little dot of white craft glue and then bake them on.