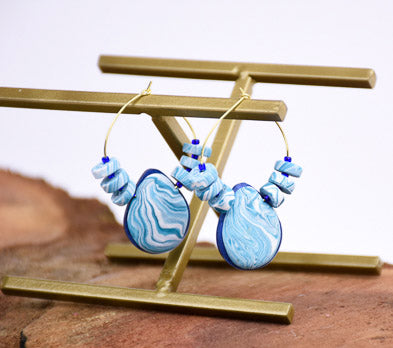
Sculpey Souffle™ and Liquid Sculpey® Heishi-Bon Earrings
Sculpey Souffle™ and Liquid Sculpey® Heishi-Bon Earrings
Designed by Amy Koranek
Read More
Sculpey Souffle™ and Liquid Sculpey® team up to create this dynamic pair of earrings that look so complex they are sure to WOW your friends (and you don't have to tell them how easy they were to create!)
COMPLETION TIME:
90 Minutes to make, bake, and assemble
Read Less
ADDITIONAL SUPPLIES
- Paper towel
- 14 Gauge wire 4” long
- Gold tone hoop earrings (2)
- Navy blue seed beads (16)
- Flat nose pliers

Project Instructions
Please make sure your work area is covered and you are not working on an unprotected surface. We recommend working on the Sculpey® Oven Safe Work Mat, wax paper, metal baking sheet, or disposable foil. Uncured Liquid Polymer Clay may damage unprotected furniture or finished surfaces. Be sure to cover your crafting area appropriately.
Getting Started with Premo Clay:
Start with clean hands, unwrap and knead clay until soft and smooth, or condition by running clay though a Pasta Machine. We recommend using a designated machine for clay purposes only. When working with multiple colors, clean hands with soap and water or baby wipes (we have found that baby wipes work best) before switching colors. Shape clay, pressing pieces firmly together. Wash hands after use.
- Baking:
Getting Started with Liquid Sculpey
Stir Liquid Sculpey® completely. Thin with Sculpey® Liquid Clay Softener as needed - Wash hands after use (we have found that baby wipes work best) .
- Baking:
First we will make the cabochon pieces so they can bake while we are working on our heishi bead designs.
Fill the medium teardrop shape in the cabochon mold with Navy Metallic. I filled both the large and the medium shapes but I ended up choosing the medium ones for my final design.
Bake the mold following the baking instructions for Liquid Sculpey® and allow to cool before gently flexing the mold to release.
As soon as possible, fill and bake a second piece so that you have two for the earring pair.

Roll 1/4 bar of each Igloo and Sea Glass together.

Roll into a rope that is partially blended. Fold the rope in half and in half again.

Twist the rope to create stripes.

Fold in half and in half again.

Roll and twist again and then fold in half and in half again. Continue this process until the rope is as stripey as you like.

Take off small amounts from the stripe clay to make backings for the cabochons. The backings will hold the ear wires in place.
Lay the cabochons face down on your work surface. Lay the ear wires across the back of the cabochons in the location where you would like them to be. Form the clay into two small teardrop shapes. Press a teardrop over the ear wire sandwiching the ear wire to the cabochon (left). Flatten the teardrop to the back of the cabochon (right).
Lay the cabochons face down on your work surface. Lay the ear wires across the back of the cabochons in the location where you would like them to be. Form the clay into two small teardrop shapes. Press a teardrop over the ear wire sandwiching the ear wire to the cabochon (left). Flatten the teardrop to the back of the cabochon (right).

Next, we will work on the heishi beads. This is a good method for making any kind of spacer beads. Take a small amount of the striped clay and shape it into a thick log. Poke and thread the craft wire through the little log so that the clay is in the middle of the wire.

With the clay on the wire, roll the clay to lengthen it. At this point you have essentially created a long tube bead.

Use the Clay Blade to section the striped clay into thin spacer beads approximately 1/8” thick. Cut through the clay using a rolling motion with the Clay Blade. When the Clay Blade comes into contact with the wire, keep rolling and cutting to make sure to score the clay all the way through. Then move over 1/8” and repeat.

When you have filled the entire log with cuts, bake the clay leaving it on the wire following the baking instructions for Sculpey Souffle™. Bake the cabochons with the ear wires attached to them too.

Allow the clay on the wire to cool completely before handling. Then slide the log of beads off of the wire. You may need to use flat nose pliers to grab the wire and pull the clay off with your hand.

Break as many of the beads apart as you can. If some of the beads won’t separate by hand, you can line the Clay Blade back up with the score lines and cut them apart.

Remove the gold wire from the cabochons. Carefully pull the wire out from between the cabochon and the backing.

Alternate stringing seed beads and heishi beads onto the ear wire, followed by a cabochon. It might take a little wiggling to get the ear wire back through the sandwich hole in the cabochon but you can do it!

Repeat with the same pattern of heishi beads and seed beads on the other side of the cabochon.

With flat nose pliers, make sure the eye in the ear wire is laying in the correct orientation to receive the tail end of the wire. I like to bend a little crook in the tail end of the wire with the pliers so that there is a catch between the tail and the eye.

Repeat assembly for the second earring.

Here’s a look at the back side.

- Choosing a selection results in a full page refresh.
- Opens in a new window.