Sculpey III Miniature Cheesecake Figurine
Sculpey III Miniature Cheesecake Figurine
Designed by Lynniepopsicle
Read More
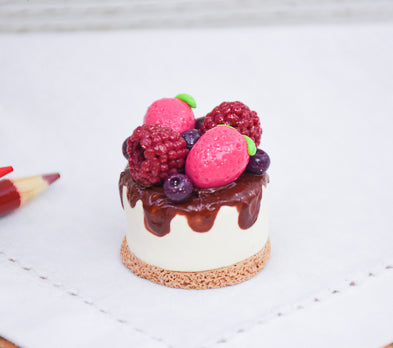
This tiny cheesecake is inspired by the fake food culture – make your own favourite dish/dessert to keep with you forever! So tiny and cute. You can turn it into a charm by inserting an eyepin before baking, and attach it to bags, necklaces, phones etc… Or just keep it as a cute little figurine.
TIME TO COMPLETION: 60 minutes including baking
Read Less
ADDITIONAL SUPPLIES
- Kitchen foil
- Tweezers

Project Instructions
- Getting Started:
Start with clean hands, unwrap and knead clay until soft and smooth, or condition by running clay though a Pasta Machine. We recommend using a designated machine for clay purposes only. When working with multiple colors, clean hands with soap and water or baby wipes (we have found that baby wipes work best) before switching colors. Shape clay, pressing pieces firmly together. Wash hands after use.
- Baking:
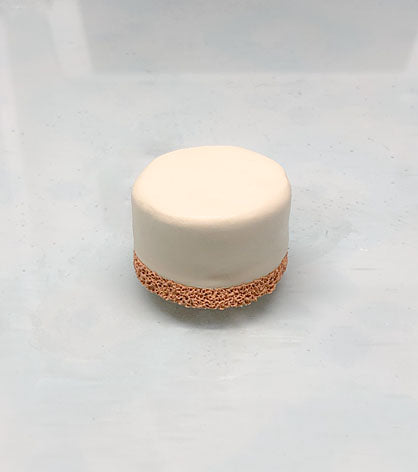
Condition a 1-inch ball of Sculpey Tan clay by rolling it for a few minutes between your hands until it becomes soft. Flatten the ball with the palm of your hand and roll it out so it’s 1/4 inch thick, then cut a circle with a circular cutter (I used a 1.5-inch cutter but any size will do depending on how big you want your cheesecake to be!).

Mix a 2-inch ball of Sculpey White clay with a 1/4 inch ball of lemonade and a 1/4 inch ball of Tan clay to create the cheesecake colour, then cut a circle (about 3/4 inch thick) with the same cutter as previous and place it on top of the biscuit base. Flatten the top.

Add texture to the biscuit base by using your needle tool.
To create your chocolate sauce mix a 1/2 inch ball of SIII Chocolate with some Translucent Liquid Sculpey – mix well, be patient this takes a while!
Apply on top of the cheesecake, then use your dotting tool to create the drips on the sides.
Apply on top of the cheesecake, then use your dotting tool to create the drips on the sides.


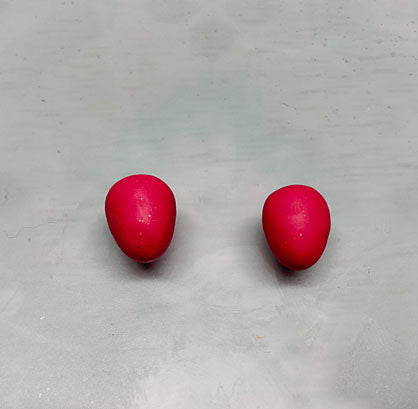
To make strawberries mix a 1/2 inch ball of SIII Garnet Glitter with a 1/2 inch ball of SIII Candy Pink.
Form two 1/2 inch balls and give them an oblong shape, then add indents using your dotting tool.
Roll out four 1/4 inch balls of Sculpey Granny Smith flatten them and give them a leaf shape by making them pointy at one end. Cut an indent halfway across and place onto the strawberries.
Form two 1/2 inch balls and give them an oblong shape, then add indents using your dotting tool.
Roll out four 1/4 inch balls of Sculpey Granny Smith flatten them and give them a leaf shape by making them pointy at one end. Cut an indent halfway across and place onto the strawberries.

To make the raspberries use a 1/4 inch ball of kitchen foil with a little tail as per picture and cover it with SIII Garnet Glitter.
Roll a thin strip of SIII Garnet Glitter, cut tiny bits and roll them into tiny balls, then place on the raspberry until covered.
Roll a thin strip of SIII Garnet Glitter, cut tiny bits and roll them into tiny balls, then place on the raspberry until covered.

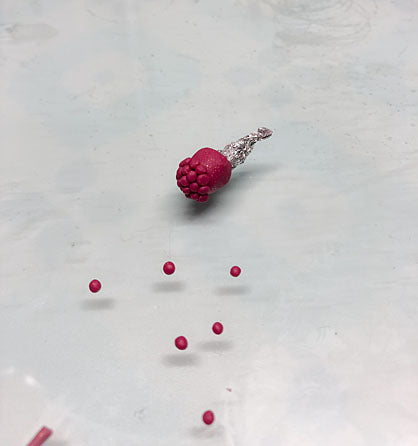
Bake in the oven as directed in Step 1 above, and once cooled down remove the foil from inside the raspberry using tweezers or a similar tool.

For the blueberries mix 1/2-inch ball of SIII Garnet Glitter with a 1/4-inch ball of SIII Blue. Form 5 tiny balls (1/4-inch) then create a round indent on one side using your dotting tool.

Place all the berries on the cheesecake in a design that pleases you. Bake according to the directions in Step 1 above.
