
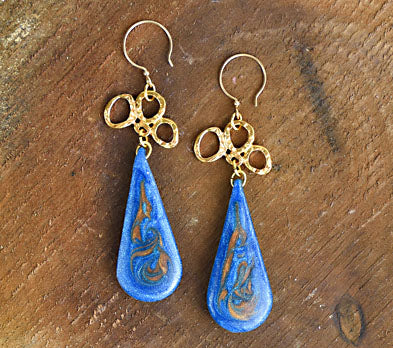
Liquid Sculpey® Bronze Swirl Teardrop Earrings
Liquid Sculpey® Bronze Swirl Teardrop Earrings
Designed by syndee holt
Read More
These dramatic earrings are simple to make, thanks to the team of Liquid Sculpey®, Sculpey Tools™ jewelry mold and Tierra Cast® metal jewelry findings.
TIME TO COMPLETION: 1 hour, including 2 bakings and assembling
Read Less
ADDITIONAL SUPPLIES
- Tierra Cast Intermix 3 Ring Link, Gold Plate (2)
- Tierra Cast Oval Jump rings 20 gauge 4x3 inside diameter (6)
- Tierra Cast French Hoop ear wires, Gold plate (2)
- Small jewelry-type hand drill with big sized for 20 gauge
- Small block of wood (optional)
- Toothpick
- Small wooden dowel or metal skewer to stir the liquid clays
- 2 pairs of jewelry pliers (mine are bent nosed pliers)
Project Instructions
- Getting Started with Liquid Sculpey® :
- Baking:
- It is important to use oven thermometer when you bake the liquids so that you can ensure your oven is at the correct temperature.
- Do not microwave the liquids. They must be baked in a Preheated oven at 275 ºF (130 ºC) for liquid colors and 300 ºF (149 ºC) for Clear – Do not exceed baking temperatures.
- If your piece is less than 1/4” bake for 15 minutes. For thicker pieces that are 1/4” or above bake for 30 minutes.
- If your liquid project has become yellowed or discolored in the oven, when you remake it, tent it by placing either – folding an index card in half and placing your project under it by using aluminum foil over your project.
Here’s a tip for baking perfectly in silicone molds. Dampen a dish towel with water and wring out as much of the water as you can. Fold the damp towel so that the molds can sit level on top of it. The damp towel will slow down the curing process so that the LS will cure evenly throughout and avoid warping.
Once you have thoroughly stirred your Liquid Sculpey® (LS) colors, start to slowly fill the teardrop mold shape. NOTE: As you can see in the photo, I also filled a few other shapes as well so I would have more pieces to create with!
Use your pointed needle tool in the Sculpey Bead Making Kit to gently guide the liquid into the top of the teardrop.
Use your pointed needle tool in the Sculpey Bead Making Kit to gently guide the liquid into the top of the teardrop.

Slowly continue to add the Liquid Sculpey to the mold to create a slight dome.

Add a small thread of the Bronze Liquid Sculpey to the mold.

Use a toothpick or your needle tool to lightly drag through the Bronze clay to create an interesting marbled pattern. You can add more Bronze if you wish or dip your toothpick into the Peacock Pearl to cover a slightly unsightly “blob”.

Move your mold carefully to the baking tray and bake as directed in Step 1 above.

Once the piece has baked and cooled to just warm, remove it from the mold. Repeat steps 2-5 to create the second earring while you drill the hole in the first completed teardrop.
Place your molded piece on a small piece of wood and use your hand drill to drill the mounting hold through the top of the teardrop as shown. Set aside and repeat when the other teardrop is baked and cooled to warm.
Place your molded piece on a small piece of wood and use your hand drill to drill the mounting hold through the top of the teardrop as shown. Set aside and repeat when the other teardrop is baked and cooled to warm.

Here is one of my completed earrings on the right and the items needed to assemble it on the left.
NOTE: I’ve turned the ear wire loops 45 degrees so that the earring would hang correctly. I grasped both sides of the ear wire with one pair of pliers just above the loop. Then I grasped the loop at the bottom with the other pair and gently turned the loop.
NOTE: I’ve turned the ear wire loops 45 degrees so that the earring would hang correctly. I grasped both sides of the ear wire with one pair of pliers just above the loop. Then I grasped the loop at the bottom with the other pair and gently turned the loop.

Do your ear wires loops face the wrong way for your earrings? Just use two pairs of pliers to gently twist the loop as shown.
