
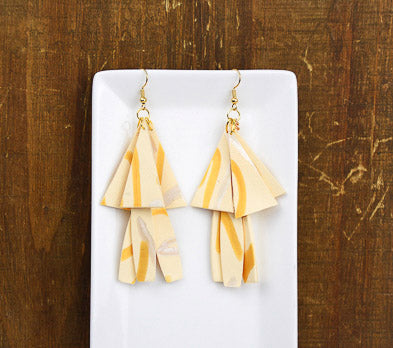
Sculpey Soufflé™ Ivory Geometric 2 Tier Earrings
Sculpey Soufflé™ Ivory Geometric 2 Tier Earrings
Designed by syndee holt
Read More
Read Less
These lightweight weight earrings have so much movement in them – they will sway and flutter as you move your head. The color combination is a classic one designed to be both casual and a little more formal with that flash of metallic.
TIME TO COMPLETION: 60 minutes
ADDITIONAL SUPPLIES
- Clean paper sheets
- Rectangular cutter (mine is from the “Leather Cutters, 39 pieces” on Amazon)
- 8mm oval gold-toned jump rings (also Amazon) (at least 12)
- 6mm round gold-toned jump ring (4)
- About 4 inches of medium gold-toned chain, 2 gold-toned ear wires
- Jewelry pliers
Project Instructions
- Getting Started:
Start with clean hands, unwrap and knead clay until soft and smooth, or condition by running clay though a Pasta Machine. We recommend using a designated machine for clay purposes only. When working with multiple colors, clean hands with soap and water or baby wipes (we have found that baby wipes work best) before switching colors. Shape clay, pressing pieces firmly together. Wash hands after use.
- Baking:
Sheet out (on a medium setting) a piece of the conditioned Ivory clay that is about the size of the palm of your hand.
Sheet out small sheets on a thinner setting of the Pearl and 18k Gold clay.
Cut small strips of the 18k and Pearl and lay them in random direction on the Ivory sheet. Make sure to vary the length of the pieces. None of my pieces are touching each other either.
Sheet out small sheets on a thinner setting of the Pearl and 18k Gold clay.
Cut small strips of the 18k and Pearl and lay them in random direction on the Ivory sheet. Make sure to vary the length of the pieces. None of my pieces are touching each other either.


Place a sheet of clean paper on top of the clay and gently press the strips down with your hand. Once you have the pieces in place, you can flip the sheet over onto the paper. Add another paper on top and gently roll over the paper with your acrylic roller in all 4 directions. The paper on top helps to keep the clay from stretching.

Flip the clay back over and check to see if you are satisfied with how the pieces have integrated into the Ivory sheet. You can even add more if you wish!

I trimmed a piece from my sheet that was about 2 inches wide and cut equal triangles that were about 3/4 inch wide at the bottom. I cut 3 of these triangles for each earring, using the first triangle as a cutting guide for size. (NOTE: I originally thought I would keep the rough edge on the bottom of the triangles as shown here, but I ended up trimming them off!)

Use your needle tool to put a hole in the pointed end of the triangle, making sure that the diameter of your jump ring can easily fit the hole and still swing easily.
Cut out a total of 6 of the rectangle pieces, using the cutter from the leather cutter set. (NOTE: they are now sold as “jewelry cutters”) Place your holes in the top end of each rectangle. Bake all the pieces as direction in Step 1 above.
Cut out a total of 6 of the rectangle pieces, using the cutter from the leather cutter set. (NOTE: they are now sold as “jewelry cutters”) Place your holes in the top end of each rectangle. Bake all the pieces as direction in Step 1 above.

Once the clay had baked and cooled, we can begin to assemble the earrings! Add the oval jump rings to the triangles.

Cut about a 1.5 inch piece of the gold-toned chain and add a 6mm round jump ring at the bottom.
Add the oval jump rings to 3 of the baked rectangular pieces.
Attach all 3 to the round jump ring.
Add the oval jump rings to 3 of the baked rectangular pieces.
Attach all 3 to the round jump ring.

Add a round jump ring to the top of the chain. Attach the 3 triangle pieces to this jump ring.
You may need to adjust the length of your chain so that the length between the two tiers of shapes is correct.
You may need to adjust the length of your chain so that the length between the two tiers of shapes is correct.

Add your ear wires and your new earrings are ready to swing!
