
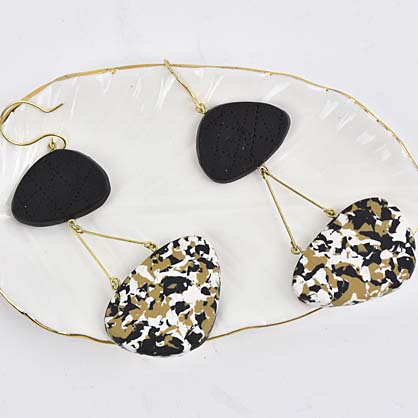
Sculpey Soufflé™ Faux Terrazzo Dangle Earrings
Sculpey Soufflé™ Faux Terrazzo Dangle Earrings
Designed by syndee holt
Read More
Read Less
Sculpey Soufflé™ teams up with Excel tools to help create these stylish swing earrings.
TIME TO COMPLETION:60 minutes
ADDITIONAL SUPPLIES
- Excel Cushion Grip knife
- Excel Pouncer Set
- Index card or heavy cardstock
- Small jewelry drill or needle tool
- Gold toned eye pins (8), double ended eye pin in length you want for your dangle (4), gold toned ear wires (s)
- Instant glue
- Jewelry pliers (I prefer using a 2 pairs of the same bent nose plier) and a pair of round nose pliers
- Several thin sheets of plain paper
Project Instructions
- Getting Started:
Start with clean hands, unwrap and knead clay until soft and smooth, or condition by running clay though a Pasta Machine. We recommend using a designated machine for clay purposes only. When working with multiple colors, clean hands with soap and water or baby wipes (we have found that baby wipes work best) before switching colors. Shape clay, pressing pieces firmly together. Wash hands after use.
- Baking:
Roll small coils of each of your three selected colors that are around 3 inches long by 1/4 inch wide. Lay them next to each other and twist the ends to make the coils twist.

Place the twisted coils on a sheet of clean paper and start chopping the clay into random small bits. Occasionally remix the bits and keep chopping until you have very small bits.

Gather your small bits on the sheet of paper and gently form and press into a patty. Cover with another sheet of paper and use the acrylic roller to gently roll the patty flatter to about 1/8 inch. I try to press straight down so that I don’t spread the upper layers of the flecks. Peel the paper back and check out your pattern. NOTE: I find that I always like the bottom of the clay patty the best!

Once you have your patty, you can use your blade to cut out the pattern you want to create. Place the paper pattern on one part of the patty and trace around it. Make sure you are cutting on a safe cutting surface like a cut mat or several pieces of paper on cardboard.

Flip your pattern to the other side and cut out that second side in a mirror of the first side.

I like to use the edge of the blade to gently smooth and round the edges of the pieces.

Use the Acrylic Roller to roll out a small sheet of the reserved Poppy Seed clay to the same thickness of

Use the Pouncer Tools to randomly etch a pattern in this small sheet of clay. Then cut out the smaller shape for the top. Flip the pattern and cut the second one as well. Use the edge of the blade handle to gently smooth the edges. NOTE: At this point, you can use a needle tool to put the holes into the pieces before baking. Souffle is so easy to drill, that I always make the holes after baking. Bake according to the directions in Step 1.

Once the clay is baked and cooled, THEN I prefer to drill my holes. I stacked the two pieces together to help me get the holes in the same places on both earrings.

Assemble the earrings as shown. You may need to rotate the eye pins for proper alignment. I bent the eye loops in the longer pins myself with needle nose pliers. You can make them any length you wish! Add the ear wire to the top loop and you are set!
