
Sculpey Premo™ Granite Floral Slab Earrings
Sculpey Premo™ Granite Floral Slab Earrings
Designed by Amy Koranek
Read More
Read Less
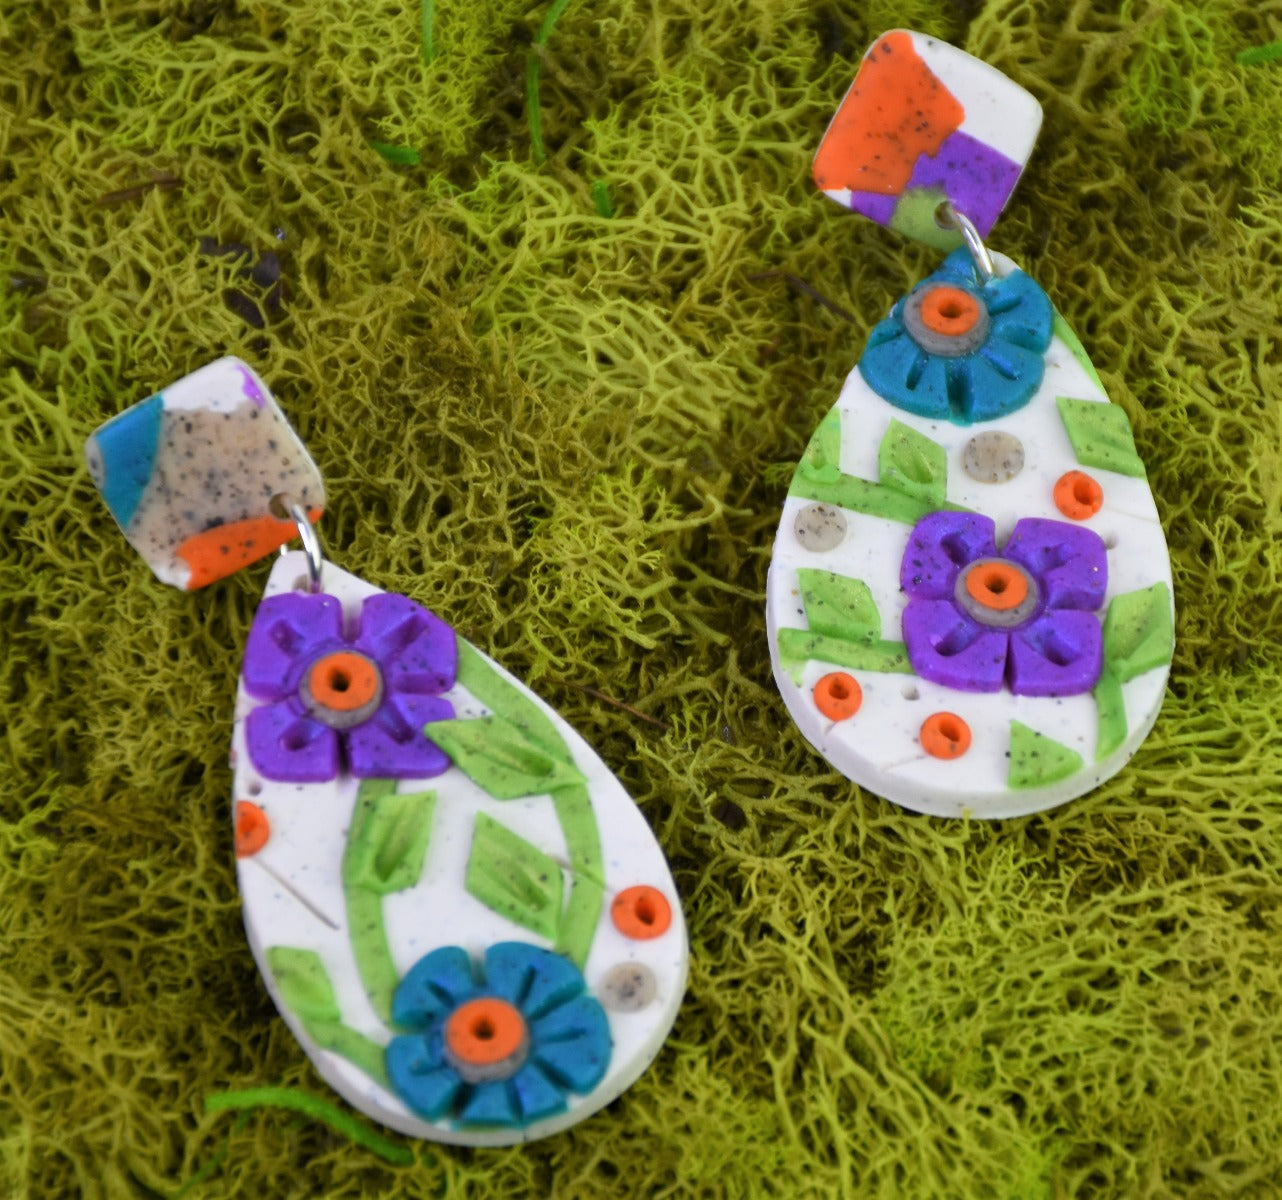
The Granite Floral Slab Earrings are one project from a six-part series of projects incorporating a mix and match style approach to jewelry making and vessel decorating. This pair of earrings is finished with some of the Terrazzo style slab that is also part of this series.
COMPLETION TIME: 90 Minutes to make and bake
ADDITIONAL SUPPLIES
- 8mm Silver tone jump rings (2)
- Silver tone ear posts (2)
- Silver tone ear backs (2)
- Silicone glue
- Flat nose pliers
Project Instructions
- Getting Started:
Start with clean hands, unwrap and knead clay until soft and smooth, or condition by running clay though a Pasta Machine. We recommend using a designated machine for clay purposes only. When working with multiple colors, clean hands with soap and water or baby wipes (we have found that baby wipes work best) before switching colors. Shape clay, pressing pieces firmly together. Wash hands after use.
- Baking:
This six-part series of projects uses a color palette that is one of my all time favorites. Each color is tinted with Gray Granite Premo to give them all the same cool speckled effect and to help them all belong to the same family of colors.
The recipe for the colors is as follows and this will be enough of each of the tinted colors for all six projects in this series.
Mix 1/8 bar of Purple Pearl with 1/8 bar of Gray Granite to create Purple Granite. Mix 1/8 bar of Peacock Pearl with 1/8 bar of Gray Granite to create Peacock Granite. Mix 1/8 bar of Bright Green Pearl with 1/8 bar of Gray Granite to create Bright Green Granite. Mix 1/8 bar of Orange with 1/8 bar of Gray Granite to create Orange Granite.
Sheet each color to the fourth thickest setting through a pasta machine or roll by hand to about 1/16” thick.

Mix 1/2 bar of White with 1/4 bar of Gray Granite for the background color. Sheet this piece through a pasta machine on the thickest setting or roll by hand to about 1/8” thick.

Roll very thin ropes of the Bright Green Granite. Make a random pattern of vines on the background clay as shown.

From the Peacock Granite sheet, cut out several of the smallest (1/2”) circle shape. Add these randomly to the vines. Press them down hard so they lay really flat. Use the blunt pointed tool to pull gouges in the edges of the circles creating petals.

From the Purple Granite sheet, cut out several of the smallest (1/2”) square shape. Add these randomly to the vines. Press them down hard so they lay really flat. Use the blunt pointed tool to pull gouges in the edges of the squares creating petals.

Use the blunt pointed tool to score lines in the center of each Purple Granite petal.

Repeat to make lines in the center of each Peacock Granite petal.

Use the ball ended tool to push a divot into the center of each flower.

Make little balls from Gray Granite and set one in the center of each flower. Flatten each one into place with the flat end of the needle tool.

Set a tiny Orange Granite ball in the center of each flower. Flatten these into place as well with the flat end of the needle tool.
Take a look at your sheet and make sure you have enough flowers randomly sprinkled all over it. You can add more now if you like following Steps 2-10.
Take a look at your sheet and make sure you have enough flowers randomly sprinkled all over it. You can add more now if you like following Steps 2-10.

Cut a strip from the sheet of Bright Green Granite about 1” wide. Divide the 1” strip into three narrow strips. Cross section the strips so tiny diamond shapes are formed. These will be used to make leaves.
Reserve the remainder of each of the sheeted colors to be used to create the Granite Terrazzo Slab.
Reserve the remainder of each of the sheeted colors to be used to create the Granite Terrazzo Slab.

Push the little diamonds into place all along the vines with the tip of the blunt end tool.

Now for some doodly details! Add little score lines to the open spaces in the background to create random tiny stems. Place a tiny Orange Granite bud at the top of each stem. Poke holes in the centers of the flowers and in the tiny buds with the blunt point tool.

Add dots of Gray Granite to the background in empty spaces. Flatten these with the flat end of the needle tool.

To make earrings, use the 1.75” teardrop cutter to cut out two shapes. You can audition how the earrings will look by moving the cutter around and looking through it. But be sure to leave a large space uncut so that you have a piece large enough to create the Granite Floral Slab Jar Project if you like.

You can cut out additional small pieces from the Floral Slab here to top off your earrings. I had some interested scraps that I chose to use!
Lay the pieces as you would like them to be assembled as earrings. Poke holes in them with the needle tool to add the jump rings later. You will need holes at the top of the bottom pieces and at the bottom of the top pieces.
Bake the pieces following the baking instructions in Step 1 above.
Lay the pieces as you would like them to be assembled as earrings. Poke holes in them with the needle tool to add the jump rings later. You will need holes at the top of the bottom pieces and at the bottom of the top pieces.
Bake the pieces following the baking instructions in Step 1 above.

When the pieces are completely cool, hook them together with jump rings using flat nose pliers. Glue ear posts to the backs of the top sections and allow them to dry completely.
