

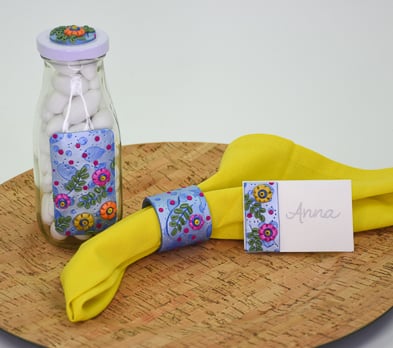
Sculpey Premo™ Floral Slab Napkin Ring
Sculpey Premo™ Floral Slab Napkin Ring
Designed by Amy Koranek
Read More
This is the first part in a three-part series. The Floral Slab in this tutorial is constructed in detail and then used to create DIY home decor items. Color selection and mixing will be discussed to show how to make a family of colors. We will also see how easy it is to really pack the details into the design - that’s what makes slab making so special and fun - all those glorious details!
Read Less
COMPLETION TIME: 45 Minutes to make and bake
ADDITIONAL SUPPLIES
- Empty toilet paper center, or empty paper towel center, or 1.25” deep X 1.5” diameter circle cookie cutter for ring form
- Packing tape or clear tape (if using a paper form)

Project Instructions
- Getting Started:
Start with clean hands, unwrap and knead clay until soft and smooth, or condition by running clay though a Pasta Machine. We recommend using a designated machine for clay purposes only. When working with multiple colors, clean hands with soap and water or baby wipes (we have found that baby wipes work best) before switching colors. Shape clay, pressing pieces firmly together. Wash hands after use.
- Baking:
For this Floral Slab design, we are going to use the Premo™ Pearl as the unifying tint that makes all the colors blend together into a family. By blending Premo™ Pearl with each color, you create a consistent flow that brings the colors together. First set aside a very small amount of the Pearl - 1/32 of the bar. We will use this piece later to make two tints of the leaf color in Step 10.
Mix 3/4 of the bar of Pearl with 1/16 of the bar of Ultramarine Blue. Mix the two colors completely together and sheet through the pasta machine to the second thickest setting.
Trim away the rough edges as shown with a Clay Blade so that you have a nice rectangular shape in Light Blue Pearl for the background of our slab. Save the rough edges of the Blue Pearl for further color mixing.

Divide the remainder of the Pearl (minus the 1/32 bar from Step 2) into four equal pieces. For the tinted colors we will mix the following colors completely:
1/16 bar of Fuchsia + Pearl = Fuchsia Pearl;
1/16 bar of Orange + Pearl = Orange Pearl;
1/16 bar of Cadmium Yellow + Pearl = Yellow Pearl;
1/16 bar of Spanish Olive + Pearl = Olive Pearl;
1/16 bar of Ultramarine Blue + 1/3 of the Blue Pearl scraps from Step 2 = Blue Pearl
1/16 bar of Fuchsia + Pearl = Fuchsia Pearl;
1/16 bar of Orange + Pearl = Orange Pearl;
1/16 bar of Cadmium Yellow + Pearl = Yellow Pearl;
1/16 bar of Spanish Olive + Pearl = Olive Pearl;
1/16 bar of Ultramarine Blue + 1/3 of the Blue Pearl scraps from Step 2 = Blue Pearl

Mix each of the color combinations from Step 3 completely to produce your Pearly rainbow as shown

Take one more sliver of Ultramarine Blue from the original bar and mix it completely with 2/3 of the scraps of Light Blue Pearl from Step 2 to create Medium Blue Pearl.

Here’s a look at the three different Blue Pearls we have mixed for the Floral Slab: Light Blue Pearl for the background, Blue Pearl (lower right) for the floral details later, and Medium Blue Pearl (upper right) for the pebble pattern that we will first make on our background.

Roll the Medium Blue Pearl into a little log and randomly pinch pieces from it. Flatten the pieces as well as you can by pinching them between your fingers before applying them randomly to the background color. Making the shapes and sizes as random as possible will make a really pleasing background that is tone on tone. The mica powder in the Premo™ Pearl adds to the cool effect of the pebbles on the background.

Roll the pebbles into the background with the Acrylic Clay Roller. Roll in each direction to make sure the pebbles go completely flat.

We will add floral details next to one half of the sheet. By only adding to half the sheet we will end up with two coordinating patterns that look beautiful together.
Score bent stems randomly across half of the sheet with the Needle Tool. Make sure to leave space between the stems for adding leaves and flowers in the empty spaces.
Score bent stems randomly across half of the sheet with the Needle Tool. Make sure to leave space between the stems for adding leaves and flowers in the empty spaces.

Cut the Olive Pearl clay in half. Add the sliver of Pearl from Step 2 to one half of the Olive Pearl. Mix it completely so that you now have Olive Pearl and Light Olive Pearl. Having two leaf colors isn’t completely necessary but it will add interest to the overall design.
Roll Olive Pearl and Light Olive Pearl into flat little ropes about 3/16” wide.
Roll Olive Pearl and Light Olive Pearl into flat little ropes about 3/16” wide.

Use the Clay Blade to slice the flat ropes into lots of little oval shaped leaf bits.
Flip the leaf bits so they are laying flat on your work surface.
Flip the leaf bits so they are laying flat on your work surface.

Use the Needle Tool to pierce the leaf bits halfway through and apply them to the stems on the background. Place Olive Pearl leaves on one side of each stem in a stacked design and place Light Olive Pearl leaves on the other side of each stem. Using the Needle Tool to pick up and press the leaves into place will add the little dash of texture and detail to each piece which is important for the slab look and design.

Keep adding those lovely little leaves until all the stems are filled.

Next add balls of Fuchsia Pearl, Orange Pearl, and Yellow Pearl for the flowers. Make little 1/4” balls and then flatten them to the background. Then use the Needle Tool to drag little petal lines in radiating fashion around the edges of each flower. Then use the Ball Tool to make a divot in the center of each flower. This motion makes the little petals kind of open up and creates a little well for the center details. It also makes sure each flower is well seated into the background color.

Repeat with the Needle Tool and the Ball Tool for every flower.

Fill each of the little center wells with a ball of Blue Pearl. Seat the centers in place with the Ball Tool.

Add a small center of Cadmium Yellow to each flower and poke a hole with the Needle Tool.

Make tiny balls from Fuchsia and sprinkle these over the surface of the background randomly.

Flatten each tiny ball into the background with the Ball Tool.

Add tiny dot details in series all over the background and between the leaves and flowers with the Needle Tool.

To make the napkin ring, cut a rectangle that is 1.5” wide and 3.5”-4” long. There are two ways you can go about making a napkin ring. You can make a ring that is a complete circle or you can make an open ring that is a cuff. I am making my ring as a cuff so that it is somewhat flexible for accommodating a variety of styles of napkins. If you use a paper form like the inside of a toilet paper roll or an empty paper towel roll, cover the area to be wrapped in clay with clear tape first. Especially if you will be making the circle style of ring instead of the cuff. The clear tape surface will make the clay come off of the paper form easily after baking.

Form the clay around the shape. Here I am using a cookie cutter that has tall sides to support the clay. I am leaving a gap at the back of the clay in a “cuff” fashion, making the ring more flexible.

If desired, add a cut out from the Floral Slab to the front of the napkin ring.

Bake the ring on the form following the baking instructions for Sculpey Premo™. Allow to cool completely before removing from the form. To release the clay, carefully flex it if it’s on a metal form to loosen it. If the clay was baked on a paper form, you can carefully flex the paper form away from the clay to release it.

- Choosing a selection results in a full page refresh.
- Opens in a new window.