
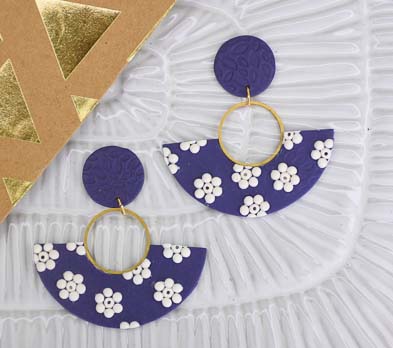
Sculpey Premo™ “Color of the Year” Floral Arch Earrings
Sculpey Premo™ “Color of the Year” Floral Arch Earrings
Designed by syndee holt
Read More
Sculpey Premo™ color team up to recreate the 2022 Pantone Color of the Year, Very Peri, to create these easy, breezy earrings.
TIME TO COMPLETION: 60 minutes
Read Less
ADDITIONAL SUPPLIES
- Brass circles .75 inch (2)
- Small Gold jump rings (2)
- Ear post (2)
- Gorilla glue- Duo tip bottle preferred
- Several sheets of lined paper
- Small piece of kitchen sponge, moistened
- Small spray bottle of water
- Needle tool or hand drill with small bit
Project Instructions
- Getting Started:
Start with clean hands, unwrap and knead clay until soft and smooth, or condition by running clay though a Pasta Machine. We recommend using a designated machine for clay purposes only. When working with multiple colors, clean hands with soap and water or baby wipes (we have found that baby wipes work best) before switching colors. Shape clay, pressing pieces firmly together. Wash hands after use.
- Baking:
Sheet out each of the conditioned colors of Ultramarine, Purple and Slate on the #3 setting (middle setting) on the clay conditioning machine. Use the second from largest cutter (1.75 inch) to cut out 2 each of the Purple and Slate. Cut out 1 circle of the Ultramarine (you may opt to add another half circle of the Ultramarine if you want a slightly more blue look). Mix the colors together thoroughly

Sheet the mixed color out on the #3 setting again and lightly set your 2-inch cutter on the clay and trim the clay to just a little larger than the cutter.

Lightly spray the leaf texture with water and gently press into the sheet of clay. We are NOT aiming for a deep texture. We are aiming for a more subtle texture for once!

Sheet out a small piece of the conditioned White clay on the next thinnest setting from your background sheet (#4 for me). Dampen your sponge and select your smallest Etch n’ Pearl. Place the White clay on a small piece of paper.

Press your Etch n’ Pearl into the dampened sponge and then into the White clay. If your clay pearl stays on the paper, press the tool into the sponge before gently scraping the clay (pearl) up from the paper and wipe the edge on your thumb. (Both the scraping action and the wiping will help remove any pesky tiny feathers of White clay from the perfect pearl!) Position it in a corner. Then just repeat, adding 6 more pearls around the center. Use the pointed end of the Etch n’ Pearl to texture the center of the flower. NOTICE that I started in a corner? That is because I wanted to practice.

Continue to add more of your “pearl flowers”. I frequently checked my placements by lightly setting my circle cutter into place.
I also checked with my center .75 inch cutter in place. I was trying not to have too many floral patterns cut up if possible.
I also checked with my center .75 inch cutter in place. I was trying not to have too many floral patterns cut up if possible.

Once you have completed the square, position the cutters again. I prefer to put a small stiff board across the top and press firmly down on the board to cut out my pieces. (Saves bruising my palms!)
DESIGNER TIP: When using circle cutters, you can gently spin the cutter right and left. This will help give you a cleaner edge!
DESIGNER TIP: When using circle cutters, you can gently spin the cutter right and left. This will help give you a cleaner edge!

Place the clay on a sheet of lined paper (I’m using an index card). Cut through the center of the design, using the lines on the paper as a guide.

Place your earring pieces on your baking sheet and gently slide the brass circles into place. I bake with the circles in place so that they fit snugly.

Sheet out a small piece of your remaining clay mixture, texture it and use the .75 inch cutter to cut out 2 pieces for the post portion of the earring.

Use your needle tool to place a hole near the bottom edge of each circle. (NOTE: You can also drill the holes after baking, which I normally do)

I like to “sink” my post backs into a small puddle of Sculpey Oven Bake Adhesive. Once they are baked, the Oven Bake Adhesive is semi-transparent and quite strong. My friends that wear posts tell me that they are super-comfy as well!
Bake the posts and the larger sections of the earrings as directed in Step 1 above. Allow to cool.
Bake the posts and the larger sections of the earrings as directed in Step 1 above. Allow to cool.

Apply the glue with the brush tip along the inside edge of the earring and gently press the brass ring against the clay. I propped my earring up and allowed them to dry overnight before attaching the posts with a jump ring.
