
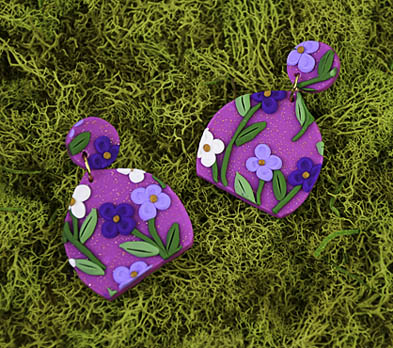
Sculpey III® Flower Slab Earrings
Sculpey III® Flower Slab Earrings
Designed by Phoebe Doehring
Read More
Read Less
Have you always wanted to try creating some of those very on-trend floral slab earrings? Well, this quick tutorial will give you all the info you need to do so!
TIME TO COMPLETION: 45 minutes
ADDITIONAL SUPPLIES
- Clay dedicated knife
- Gold jump rings (2)
- Gold post earring backs (2)
- Jewelry Pliers
- Super Glue
- Paintbrush
Project Instructions
- Getting Started:
Start with clean hands, unwrap and knead clay until soft and smooth, or condition by running clay though a Pasta Machine. We recommend using a designated machine for clay purposes only. When working with multiple colors, clean hands with soap and water or baby wipes (we have found that baby wipes work best) before switching colors. Shape clay, pressing pieces firmly together. Wash hands after use.
- Baking:
Condition and run 1/3 a block of Violet Glitter clay through the clay machine on the #1 setting. Set aside this sheet of clay for now.
Mix together a dime sized amount of White and String Bean clays to make Light Green.
Mix together a dime sized amount of White and Purple clays to make Light Purple.
Roll VERY thin snakes of String Bean clay to make the stems of the flowers. Cut 1” and 1/2’ pieces from the snakes. Press the snakes on your sheet of Violet glitter leaving room between stems to add leaves and flowers. Each stem should have a little offshoot stem.

Roll another thin snake (slightly thicker than the other snakes) of String Bean clay and cut little 1/4” to 1/2” pieces off this snake. With your fingertips point both ends of all these little pieces Press them flat to make leaves. Do this again with the Light Green clay you have mixed together.
Press leaves on either side of the stems alternating String Bean colored leaves and Light Green colored leaves.
Press leaves on either side of the stems alternating String Bean colored leaves and Light Green colored leaves.

To make the flowers you will need to roll lots of very small, equal sized balls of Purple, White and Light Purple clays.
Create four petaled flowers at the end of each stem by pressing four small balls close together. Alternate the flowers colors to make it visually interesting.
Create four petaled flowers at the end of each stem by pressing four small balls close together. Alternate the flowers colors to make it visually interesting.

Use the end of your paintbrush to make little round indents in each flower petal to give definition.
Roll teeny tiny balls of Jewelry Gold and press one in the center of each of the flowers.
Use your clay knife and make a line down the center of each leaf.
Roll teeny tiny balls of Jewelry Gold and press one in the center of each of the flowers.
Use your clay knife and make a line down the center of each leaf.

Lay the desired template gently on your sheet of clay in an area that has plenty of color and interest. Cut out the shape. Repeat and cut out another.
Use your little Sculpey Circle cutter and cut out two circles from your sheet that will flow well with the bottom portion of the earrings.
Use your little Sculpey Circle cutter and cut out two circles from your sheet that will flow well with the bottom portion of the earrings.

Use your 5 in 1 tool to create holes at the bottoms of the circle shapes and the tops of each of the other shape to accommodate the jump rings.
Bake the earrings in your oven at 275 degrees for 15 minutes. Allow to cool completely.
Bake the earrings in your oven at 275 degrees for 15 minutes. Allow to cool completely.

Use your jewelry pliers to attach a jump ring to each earring that links the circle piece and other shape together.
Turn the earrings over. Use a drop of Super glue and glue the post earring backs onto each earring. Allow to dry completely.
Turn the earrings over. Use a drop of Super glue and glue the post earring backs onto each earring. Allow to dry completely.

- Choosing a selection results in a full page refresh.
- Opens in a new window.