
Sculpey Premo™ Off Center Pendant
Sculpey Premo™ Off Center Pendant
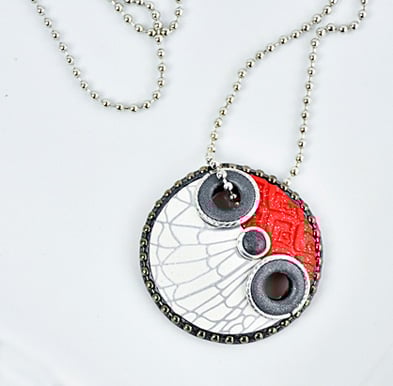
Designed by Amy Koranek
Read More
Read Less
This pendant design incorporates elements of texture, sparkle, silk screened patterns, and metal embellishments.
TIME TO COMPLETE: 75 minutes
ADDITIONAL SUPPLIES
- Bright silver metallic acrylic paint
- Water basin large enough to hold a silk screen
- 10mm Twisted silver tone jump rings (2)
- 4mm Bright Silver tone jump ring
- 20” Silver tone ball chain with clasp
- 3” Silver tone ball chain
- Wire cutters
Project Instructions
Getting Started:
Please make sure your work area is covered and you are not working on an unprotected surface. We recommend working on the Sculpey® Oven Safe Work Mat, wax paper, metal baking sheet, or disposable foil. Uncured Liquid Polymer Clay may damage unprotected furniture or finished surfaces. Be sure to cover your crafting area appropriately.
Getting Started with Premo Clay:
Start with clean hands, unwrap and knead clay until soft and smooth, or condition by running clay though a Pasta Machine. We recommend using a designated machine for clay purposes only. When working with multiple colors, clean hands with soap and water or baby wipes (we have found that baby wipes work best) before switching colors. Shape clay, pressing pieces firmly together. Wash hands after use.
Getting Started with Liquid Sculpey
Stir Liquid Sculpey® completely. Thin with Sculpey® Liquid Clay Softener as needed - Wash hands after use (we have found that baby wipes work best) .
Getting Started with Premo Clay:
Start with clean hands, unwrap and knead clay until soft and smooth, or condition by running clay though a Pasta Machine. We recommend using a designated machine for clay purposes only. When working with multiple colors, clean hands with soap and water or baby wipes (we have found that baby wipes work best) before switching colors. Shape clay, pressing pieces firmly together. Wash hands after use.
- Baking:
Getting Started with Liquid Sculpey
Stir Liquid Sculpey® completely. Thin with Sculpey® Liquid Clay Softener as needed - Wash hands after use (we have found that baby wipes work best) .
- Baking:
butterfly wing screen image on the clay shiny side down. Burnish out air bubbles with your fingertips. Place a line of silver acrylic paint across the top of the image. Holding the squeegee at a 45 degree angle, firmly drag the paint across the screen. Immediately lift the screen and place it in a water basin to remove the paint. Allow the paint to dry on the clay completely.

Mix Cadmium Red and White Gold Glitter Premo together 1:1. Sheet the mix through the clay conditioning machine on the second thickest setting. Press the texture into the clay as deeply as you can with fingertip pressure. Once the texture has bitten into the clay, roll over the texture sheet with the Acrylic Clay Roller to get a deep and even texture. Remove the texture sheet.

Cut the screened piece out using the matching sized Circle Cutter. Cut the piece off center.

Cut a straight edge along the red textured sheet. Match the straight edge up to the larger Igloo screened piece.

Trim the red with the same size circle that you used on the screen piece so you now have a complete circle. Carefully press the two sides of the circle together.

Use the medium Etch ‘n Pearl to set a pearl of Graphite Pearl Premo in the middle of the seam

Place the small jump ring around the pearl and carefully push it into place.

Roll a rope of Graphite Pearl 1/8” thick. Press the rope to the side of the circle and trim the ends. Smooth the seam with your fingertip.

Press a piece of ball chain into the Graphite Pearl rope. Trim the ball chain as needed so it lays flat. Make sure it is well seated in the clay and that the clay is holding the ball chain in place.

Sheet Graphite Pearl to the third thickest setting. Cut out two circles using the mini circle cutter. Position a 10mm jump ring around each one of the circles. Use the large Etch ‘n Pearl to carefully cut out the center of each one

Position the circles with the jump rings around them on either side of the center pearl. Carefully press them into place.

Very carefully press the design onto the largest dome of the Hollow Bead Maker. Make sure the ball chain and the jump rings do not come free as you press the piece against the dome.
Use the large Etch ‘n Pearl to cut the centers of the Graphite Pearl circles free. Leave the center pieces in place for now. We will pop them out after the piece is baked.
Bake the piece on the Hollow Bead Maker following the baking instructions for Soufflé.
Use the large Etch ‘n Pearl to cut the centers of the Graphite Pearl circles free. Leave the center pieces in place for now. We will pop them out after the piece is baked.
Bake the piece on the Hollow Bead Maker following the baking instructions for Soufflé.

When the piece is completely cool, carefully remove the centers from the Graphite circles.

String a ball chain with clasp through the top circle.

- Choosing a selection results in a full page refresh.
- Opens in a new window.