
Sculpey Premo™ Copper Leopard Print Earrings
Sculpey Premo™ Copper Leopard Print Earrings
Designed by syndee holt
Read More
Sculpey Premo™ and Sculpey Soufflé™ team up with this great silkscreen and arch cutter from Hello Cutters to create a unique take on the popular “arch motif”.
TIME TO COMPLETION: 75 minutes, including baking
Read Less
ADDITIONAL SUPPLIES
- 6 mm black (or gold) jump rings (4)
- 6 mm (apx) stainless steel post (2)
- Small piece of course sandpaper for texture
- Small spray bottle of water
- Glossy black acrylic paint and small paint brush
- Silicone brush or plastic card to spread the paint (old hotel room keys work great!)
- Small piece of lined paper or index card
- Craft blade (like Exacto)
- Instant glue
- Clay dedicated pasta machine (Optional)
- 3 Small 2x2 inch pieces of cardboard stacked together and glued at the edges.
Project Instructions
- Getting Started:
Start with clean hands, unwrap and knead clay until soft and smooth, or condition by running clay though a Pasta Machine. We recommend using a designated machine for clay purposes only. When working with multiple colors, clean hands with soap and water or baby wipes (we have found that baby wipes work best) before switching colors. Shape clay, pressing pieces firmly together. Wash hands after use.
- Baking:
Condition and roll out the Sculpey Premo™ Copper so that you have a sheet big enough for the entire silkscreen. Place the silkscreen on the clay with the letters right side up and gently smooth into place.

Apply your selected paint to the silicone brush or plastic scraper and QUICKLY spread across the silkscreen. Make sure to remove any excess paint from the screen as you work.

Quickly remove the silkscreen and IMMEDIATELY wash it under running water. A small tub of water will work as well. Lay the screen to dry with the emulsion side up (letters will be backwards).

Now you can relax and admire your silkscreened clay while it dries!

Once the paint has completely dried, use the cutter to press firmly into the clay. Use your finger to gently press the clay out of the cutter and set aside. Repeat to make the second arch and set the excess clay in a safe place for later use.
NOTE: I like to carefully trim the edges of the cut clay with a craft blade to lessen any sanding time after baking. Set the arches aside for now.
NOTE: I like to carefully trim the edges of the cut clay with a craft blade to lessen any sanding time after baking. Set the arches aside for now.

Roll out about half the block of the Sculpey Soufflé™ Poppy Seed to a thickness just slightly thicker than your Copper. Lightly spray your piece of sandpaper with water and press firmly into the clay to texture it.

Use the 1-inch round cutter from the Nested Circle cutters to cut two circles of the textured clay. Set aside for a moment. NOTE: If you don’t have this cutter, you can trace a nickel on a piece of paper, cut it out and use it as a template!

Line the top of your arches up on a small sheet of lined paper. Use the same 1-inch cutter to cut the center top of each of the arches, using the lines to make sure that you cut the same from each arch. Save the small pieces that you cut out.

Check to make sure that your Poppy Seed circles fit correctly.

Use .75-inch cutter (or pattern) to cut out 2 more pieces of the textured Poppy Seed clay. Then use a slightly smaller cutter (mine is from the Sculpey Mini Geometric cutters) to cut out two circles from either the silkscreened wedges you cut out of the arches or the reserved sheet of silkscreened clay.

Here is a look at the pieces we have so far. NOTE: The small, patterned pieces for the post portions are just sitting lightly on the Poppy Seed clay for the photo.

Use the pointed tool from the kit to put holes in each of the pieces for hanging.

THIS IS MY METHOD FOR ATTACHING THE POSTS TO THE CLAY. Stack the 2x2 pieces of cardboard and glue the corners with instant glue. Use pointed tool to make several holes in the cardboard through the layers. Now press a post back through the Poppy Seed circles, just higher than center and carefully drop the post into one of the holes so that the Poppy Seed clay is flat. Repeat for the other circle. NOTE: I like to put my holes in the post section after the next step. Place the arches and circles on your baking sheet.
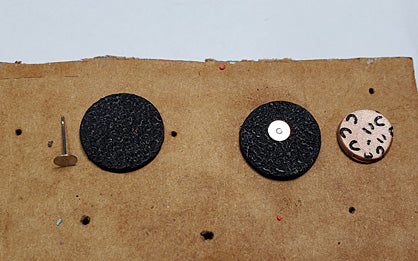
Use either instant glue or Liquid Sculpey to put a dot on the post. The dot should be about the size of the post, no larger!

Gently press the smaller patterned circle into place over the post.

If you haven’t already put your holes on the bottom of the circle you can do so now. Place this stack of cardboard on your baking sheet. (NO it will NOT burn!)
Bake all the pieces according to the directions above.
Bake all the pieces according to the directions above.

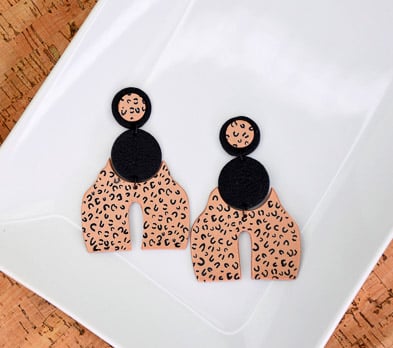
Once the clay has baked and cooled, assemble the earrings as shown.

Here's a look at my completed design.
