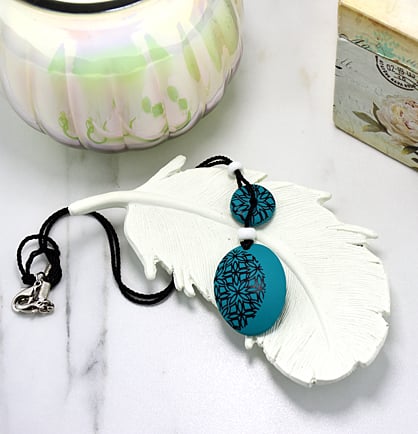
Sculpey® III - Lattice Pendant
Sculpey® III - Lattice Pendant
Designed by Amy Koranek
Read More
Read Less
This graphic pendant is a quick and easy project that can be adapted to several different silkscreen patterns and clay colors.
ADDITIONAL SUPPLIES
- Black acrylic paint
- Water basin for rinsing the screen immediately
- White pony beads (2)
- 28” Black silk cord
- Scissors

Project Instructions
- Getting Started:
Start with clean hands, unwrap and knead clay until soft and smooth, or condition by running clay though a Pasta Machine. We recommend using a designated machine for clay purposes only. When working with multiple colors, clean hands with soap and water or baby wipes (we have found that baby wipes work best) before switching colors. Shape clay, pressing pieces firmly together. Wash hands after use.
- Baking:
Sheet Teal Sculpey®III through the pasta machine on the thickest setting. Hand roll over it with the Acrylic Clay Roller to smooth out any ripples.

Burnish the shiny side of the Lattice screen to the clay. Place a thin line of the paint across the top of the Lattice pattern. Drag the squeegee pulling the paint at a 45 degree angle across the clay. Immediately peel the screen away from the clay and place it in a basin of water or rinse under running water to clean it. In this photo I show that I screened the image twice, but you will only need one to complete the project.

Using the second largest oval, cut out an oval shape that goes through the Lattice design and leaves a blank area on the right side as shown. Use the 1” circle cutter to cut out another piece from the Lattice design. Smooth all the cut edges with your fingertips.

Use the 2 mm ball tool to poke a hole through the top of the oval shape for stringing. Poke through from the front and then from the back, repeatedly until you gradually make the hole large enough. Smooth any rough edges around the hole at the back.

Cut another circle from the Teal, this one does not need to be screened, and add it to the back of the screened piece to make it double thick.

Smooth the edges of the circle bead on both sides. Poke a hole through the center with the 2 mm ball tool. Start with the first poke through the front, then go through the back and repeat until the hole is large enough. Smooth rough edges around the hole on the back.

Press the oval to the largest dome on the Hollow Bead Maker to give it shape. Bake the Hollow Bead Maker and the single circle bead following the baking instructions for Sculpey®III. [

Allow the pieces to cool completely before assembly. Fold the cord in half and run the loop of the cord through the oval piece first. String the tails of the cord through the loop in the cord and pull tight. String a pony bead onto both cords sitting just above the oval. Thread one cord through from the front of the circle and one cord through from the back. String another pony bead on both strings to sit just above the circle. Tie a double knot in the cord at the very end. Trim the tails.

- Choosing a selection results in a full page refresh.
- Opens in a new window.

