
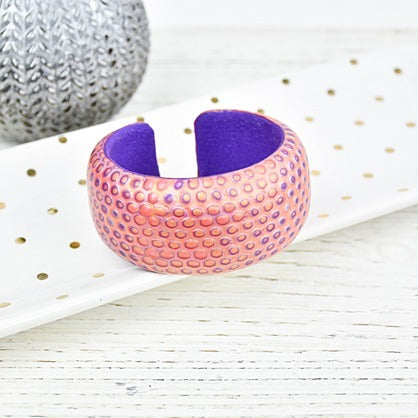
Sculpey Premo™ Jewel Toned Cuff Bracelet
Sculpey Premo™ Jewel Toned Cuff Bracelet
Designed by Krithika Parthan
Read More
Read Less
Create a beautiful cuff with a sheet of texture sheet mokume gane created with Sculpey Premo™. Sand and buff it to a soft gleaming shine by hand.
TIME TO COMPLETION: About 2 hours including baking
ADDITIONAL SUPPLIES
- Cuff blank
- Texture sheet (I used Shade-Tex Architecture Rubbing Plate)
- Deli paper or parchment paper
- Burnishing tool
- Scrap clay
- Coarse texture sponge or sandpaper
- Renaissance Wax (optional)
- Machine buffer (optional)
Project Instructions
- Getting Started:
Start with clean hands, unwrap and knead clay until soft and smooth, or condition by running clay though a Pasta Machine. We recommend using a designated machine for clay purposes only. When working with multiple colors, clean hands with soap and water or baby wipes (we have found that baby wipes work best) before switching colors. Shape clay, pressing pieces firmly together. Wash hands after use.
- Baking:
Sheet 1/4 of a 2 oz block of Pearl, Sunset Pearl and 18k Gold. Mix 1/8 block of Purple and Purple Pearl and sheet this as well. Run all the colors through a medium thick setting, about a #3 (where #1 is the thickest). You want a rough rectangle shape.

Lay the Sunset Pearl sheet on 18K Gold and run it through the conditioning machine. Repeat with a sandwich of the purple blend and Pearl. Lay the purple-pearl sheet on the other sheet and run this through the clay conditioning machine again. Rotate the sheet as you roll it to maintain the rectangle shape. You should now have a sheet of clay with 18K Gold-Sunset Pearl-Pearl-Purple layers.

Cut the sheet in half, lay one half on the other and run it through the machine. Do this one more time but leave the sheet at the thickest setting on your clay conditioning machine. You should have a long rectangle with the layers repeated 4 times within the stack.

Place your texture sheet on the stack and run it through the clay conditioning machine if possible. If not, use an acrylic roller to impress the texture into the sheet.
Depending on whether you place the gold side against the texture or purple, you will get a different look. Experiment with a small piece to see which one you like better. This will also help you check if you have thin enough layers.
Depending on whether you place the gold side against the texture or purple, you will get a different look. Experiment with a small piece to see which one you like better. This will also help you check if you have thin enough layers.

Press the clay sheet gently to attach it to the worksurface making sure you don’t squish the texture. Using the flexible blade from the super slicer set, bend it slightly and start shaving away the raised portion of the clay. Try to keep the blade flush with the flat portions of the sheet. Remove all the raised areas to reveal a beautiful pattern.


The sheet could be still bumpy at this time. Place a sheet of deli paper of parchment paper on the sheet and using a burnishing tool to smooth out the surface. I like to use a coffee tamper. As you smooth the surface, the pattern will become more visible through the translucent paper. Use your fingers to check if the surface is smooth and remove the paper when you are happy.

We will construct a domed cuff with scrap clay. From a thick sheet of scrap clay, cut a strip a little narrower than the cuff width. Cut another strip a little thinner. Lay the thin strip on the wider one on your work surface. Using your finger, press down on the edges to dome them and join the strips. Do this on both sides till you have a nice smooth bevel.


Place the domed strip of clay on the cuff. Cut bevels on both ends and smooth over the ends. Use your fingers to smooth over the whole surface. Let the edge of the cuff act as your guide. I prefer to cure the base by baking it according to the directions in Step 1 and add the next layer.

Cut a piece of the pattern long enough and wide enough to go over the scrap core. If using a cured base, apply Bake and Bond to the surface. Cover the cuff with the patterned sheet and fold it over the inner edge. Use your Super Slicer blade to trim off the excess. Cure the cuff by baking according to the directions in Step 1.


Condition about 1/2 oz of clay in the color of your choice for the inner lining. I used the same purple mix I created for the surface. Create a long thin strip, optionally textured on one side.
Apply Bake and Bond on the inside of the cuff. Add the textured clay on the inside and press it to attach. Using the baked edge as a guide, trim off excess clay. Cure the cuff again by baking according to the directions in Step 1.
Apply Bake and Bond on the inside of the cuff. Add the textured clay on the inside and press it to attach. Using the baked edge as a guide, trim off excess clay. Cure the cuff again by baking according to the directions in Step 1.

Sanding this cuff will make the mica clay come alive!
Line your worksurface with an old towel. Fill a bowl with water and add a drop of hand soap or dish detergent. Starting with the 400 grit from the Sculpey sandpaper kit, start sanding the cuff. If the kit is brand new, soak the sandpaper for a few minutes in the bowl of water to make it more pliable.
Sand with 400 grit to remove the largest lumps and bumps. Dip the sandpaper in water frequently to rinse off the clay dust. Move on to 600 grit and sand till the scratches left by 400 grit have been removed. Change out the water if the bowl looks very muddy.
Continue with 800 grit and finish up with 1000. The clay surface should feel buttery smooth! If you have a machine buffer, you can use it to shine up the clay. I used a cotton towel to buff by hand. I applied a small amount of Renaissance Wax, let it dry and buffed again for a smooth and lovely sheen!

