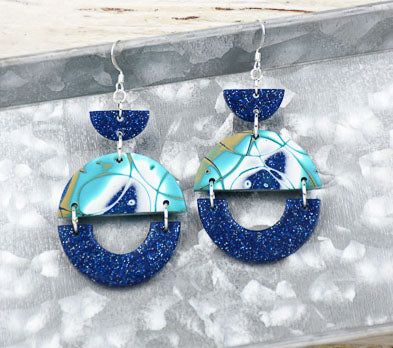
Sculpey Premo™ and Sculpey Soufflé™ Mokume Gane Circles Earrings
Sculpey Premo™ and Sculpey Soufflé™ Mokume Gane Circles Earrings
Designed by Amy Koranek
Read More
Read Less
A mixture of Premo and Soufflé provides unique and endless color combinations. Layering in a Mokume Gane technique creates a subtle blending of colors. This set of earrings is the second in a three part series exploring the color combinations and creativity that are available from the Sculpey Soufflé and Sculpey Premo Multipack of colors.
COMPLETION TIME:60 Minutes to make, bake, and assemble.
ADDITIONAL SUPPLIES
- Pasta machine
- 8 mm Bright silver tone jump rings (6)
- 6 mm Bright silver tone jump rings (2)
- 4 mm Bright silver tone jump rings (2)
- Bright silver tone ear wires (2)
- Flat nose pliers

Project Instructions
- Getting Started with Liquid Sculpey:
- Baking:
This mokume gane pattern will incorporate a unique mixture of Soufflé and Premo. When selecting colors for mokume gane, I like to choose a variety of styles of clay. I’ve selected two flat colors from Soufflé: Latte and Igloo; a metallic color from Premo. Peacock Pearl; and a glitter color from Premo: Galaxy Glitter.
Use the Acrylic Clay Roller or the thickest setting on the pasta machine to make a small sheet of each color about 1/8” (3.2mm) thick and 2” (5-6cm) square. The important thing is to have equal size pieces of each color.
Use the Acrylic Clay Roller or the thickest setting on the pasta machine to make a small sheet of each color about 1/8” (3.2mm) thick and 2” (5-6cm) square. The important thing is to have equal size pieces of each color.

Stack the colors as shown. I like to put the darkest color on the top so that the darkest color is the one that is pressed through the stack creating the pattern.

Roll the stack with the Acrylic Clay Roller to flatten it.

Press the stack through the pasta machine on the thickest setting or roll the stack flat with the Acrylic Clay Roller to double its size.

Divide the sheet in half with the Clay Blade.

Stack the two halves one on top of the other.

Press the stacked sheet through the pasta machine on the thickest setting or roll with the Acrylic Clay Roller to double the size.

Divide the sheet in half with the Clay Blade.

Stack one half on top of the other. Roll with the Acrylic Clay Roller to seal the two sheets together.

Here is how the layered sheet looks from the edge. There should be four layers of each color.

Use the circle cutters to create a random pattern in the clay. Start with the largest size circles and add smaller circles. Press the cutters all the way through the sheet to the work surface below. If pieces stick inside the cutters, carefully push them out with your fingertips and replace them in the pattern.

Use the blunt end of the Blunt Point Tool to poke random holes in the pattern as shown. Make sure the holes go all the way through to the work surface below.

Use the Acrylic Clay Roller to flatten the sheet once again. This will help the pieces all connect back together.
Use the flexible Clay Blade to slice the very top layer of clay away from the sheet. When the piece that is sliced is flipped over, the pattern will be revealed. Only slice very thin slivers off the top so that you will have a sheet thick enough for your earrings.
Use the flexible Clay Blade to slice the very top layer of clay away from the sheet. When the piece that is sliced is flipped over, the pattern will be revealed. Only slice very thin slivers off the top so that you will have a sheet thick enough for your earrings.

Continue removing thin slices from the surface until all of the pattern is revealed.

If you flip the sheet over, you will see that the pattern is reversed on the back.

This side of the sheet can be carefully sliced as well and will yield a different color pattern. This makes the earrings have more interest since they are patterned on both sides.
When you are done slicing, roll the sheet with the Acrylic Clay Roller on both sides so that the sheet is very smooth.
When you are done slicing, roll the sheet with the Acrylic Clay Roller on both sides so that the sheet is very smooth.

To make the pieces for the earrings, start first with a 1-1/2” (38mm) circle cutter. Then cut the circle in half with the Clay Blade.

Make a sheet of Galaxy Glitter through the thickest setting of the pasta machine 1/8” (3.2mm) thick. Cut out the 1-1/2” (38mm) circle from the sheet. Cut the 3/4” (19mm) circle out of the center of the larger circle.

Cut the Galaxy Glitter circles in half. Lay out the earring design as shown.

Poke holes in the pieces using your Needle Tool or the Blunt Point Tool. Make sure the holes are large enough to accommodate your jump rings.
Bake the pieces following the baking instructions for Sculpey Premo. Allow the pieces to cool completely.
Bake the pieces following the baking instructions for Sculpey Premo. Allow the pieces to cool completely.

Here is a look at the way the earrings will be assembled.

This is a look at the back of the earrings for assembly.

Use flat nose pliers to open and close the jump rings to assemble as shown.

Here’s a look at the back of the completed earrings.


