

Sculpey Premo™ Mokume Gane Umbrella Earrings
Sculpey Premo™ Mokume Gane Umbrella Earrings
Designed by Amy Koranek
Read More
Read Less
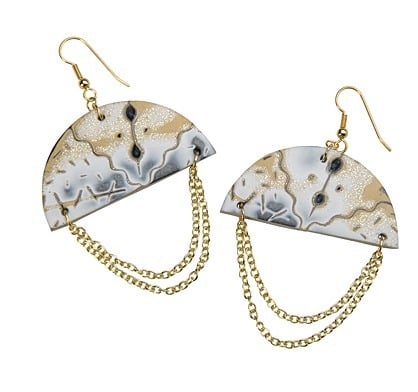
Premo Sculpey® neutral colors team up to create an exceptional Mokume Gane pattern for these umbrella earrings.
ADDITIONAL SUPPLIES
- Gold tone ear wires (2)
- Gold tone small jump rings (4)
- Gold tone medium jump rings (4)
- 3” Gold tone chain (2)
- 2” Gold tone chain (2)
- Wire cutters
- Flat nose jewelry pliers

Project Instructions
- Getting Started:
Start with clean hands, unwrap and knead clay until soft and smooth, or condition by running clay though a Pasta Machine. We recommend using a designated machine for clay purposes only. When working with multiple colors, clean hands with soap and water or baby wipes (we have found that baby wipes work best) before switching colors. Shape clay, pressing pieces firmly together. Wash hands after use.
- Baking:
Sheet each of the Premo colors through the pasta machine on the thickest setting. Cut out pieces that are about 2” x 2” from each color sheet.

Pile the colors up as shown. I like to put the darkest color on top because it is the one that will carry the design through the other colors later and will show up the best.

Flatten the entire stack of colors with the Acrylic Clay Roller to thin it enough to press easily through the pasta machine’s thickest setting and also to press out air bubbles from between the layers.

Sheet the pile through the pasta machine on the thickest setting again. This time cut the sheet in half with the Super Slicer.

Layer one half over the other keeping the colors in order and lining up the straight edges as shown.

Press the new stack through the pasta machine again on the thickest setting.

Cut the sheet in half again and layer one half on top of the other as you did in Step 6. Roll over them with the Acrylic Clay Roller just enough to seal them together, press out air bubbles, and to help the striped sheet stick down to the work surface.

Using the Wave Blade Super Slicer, cut through the stack up and down and side to side as shown.

Use your tools to add more designs: In the top left and bottom right corners impress the side of the knife tool making a double edged line.
Criss-cross this double line with the straight rubber tipped tool.
Make little speckles in the outer areas of these two spaces with the Needle Tool.
In the top right and bottom left corners use the Needle Tool to score a line through the middle area.
Use the 6 mm Ball Tool to press divots in this line.
Add little dots with the 2 mm Ball Tool.

Do not lift the clay up yet. Leave it in place and roll over it with the Acrylic Clay Roller to heal up the cuts most of the way. Its okay if you can still see ghosted images of the impressions and cuts that you made.

Use the Flexible Super Slicer to carefully shave away the very top layer from the clay slab. This layer will be mostly Graphite Pearl but as you shave it away and flip it aside the awesome pattern will be revealed. Shave an even layer away from the surface of the design. Roll over it with the Acrylic Clay Roller to make sure the top is very smooth.

Use the 2” Circle Cutter to cut out a circle shape from your favorite part of the design.

Use the Rigid clay blade to cut the circle in half. Smooth all cut edges with your fingertips.

Decide how you will like the half circles to appear in your finished design.

Poke holes at the top middle of each half circle. Poke a hole in the bottom corner of each half circle for later assembly with jump rings. To make really neat holes, poke from the front to back with either the Needle Tool or the 2mm Ball Tool. Then repeat with the same tool poking from the back to front.
Bake the pieces following the baking instructions for Premo. When they are completely cool the are ready to assemble as shown.
Add two small jump rings in series to the top hole. Add the ear wire to the top jump ring. Repeat on the other half circle.
Add medium jump rings to each of the bottom holes. Add a length of 3” and a length of 2” chain to dangle from each set of jump rings. Use flat nose pliers to open and close jump rings.
