
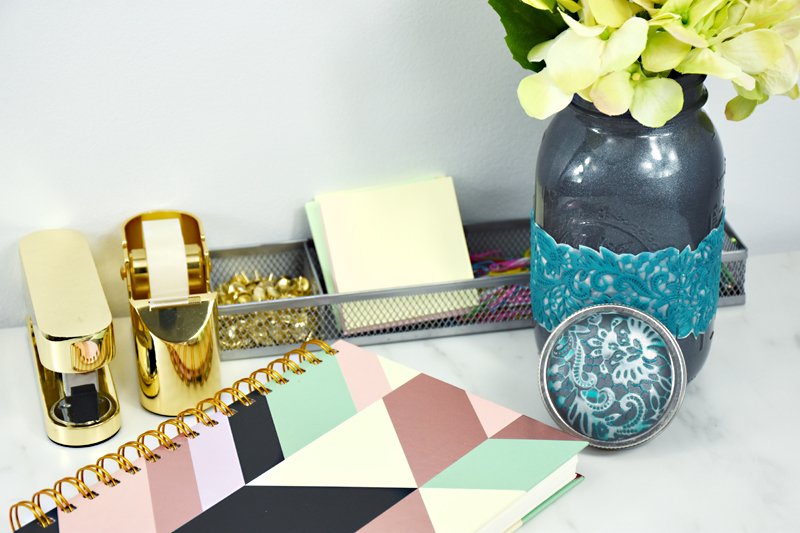
Premo Sculpey™ and Liquid Sculpey® Lacy Storage Jar
Premo Sculpey™ and Liquid Sculpey® Lacy Storage Jar
Designed by Amy Koranek
Read More
Use the Sculpey Lace Silicone Mold to mold beautiful lace pieces and to impress a texture into your Mokume Gane slab to make a perfectly matched jar and lid combination.
Read Less
ADDITIONAL SUPPLIES
- Glass canning jar with seal and sealing ring - clean and dry
- Silicone Glue
- Rubberbands
Project Instructions
- Getting Started:
Start with clean hands, unwrap and knead clay until soft and smooth, or condition by running clay though a Pasta Machine. We recommend using a designated machine for clay purposes only. When working with multiple colors, clean hands with soap and water or baby wipes (we have found that baby wipes work best) before switching colors. Shape clay, pressing pieces firmly together. Wash hands after use.
- Baking:
In a small disposable bowl (or silicone bowl), mix some of the Pearl Liquid Sculpey with a very small amount of Black Liquid Sculpey to create a Graphite Pearl type color. a small amount of Graphite Pearl Liquid Sculpey (LS) into the bottom of the jar. Tilt and swirl the jar until the inside is evenly coated. Add more LS as needed to coat the entire inside of the jar. Bake the jar following the baking instructions for LS.

Fill the Silicone Lace Mold with Peacock Pearl LS. Squeegee off excess LS and scrape it back into the bottle if possible. Bake the silicone mold following the baking instructions for LS.

When the mold is completely cool, leave the Peacock Pearl layer in the mold and cover the back of it with an even layer of Pearl LS. This will make a double layer of LS colors in the mold. Bake the silicone mold again following the instructions for LS.

When the mold is completely cool, gently peel the baked lace out by gently flexing the mold.

Carefully trim the excess baked Pearl LS away from the lace edges. Trim leaving a little edge of Pearl all along the decorative edge but trim the Pearl flush on the straight ends

Bend the lace piece around the jar to see how it fits. Repeat Steps 3-6 to make a second lace piece if you like. My jar has two pieces wrapped around it

Next we’ll make a Mokume Gane lid to match. Sheet 1/2 block each Peacock Pearl, Graphite Pearl, Pearl, and White Gold Glitter Premo through the pasta machine on the thickest setting. Make your sheets relatively even in size.

Layer the sheets as shown.

Flatten the pile of sheets with the Acrylic Clay Roller to thin them and seal them together. Thin the slab enough with the roller that it goes easily through the pasta machine. Sheet them together through the pasta machine on the thickest setting. Cut the striped sheet in half using the Rigid Blade Super Slicer.

Layer one half on top of the other. Roll with the Acrylic Clay Roller to seal and thin.

Sheet through the pasta machine again on the thickest setting. This time divide the sheet into four sections.

Layer the four sections on top of each other.

Roll over the slab with the Acrylic Clay Roller just enough to seal the sections together and smooth out air bubbles. The piece should be large enough to accommodate the size of the lid seal.

Use the Silicone Lace Mold like a texture sheet to impress the lace design into the slab. Impress the design as deeply as you can with hand pressure first. When the mold has bitten into the clay you can roll over it with the Acrylic Clay Roller to make the design deep and even.

If you like you can prepare a separate sheet of clay to catch the slices that will be removed from the Mokume Gane stack. I sheeted the remaining White Gold Glitter Premo through the pasta machine on the thickest setting to catch my slices. Carefully slice the texture away from the slab with the Flexible Super Slicer Blade.

Flip the slices over onto the extra sheet of Frost White Glitter if you like. That way you can use the slices in another project. The slices are really pretty and I don’t like to waste them.

Continue carefully slicing away the raised areas until the entire design is one even layer. Roll over it gently with the Acrylic Clay Roller to smooth it.

Use the ring from the lid to determine which area of the Mokume Gane slab you would like to use.

Using the sealing lid as a template cut this circle out with the sharp 5-in-1 Blade.

Push the clay disk into the sealing ring so that it marks the inner edge of the sealing ring into the clay.

Remove the sealing ring to see that the line is visible in the clay. Trim along this line with the sharp blade

Sheet Graphite Pearl Premo through the pasta machine on the thickest setting. Cut out a disk using the sealing ring as a template.

Glue the Graphite Pearl disc on top of the seal with silicone glue. Place the seal inside the sealing ring so that the clay disc shows above the ring. Smooth the edges of the clay disc with your fingertips.

Place the Mokume Gane disc on top of the Graphite Pearl disc. Make sure they are sealed well together

Smooth the edges of the Mokume Gane disk down around the edges with your fingertips. It’s ok if the edges of the patterned disc go over the sealing ring now because the clay has been glued to it and the sealing ring will not be removed again

Bake the lid following the baking instructions for Premo. When the lid is completely cool you can place it back on the jar.

Place the lace pieces on the jar. Decide how you want them to lay out. I started and stopped my lace pieces at the markings on the sides of the jar and trimmed the pieces so they did not overlap.

Glue the lace pieces into place with silicone glue. Hold them onto the jar while the glue dries with rubber bands.

When the glue is completely dry you are ready to enjoy your coordinating storage jar. The jar is great for storing office supplies or clay tools but should not be considered food safe.
