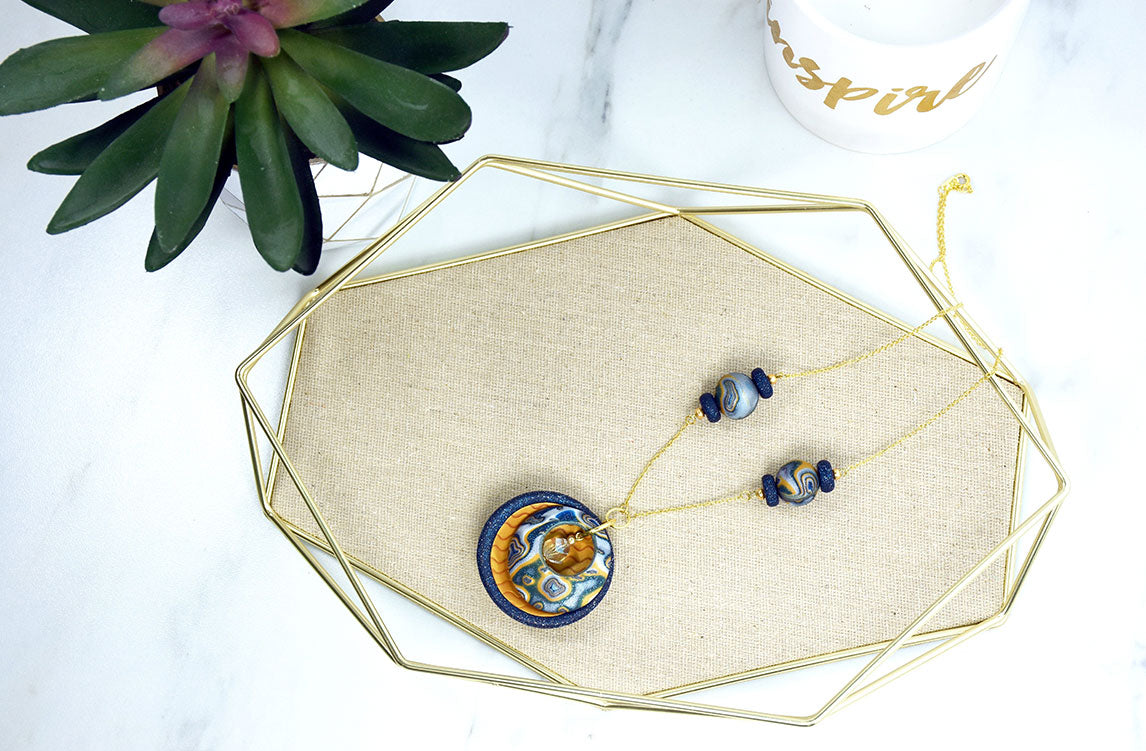
Sculpey Premo™ Glittering & Gold Necklace
Sculpey Premo™ Glittering & Gold Necklace
Read More
Read Less
Combine Galaxy Glitter with Pearl colors to produce a shimmering other-worldly design.
ADDITIONAL SUPPLIES
- Gold tone seed beads (6)
- Round nose pliers
- 2 - 2 inch eye pins
- Gold necklace chain
- Gold clasp
- 2 - 4 mm jump rings
- 2 - 6 mm jump rings
- Large jump ring
- Optional - 1 inch head pin and crystal bead

Project Instructions
- Getting Started:
Start with clean hands, unwrap and knead clay until soft and smooth, or condition by running clay though a Pasta Machine. We recommend using a designated machine for clay purposes only. When working with multiple colors, clean hands with soap and water or baby wipes (we have found that baby wipes work best) before switching colors. Shape clay, pressing pieces firmly together. Wash hands after use.
- Baking:
Sheet equal amounts (1/8 bar) of each color through the Clay Conditioning Machine on the thickest setting.

Stack the colors as shown.

Flatten the stack with the Acrylic Clay Roller so that it is thin enough to pass through the Clay Conditioning Machine. Sheet the stack on the thickest setting.

Cut the stack in half and re-stack the two pieces. Sheet on the thickest setting again.

Cut the stack in half and re-stack the two pieces.

Cut the stack in half again and stack again so there are four striped layers stacked on top of each other. It's okay if the pieces are not completely uniform.

Position the stack in front of you on your work surface. Form the sides up with your hands so that there are not sharp edges. I like to place my darkest color on the top as shown. Press the 12mm Ball Tool hard into the stack making big divots randomly.

Press the 6mm Ball Tool hard into the stack making random divots.

Repeat this process with the 2mm Ball Tool.

Push the sides inward with your hands and the divots will start filling up.

Roll over the top of the stack with the Acrylic Clay Roller using enough pressure to help the divots heal. It's okay if they don't close up completely.

Carefully slice through the stack - parallel with the stripes - not more than 1/8" thick with the Flexible Blade. When you open up the slice, the beautiful Mokume Gane pattern will be revealed.

Press a slice of the pattern through the Clay Conditioning Machine to the second thickest setting. Cut out a 1.5" circle from the patterned clay. Cut the middle out off-centered using the 3/4" circle cutter.

Press the circle design onto the largest dome of the Hollow Bead Maker. Bake the piece on the Hollow Bead Maker following the baking instructions in Step 1. When the piece is completely cool, carefully remove it from the Hollow Bead Maker by popping it off with your fingernail.

Sheet another piece of the Mokume Gane pattern slice through the Clay Conditioning Machine to the second thickest setting. Cut out four 3/4" circles. Make two 3/8" balls from Galaxy Glitter. Place two of the small patterned circles on one of the balls shaping the circles to the sides of the ball. Roll the ball in the palm of your hands to smooth. Repeat for the second Galaxy Glitter ball.

Pierce the patterned balls with one of the skewers from the Bead Baking Rack. Also make four simple disc shaped beads from Galaxy Glitter for spacer beads. Pierce and bake these as well. Bake the beads following the baking instructions in Step 1. When the beads are completely cool, carefully remove them from the skewer.

Sheet 1/4 block of Gold through the Clay Conditioning Machine on the thickest setting. Fold the sheet in half so it is double thick. Roll it with the Acrylic Clay Roller to smooth the layers together. Cut through the slab of Gold clay with the wave blade in parallel cuts.

If the little rows are coming apart, carefully push them back together. Roll the sheet with the Acrylic Clay Roller healing the cuts so they are less visible.

Slice through the Gold slab with the Flexible Blade across the cuts. When you remove the slice and turn it over, you will see the image of the waves in the clay. This is where the mica in the Gold Premo has pooled creating the illusion of lines.

Sheet one of the pieces through the Clay Conditioning Machine on the second thickest setting. Sheet a piece of Galaxy Glitter through the Clay Conditioning Machine on the second thickest setting as well. Cut out a 1.75" circle from the Galaxy Glitter and a 1.75" circle from the wave Gold sheet. Place the Gold sheet inside the Galaxy Glitter sheet and carefully seal up the seem with your fingertip.

Cut out a 2" circle making a dark border around the Gold waves.

Press the piece into the back of the largest dome of the Hollow Bead Maker making sure to press air bubbles out from the middle.

Carefully place the cured Mokume Gane pattern piece over the top so that both pieces are curved toward each other.

Line up the Mokume Gane piece high in the back piece. Use the 2mm ball tool to mark the location through the open hole in the front piece where a hole will go in the back piece.

Carefully remove the Mokume Gane pattern piece and set it aside. Make sure the hole in the back piece is neat and open. Bake the clay backing in the Hollow Bead Maker following the baking instructions in Step 1. When the piece is completely cool gently remove it from the dome.

OPTIONAL: Next make the bead charm for the center of the design. String a 1" head pin through a gold seed bead, clear crystal bead, and then another gold seed bead. Curl the tail into a loop tightly to the top bead with round nose pliers.

String a 2" eye pin through a gold seed bead, spacer bead, Mokume bead, spacer bead, and finally another seed bead. Trim the tail of the eye pin. Curl a loop in the remaining tail tightly to the seed bead with round nose pliers. Repeat to make a second set.

Hook the clasp on the gold necklace chain. Cut the gold necklace chain in half directly opposite the clasp. Cut off a 1.5" section of chain from each of the cut ends. Set these aside. Connect the Mokume patterned set to the end of the necklace chain with a 4mm jump ring. Repeat with the second set on the other end of the necklace chain.

Connect the front and back domed pieces and the dangle charm (optional) together with the large jump ring.

Connect a 1.5" chain piece to each of the Mokume patterned sets with a 4mm jump ring. Connect these to the pendant piece by adding a 4mm jump ring to each end of the chain and then placing both of those on a 6mm jump ring. Connect the 6mm jump ring to the large jump ring in the pendant piece.
