
Sculpey III® Wrapped Candy Ornament
Sculpey III® Wrapped Candy Ornament
Designed by Amy Koranek
Read More
Read Less
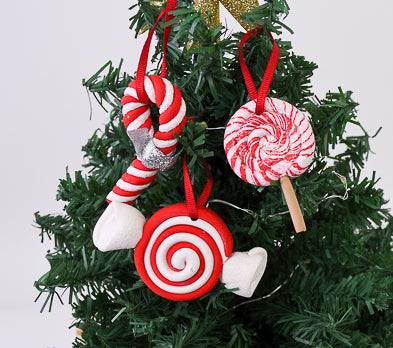
Fill the tree with bright red and white ornaments this season with a candy theme.
COMPLETION TIME:45 Minutes to make and bake
ADDITIONAL SUPPLIES
- Iridescent glitter
- Cotton swab
- Rubbing alcohol
- 8” Coordinating ribbon
- Scissors

Project Instructions
- Getting Started:
Start with clean hands, unwrap and knead clay until soft and smooth, or condition by running clay though a Pasta Machine. We recommend using a designated machine for clay purposes only. When working with multiple colors, clean hands with soap and water or baby wipes (we have found that baby wipes work best) before switching colors. Shape clay, pressing pieces firmly together. Wash hands after use.
- Baking:
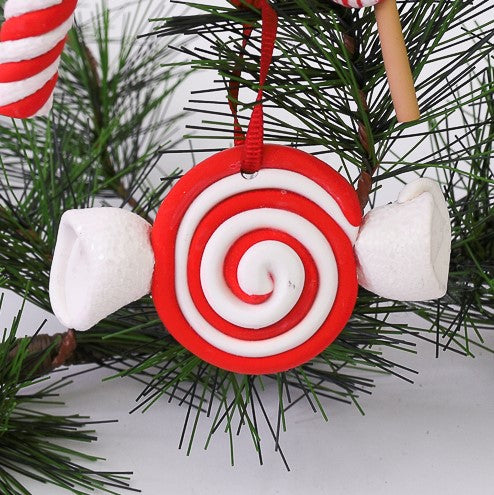
From 1/8 bar of White and 1/8 bar of Red Hot Red, roll out long ropes 6” long. Flatten the ropes with the roller.
Pinch the flat ropes together side by side. Clean your hands often so that the Red Hot Red transfer onto the White is kept to a minimum. Bend the end of the Red Hot Red over the end of the White.
Pinch the flat ropes together side by side. Clean your hands often so that the Red Hot Red transfer onto the White is kept to a minimum. Bend the end of the Red Hot Red over the end of the White.

Spiral the clays together into a disk shape.

Make another thin flat sheet from 1/16 bar of White. Sprinkle iridescent glitter onto the White sheet.
Spread the glitter all over the surface of the sheet with your fingertips.
Cut the flat sheet in half at an angle with the knife tool.
Spread the glitter all over the surface of the sheet with your fingertips.
Cut the flat sheet in half at an angle with the knife tool.

Roll the little piece of clay up with the glitter on the outsides. Pinch one end of the piece to a point. Repeat for the second piece as well.

Poke two holes in the sides of the candy opposite each other with the Blunt Point tool. Ream the holes to make them large enough to accommodate the wrapper pieces. Poke the pinched points of the wrapper from Step 7 into each hole.
Dampen the cotton swab with rubbing alcohol. Carefully use the damp tip to remove any Red Hot Red stains from the White.
Dampen the cotton swab with rubbing alcohol. Carefully use the damp tip to remove any Red Hot Red stains from the White.

Poke a hole in the candy with the Blunt Point tool to the hanging ribbon. Bake the candy following the baking instructions for Sculpey III®.

Add a ribbon to the candy when it is completely cool. Tie an overhand knot and trim the tails.
