
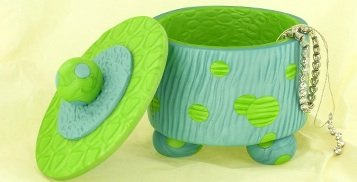
Sculpey Premo™ Mica Shift Trinket Box
Sculpey Premo™ Mica Shift Trinket Box
Read More
This Trinket Box is a lovely addition to any room in your home. The mica shift technique makes it a very special conversation piece.
Read Less
ADDITIONAL SUPPLIES
- Masking tape
- Craft knife with #11 blade
- 12" metal ruler
- Deli wrap or waxed paper
- Cornstarch and brush
- Alcohol swabs, or rubbing alcohol
- Paper towels
- Section of cardboard tube – 2 ¾” diameter by 2” high
- Jacquard Products Pearl Ex powders: Brilliant Yellow, Duo Blue-Green
- Coarse 180-grit sandpaper
- Round cookie cutters
Project Instructions
- Getting Started:
Start with clean hands, unwrap and knead clay until soft and smooth, or condition by running clay though a Pasta Machine. We recommend using a designated machine for clay purposes only. When working with multiple colors, clean hands with soap and water or baby wipes (we have found that baby wipes work best) before switching colors. Shape clay, pressing pieces firmly together. Wash hands after use.
- Baking:
To make the box - cut length of cardboard tube about 2" high. Wrap with deli paper or computer paper (not waxed paper). Secure paper on the inside of the tube with masking tape.

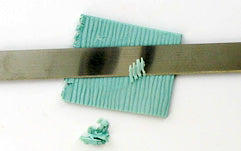
Dust clay surface with cornstarch to prevent sticking. Texture clay by pressing with rubber stamps, acrylic texture plates, or other texture tools; press into only about 1/4 of the thickness of the clay. Lay textured sheet on work surface with one edge overlapping a sheet of deli wrap. Hold the flexible blade by each short edge with the sharp side facing toward you. Move your hands toward each other to flex the blade in a wide "U" shape. Use this curved blade to scrape away the textured surface of the clay, shaving off a little bit of the surface at a time. For best results, hold the bottom edge of the blade parallel to the surface of the clay, and scrape off small pieces with each cut. Keep the blade clean by putting the scrapings in a heap to the side of your sheet, and by periodically cleaning the blade with the alcohol swabs. When most of the texture has been scraped away, run the sheet through the Clay Conditioning Machine on successively thinner settings just until the surface is smooth, or roll with acrylic roller. Lay this patterned sheet on top of another layer of clay (preferably the same color) that was rolled at the thickest setting on the pasta machine. Using acrylic roller, press both sheets together, taking care not to allow any air bubbles between the sheets.
The box is baked several times throughout the construction. At each step, bake at 275 °F for 30 minutes. You can work on the next step while the box is baking to save time.
Slice 1 oz. Pearl clay with rigid blade. Condition clay, adding small amounts of Yellow clay, Bright Green Pearl clay, and Brilliant Yellow mica powder to make a bright green color. Roll out clay to widest setting on the Clay Conditioning Machine, about 3" wide and 10" long. Use the mica shift technique to create a 3" x 10" patterned sheet. Trim one long edge, and measure up 2" and trim the other long edge. Curve this sheet around the paper-covered cardboard tube, pattern side in. Overlap the short edges, trim, and smudge the seam together. Bake. While baked clay is still warm, carefully remove armature. Sand outside and bottom edge with coarse sandpaper. Make a 3" x 3" mica shift patterned sheet with Bright Green clay. With roller, adhere patterned sheet to baking surface. Apply Oven Bake Clay Adhesive to bottom edge of inside box wall, and press wall firmly into raw clay. Trim around bottom edge with craft knife. Bake. Allow to cool completely before removing from the baking surface.
Using rigid blade, slice 8 oz. Pearl clay and condition with Duo Blue-Green mica powder until a bright blue color is achieved. Roll a sheet that is large enough to cover the exterior of the box, and pattern it with the mica shift technique. If desired, use small round cutters to remove pieces of Blue clay, cut out pieces of Green clay with the same cutter, and insert Green circles into Blue holes. Add a thin film of Oven Bake Clay Adhesive to the sanded exterior of the box, place clay on outside of box, patterned side out, and trim. Bake.

Sand box bottom where feet will be attached with coarse sandpaper. Make 3 feet from same-size balls of clay. Position the feet on the baking surface, add a drop of Oven Bake Clay Adhesive to the top of each foot, and press the box top onto the feet. Bake.

Roll a double thickness of clay and use Acrylic Roller to adhere to the baking surface, and cut with round cutter (or any shape you want) slightly bigger than the diameter of the box base. Bake.
Sand the center of the inside of the lid with coarse sandpaper, add a film of Oven Bake Clay Adhesive to the sanded area, and add a double-thickness of clay to the center of the lid (you want to see the edges of the lid). Press the top of the box bottom into the raw clay to make a pattern. Trim inside the impressed edge and remove all excess clay. Smooth the inset and bake.
Decorate the box lid with more layers of clay, baking between steps as desired. Make a round ball for the lid handle; shave off one side, apply Oven Bake Clay Adhesive, and bake.
