
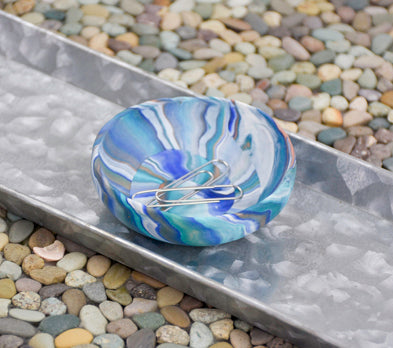
Sculpey Premo™ Marbled Coil Dish
Sculpey Premo™ Marbled Coil Dish
Designed by Amy Koranek
Read More
Read Less
Make this awesome little bowl in an afternoon! You can change up the colors to create new and wonderful designs of your own for all your friends.
TIME TO COMPLETION:60 minutes
ADDITIONAL SUPPLIES
- Metal or glass bowl form
Project Instructions
- Getting Started:
Start with clean hands, unwrap and knead clay until soft and smooth, or condition by running clay though a Pasta Machine. We recommend using a designated machine for clay purposes only. When working with multiple colors, clean hands with soap and water or baby wipes (we have found that baby wipes work best) before switching colors. Shape clay, pressing pieces firmly together. Wash hands after use.
- Baking:
These instructions are based on 1 ounce bars of each color. From 1/2 bar (1/2 ounce) of each color make a log 1/4” thick.

Bundle the logs together with sides touching as shown.

Roll and twist the bundle to smooth the sides and make a striped rope.

Fold the rope in half and then in half again.

Roll and twist the rope again to make it longer and to multiply the stripes. You can repeat Step 5 (folding in half and half again) to make more and more stripes.

The more you fold, roll, and twist, the more stripes you will have and the more the colors will blend.

Coil the rope up.

Flatten the coil with the Tube Roller to make a flat patty no more than 1/4” thick.

Decide which side of the patty you prefer. The preferred side should go against the bowl form because it’s the inside of the dish that you will enjoy the most.
Bevel the edge of the patty all the way around to make it thinner with your fingertips.
Bevel the edge of the patty all the way around to make it thinner with your fingertips.

Check the edges and make sure they are nice and neat.

Form the clay to the bottom of a glass or metal bowl to give it shape with the preferred side toward the form. If you want the bottom of your little clay dish to have a flat bottom, press down on the clay dish against the work surface to flatten it. Bake the clay on the bowl form following the baking instructions in Step 1 above. When the bowl is completely cool, carefully pop the clay dish off of the form with your fingertips

- Choosing a selection results in a full page refresh.
- Opens in a new window.