
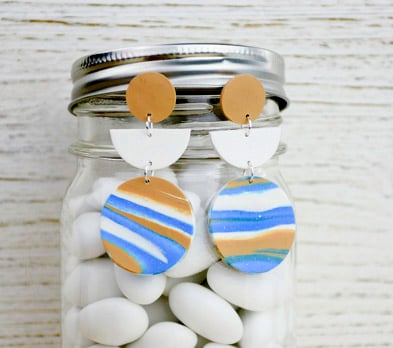
Sculpey III® Glitter Marbled Earrings
Sculpey III® Glitter Marbled Earrings
Designed by Gretchen Amberg
Read More
Read Less
These eye-catching earrings feature a bit of bling from the Sculpey III® glitter clays. They are so quick and easy to make, you will want to make a pair for your BFF!
ADDITIONAL SUPPLIES
- Pair silver-tone earring posts
- 4 pcs 6 mm silver-tone jump-rings
- Small chain nose-pliers
- Needle tool or toothpick
- Circle cutters 5/8” and 7/16”
Project Instructions
- Getting Started:
Start with clean hands, unwrap and knead clay until soft and smooth, or condition by running clay though a Pasta Machine. We recommend using a designated machine for clay purposes only. When working with multiple colors, clean hands with soap and water or baby wipes (we have found that baby wipes work best) before switching colors. Shape clay, pressing pieces firmly together. Wash hands after use.
- Baking:
Condition 1/2 block of Tan clay and roll out a sheet on a thin setting. Cut two 7/16” circles. Remove the extra clay and set it to the side. Use a toothpick or needle tool to poke a small hole through the center of each circle.

Adjust the setting on the Clay Conditioning Machine to a medium/thin setting. Gather the excess clay from Step 2 and roll through the Clay Conditioning Machine. Cut out two 5/8” circles.
Place an earring post on the back of each of the 5/8” circles that you just created. Place the post so it is off center towards one side of the circle.
Pick up one of the 7/16” circles. Line up the earring post with the hole in the 7/16” circle of clay. Slide the 7/16” circle of clay down the post and press onto the 5/8” circle. The disc portion of the post should be sandwiched between the two circles of clay. Repeat with the two remaining circles of clay.

Use the toothpick or needle tool to poke a hole close to the edge of each circle assembly. Try to place the holes so they are close to the same place in relation to the earring posts.

Condition 1/2 block of White Glitter clay. Roll out a sheet of clay on the same setting as Step3. Cut out one 1” circle. Use the blade to cut the circle in half. Use a toothpick or needle tool to poke a small hole through both the top and bottom of each half-circle of clay. Place the holes as close to centered and opposite each other as possible.

Condition 1/2 block of Blue Glitter clay. Roll the Blue Glitter clay and the left-over Tan and White Glitter clay from the previous steps into small logs. Press the three logs of clay together and twist until you have a marbled pattern.

Use your hands to flatten the wad of clay. Roll the clay through the machine one-time. Cut two 1.250” circles of clay. Use a toothpick or needle tool to poke a small hole towards the top of each circle. Bake these marbled circles plus the White Glitter and Tan pieces for 20 minutes and let cool completely.

Use the small chain-nose jewelry pliers to open the jump-rings. Open the jump-rings sideways rather that opening them by widening the gap between the two wire ends (because opening the rings by widening the gap can distort the shape of the ring!)

Slide a large marbled clay circle onto the jump-ring. Slide the hole in the rounded end of one of the White Glitter half circles onto the jump-ring. Repeat with the other two marbled and White Glitter pieces. Use the pliers to gently close the rings.

Use the pliers to gently close the rings.

Repeat step 9 to attach the Tan post pieces to the other side of the White Glitter half circles. Once all the clay pieces are attached and the jump-rings are closed, you are finished.
