
Sculpey®III and Liquid Sculpey® Mandalagon Frame
Sculpey®III and Liquid Sculpey® Mandalagon Frame
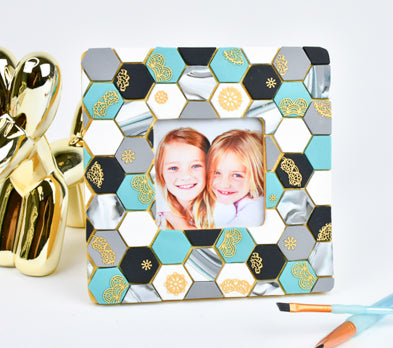
Designed by Amy Koranek
Read More
Read Less
This frame boasts an interesting combination of textures, patterns and color that is sure to be just perfect to show off your photos.
ADDITIONAL SUPPLIES
- Wood frame
- Sandpaper for wood 300 grit
- Gold acrylic paint
- Paintbrush
- Paper towel
- Alcohol
- Small sharp scissors
Project Instructions
Getting Started with Sculpey® Clay:
Start with clean hands, unwrap and knead clay until soft and smooth, or condition by running clay though a Pasta Machine. We recommend using a designated machine for clay purposes only. When working with multiple colors, clean hands with soap and water or baby wipes (we have found that baby wipes work best) before switching colors. Shape clay, pressing pieces firmly together. Wash hands after use.
Getting Started with Liquid Sculpey
Stir Liquid Sculpey® completely. Thin with Sculpey® Liquid Clay Softener as needed - Wash hands after use (we have found that baby wipes work best) .
Start with clean hands, unwrap and knead clay until soft and smooth, or condition by running clay though a Pasta Machine. We recommend using a designated machine for clay purposes only. When working with multiple colors, clean hands with soap and water or baby wipes (we have found that baby wipes work best) before switching colors. Shape clay, pressing pieces firmly together. Wash hands after use.
- Baking:
Getting Started with Liquid Sculpey
Stir Liquid Sculpey® completely. Thin with Sculpey® Liquid Clay Softener as needed - Wash hands after use (we have found that baby wipes work best) .
- Baking:
To prepare the frame, sand away rough edges as needed with sandpaper. Paint the edges and the back of the frame with gold paint.

Remove the cap from the Gold Liquid Sculpey® (LS) and stir thoroughly. Squirt Gold LS all over the face of the frame.

Spread the Gold LS with your fingertips or with the knife tool to cover the entire face of the frame in a thin layer. Set the frame aside for now. The LS will soak slightly into the wood grain making a nice surface for the clay tiles to adhere to.

Next, we will create the mandalas and bake them so they are ready to add to the frame later. Squirt a puddle of Gold LS into each of the cavities of the mandalas. Spread the LS into all the details with the provided squeegee or with your fingertips.

Use the squeegee to remove as much excess LS as possible. Wipe tools clean with paper towel.

Here’s a look at the mold showing how much of the excess Gold LS has been squeegeed away.

To get all the LS out of the tiny details or “windows” in the mandalas, we will next use a blotter. Fold one paper towel into a thick pad. Dampen the folded edge of the pad with rubbing alcohol.

Squeegee the back of the mold one more time with the pad. Bake the mandala mold following the baking instructions for LS. Allow the mold to cool completely before handling.

Each bar of Sculpey®III is marked into four equal portions. Mix 1.5 portions of White with 1.5 portions of Black to make Gray.
Sheet each Teal Pearl, White, Black, and Gray through the pasta machine or flatten with an Acrylic Clay Roller to not more than 1/8” thick. Cut out large hexagons from each color using the Large Hexagon Mosaic Cutter. The wood frame in my tutorial is approximately 8” square with a 4” photo opening. My frame requires 8 Black hexagons, 10 White hexagons, and 11 Teal Pearl hexagons.
The Hexagon cutters are so easy to use. Just press down evenly all the way through the clay with your hands. Give a little wiggle at the bottom to help the clay release from the cutter. Then pick the cutter up. If clay pieces stick in the cutter, just push them out with your fingertips. Arrange the cut out pieces on a piece of wax paper or deli paper. If you need to cut extras, you can line the cutter right up to the last cut and cut again. Save half hexagons and partial pieces in case you need them around the edges.

If you are sure you have enough of the solid color hexagons, then use the remaining scrap clays to make the marble color. Roll each color into a rope and assemble them into a larger rope as shown.

Roll and twist the rope to create stripes and to make the rope thinner - about 1/4” thick.

Fold the rope in half and in half again and repeat the rolling and twisting process again.

Fold the rope in half and in half again one more time. This process of rolling, twisting, and folding helps to multiply and to thin the stripes.

Gently roll just to make a thick rope.

I’m going for really muted marbling where the colors are really more muddled together. To get this look, I’m slicing the thick log open into three even slices. The colors inside the log are much more muted than on the outside which is what I’m looking for.

Position the three slices side by side and then flatten them with the Acrylic Clay Roller to the same thickness as the clay hexagons you cut out in Step 10. The rolling will help to mute the marbling even more. If you want to keep making the marbling even more muted, you can fold the sheet in half and roll it again.

When you are happy with the marbling, roll the sheet with the Acrylic Clay Roller to the same thickness as your sheets in Step 10, and cut out large Hexagons. For the 8” square frame I needed at least nine of the marbled pieces. Place the cut pieces on a piece of wax paper or deli paper to keep them organized.

Start at one of the corners of the frame and lay the hexagons across the top leaving 1/16” space between them. The Gold grout will show between the pieces. For now, just lay them in place. If you need to move them around, you can do so as long as you don’t push them down into position.

As you add rows, it’s easiest if you let the pieces hang over the sides of the frame. Then you can flip the frame over onto a piece of wax paper or deli paper to trim the pieces that go past the edges from the back.

Continue laying the hexagons all over the frame. Adjust the spacing as needed to get the look that you desire. Trim the pieces around the outside and inside edges. Use partial hexagons to fill in around the edges and the corners. When you are happy with the layout, make sure each individual hexagon is well seated in the Gold LS so that when baked, they will attach permanently.

Gently flex the mandala mold to release the mandalas. You can trim the mandalas to make more mandalas. The largest ones are the easiest to start with. Here I have clipped the centers out with small sharp scissors instantly going from two mandalas to four.

Next, trim the mandalas further so they fit neatly onto the hexagon shapes.

Add the mandala pieces as highlights to your frame. Make sure they are seated in the Sculpey®III hexagons with the background clay just slightly hugging the mandala pieces. Bake following the baking instructions for Sculpey®III. Allow to cool completely before handling.
