
Sculpey Premo™ Geometric Statement Necklace
Sculpey Premo™ Geometric Statement Necklace
Designed by syndee holt
Read More
Read Less
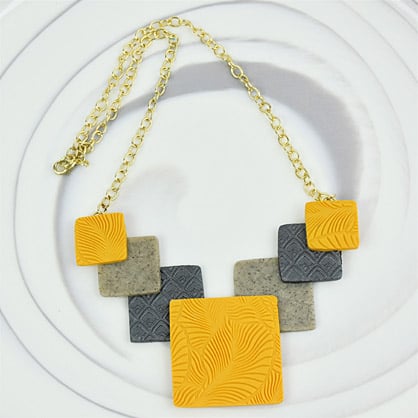
Premo Mustard adds the pop! To a neutral toned statement necklace created with Sculpey textures and cutters.
TIME TO CREATE: 90 minutes including baking
ADDITIONAL SUPPLIES
- Clean work surface
- Small spray bottle of water
- Instant glue
- 7 mm gold toned jump rings (4)
- Gold toned chain and clasp
- Jewelry tools
- Paper towel or micro-fiber towel
Project Instructions
- Getting Started:
Start with clean hands, unwrap and knead clay until soft and smooth, or condition by running clay though a Pasta Machine. We recommend using a designated machine for clay purposes only. When working with multiple colors, clean hands with soap and water or baby wipes (we have found that baby wipes work best) before switching colors. Shape clay, pressing pieces firmly together. Wash hands after use.
- Baking:
Sheet out half a package of the conditioned Mustard clay on the second from widest setting. Lightly spray your texture sheet with water and use the acrylic roller to press your selected texture into the clay. (NOTE: I like to cut my texture sheet apart into the individual patterns, but you don’t need to!) Remove the texture and gently blog any moisture from the clay with a paper towel or microfiber towel.

Cut your largest piece from the textured clay, using the 1.75 inch cutter. Leave room to cut out two smaller pieces if you can!

Cut out the two smaller squares with the .75 inch cutter. Set these pieces aside for now.

Sheet out a small piece of the conditioned Grey Granite on the same setting as the Mustard. Cut out a 1.5 inch square and a .75 inch square. Set aside.

Sheet out a portion of the conditioned Graphite Grey on the same setting. Lightly spray your selected texture with water and use the acrylic roller to press it into this sheet of clay.

Use the same cutters that you used in Step 6 to cut out two squares. (I show 3 different cutters because I cut out several sizes of each to play with the design after I baked the pieces!). BAKE ALL YOUR SQUARES ACCORDING TO THE DIRECTIONS IN STEP 1 ABOVE.

Once your squares are baked (or you can design before, just don’t press the pieces together. The style will be cleaner with flat piece if you bake the pieces individually and glue together after baking. You can see how these unbaked pieces are starting to bend.)

Once you have your design set but NOT glued yet. Take the two smaller squares at the top and flip them over and position a jump ring at the center top of each square. Add a drop of the bakeable bonding medium (formerly named Bake n’ Bond).

Cut a small piece of unbaked Mustard clay (I used the circle cutter from the Sculpey Mini Cutters- Geometric) and press it firmly over the jump ring as shown. Rebake these two pieces.

While those two pieces are baking, you can assemble the rest of your necklace. I used spare baked pieces to help prop my squares into place so that they would all glue flat. Finally, add your baked pieces and link your chain to the jump rings with the extra jump rings or use a link of your chain. Adjust for your desired length and add a clasp.
