
Sculpey Premo™ Faceted Beads Bracelet
Sculpey Premo™ Faceted Beads Bracelet
Designed by Amy Koranek
Read More
Read Less
This cool bracelet is so easy to make, you will want to make several in different colors!
COMPLETION TIME:45 Minutes to make and bake
ADDITIONAL SUPPLIES
- 9” Elastic string
- Scissors

Project Instructions
- Getting Started:
Start with clean hands, unwrap and knead clay until soft and smooth, or condition by running clay though a Pasta Machine. We recommend using a designated machine for clay purposes only. When working with multiple colors, clean hands with soap and water or baby wipes (we have found that baby wipes work best) before switching colors. Shape clay, pressing pieces firmly together. Wash hands after use.
- Baking:
From each bar remove a 1/8 size piece. Keep the pieces as neat and cube like as you possibly can. I did not condition the clay, instead I just cut the 1/8 size pieces from the bar so they would remain very neat.
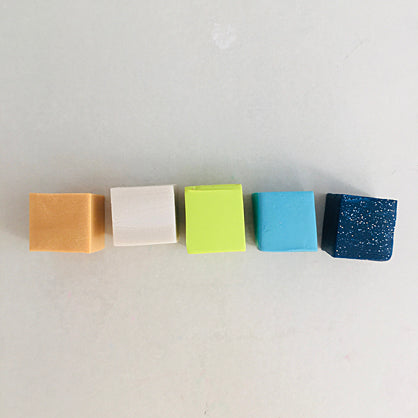
Shape the little pieces as needed with your fingertips to make them all even in size and shape.

Mark each of the cube shaped beads with a little hash mark across the center of each of the twelve edges. These hash marks will serve as little guidelines for cutting the corners off of the cube to turn them into faceted shapes.

Using the hash marks as guides, slice off each corner starting in the center of an edge and slicing toward the two hash marks directly across that will remove the corner.

Remove each corner.

Repeat for each of the cube beads.

Poke a hole using the Needle Tool through the flat sides of all the faceted beads.

Make each hole larger by pushing the Blunt Point Tool through the hole that you made in Step 8. This is to make sure that the bead holes are large enough to accommodate the stretchy string.

From 1/16 bar of Ecru, make twelve ball beads. Then flatten each one slightly to make them into spacer beads. Use the Blunt Point Tool to push holes through each one. You may need to make more sets of the spacer beads depending on how many you need to finish your bracelet. I needed 24 beads (2 sets) to complete my bracelet.

Bake all the beads following the baking instructions in Step 1 above.

When the beads are completely cool, string them onto the stretchy string.
Tie a knot in the stretchy string and trim with scissors.

- Choosing a selection results in a full page refresh.
- Opens in a new window.