
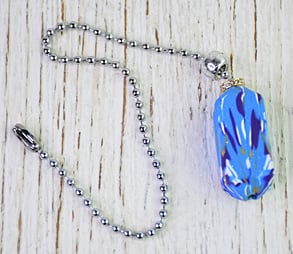
Sculpey III® Blue Glitter Fan Pull
Sculpey III® Blue Glitter Fan Pull
Designed by Amy Koranek
Read More
Read Less
The Mirror Image technique is a fun way to show off a cool pattern on all four surfaces of this oversized bead used as a stylish pull.
COMPLETION TIME:45 Minutes to make and bake
ADDITIONAL SUPPLIES
- Ball chain
- Silver pony bead
- Gold disc spacer bead with crystal
- Silicone glue
Project Instructions
- Getting Started:
Start with clean hands, unwrap and knead clay until soft and smooth, or condition by running clay though a Pasta Machine. We recommend using a designated machine for clay purposes only. When working with multiple colors, clean hands with soap and water or baby wipes (we have found that baby wipes work best) before switching colors. Shape clay, pressing pieces firmly together. Wash hands after use.
- Baking:
From 1/8 block of Blue Glitter, make a short thick log.
From 1/16 block of each Jewelry Gold, White, and Purple make logs the same length as the Blue Glitter.
From 1/16 block of each Jewelry Gold, White, and Purple make logs the same length as the Blue Glitter.

Bundle the logs together as shown.

Roll and twist the log to smooth it and to thin it. Keep rolling and twisting until the log is about 5” long.

Fold the log in half and then in half again. We are doing this so that we can multiply and layer the stripes.

Repeat Steps 4 and 5. At this point the stripes should not look very uniform.

Using finger pressure, form the log into a rectangular shaped bead with really flat sides, about 1.75” x .75” x .75”.

Use the Clay Blade to trim the ends off square. Set the cutoffs aside.

Use the Clay Blade to divide the rectangular bead right down the middle lengthwise. Once the bead is cut in half, open it up like a book.

The two sides, once opened, will produce an identical mirror imaged pattern - this is called Mirror Image or Natasha Technique. Push the two sides together so that they touch carefully matching the patterns.

As you look at the bead with the mirror image facing up, imagine dividing the right side of the bead and the left side of the bead each in half.
Cut the bead lengthwise halfway from the center line toward the right.
Cut the bead lengthwise halfway from the center line to the left. The middle section - which is the mirror image section - should be twice as wide as the sections on the left and on the right.
Cut the bead lengthwise halfway from the center line toward the right.
Cut the bead lengthwise halfway from the center line to the left. The middle section - which is the mirror image section - should be twice as wide as the sections on the left and on the right.

If you open the main bead and you open the piece you cut from one side in opposite directions, the mirror image pattern will be revealed again right along the cut edges. Push these together sides touching carefully matching the pattern.

Turn the bead and match the remaining piece that you cut in the previous step to the remaining side so that the cut lines form, once again, a mirror image pattern.

The fourth side of the bead should already be a mirror image if you reassembled the bead correctly.
Once all four planes of the bead have their mirror imaged patterns, press all sides together with your fingertips and smooth the seams. Make sure the bead is put back together compactly without gaps in the middle.
Once all four planes of the bead have their mirror imaged patterns, press all sides together with your fingertips and smooth the seams. Make sure the bead is put back together compactly without gaps in the middle.

Next we will make the bead look slightly faceted so it will have even more interest.
Use the Clay Blade to trim away all four corners from the bead as it faces you.
Use the Clay Blade to trim away all four corners from the bead as it faces you.

Roll the bead 1/4 turn, and again trim away all four corners. This should produce a pyramid shape at the top end and the bottom end of the bead. Blend all the cuts with your fingertips so they are neat.

Use one of the Etch’n Pearls to poke a hole all the way through the bead from end to end. Select your Etch ‘n Pearl so that the hole through the bead is large enough to accommodate the ball chain.
Bake the bead following the baking instructions for Sculpey III®. You may bake it on the Etch ‘n Pearl propped on the edge of the baking pan so that you won’t get a shiny spot from the bead touching the pan.
Bake the bead following the baking instructions for Sculpey III®. You may bake it on the Etch ‘n Pearl propped on the edge of the baking pan so that you won’t get a shiny spot from the bead touching the pan.

To attach the bead to the ball chain, string both the pony bead and the spacer bead onto the ball chain. Then slide the ball chain all the way through the clay bead. Carefully place silicone glue on the end of the ball chain and then pull that section of ball chain all the way up into the bead. Allow the glue to dry completely before installing as a fan pull.

- Choosing a selection results in a full page refresh.
- Opens in a new window.