
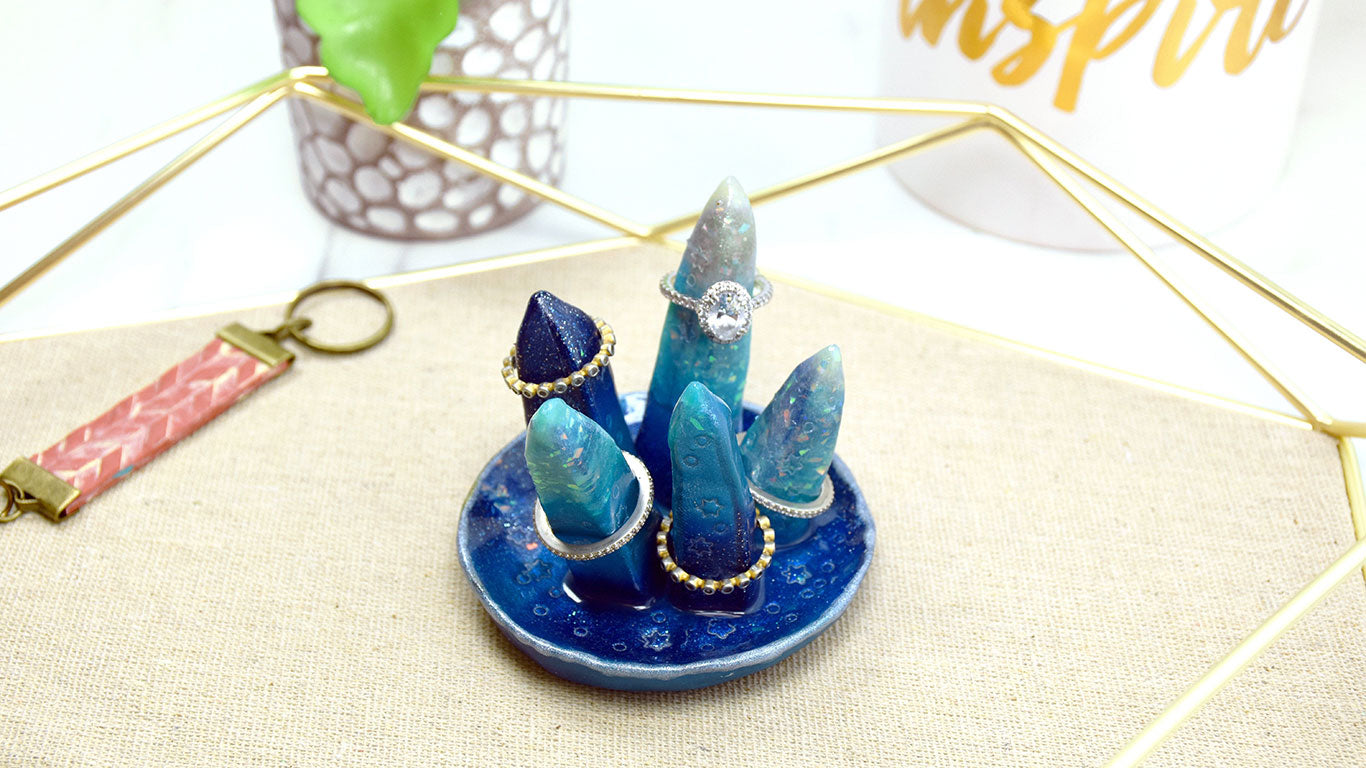
Premo™ Galaxy Crystal Ring Dish
Premo™ Galaxy Crystal Ring Dish
Read More
Read Less
Premo™ Galaxy Glitter, Peacock Pearl, and Opal make the perfect crystals for organizing your jewels!
ADDITIONAL SUPPLIES
- Glass plate
- Paper towel
- Paint brush
Project Instructions
- Getting Started:
Start with clean hands, unwrap and knead clay until soft and smooth, or condition by running clay though a Pasta Machine. We recommend using a designated machine for clay purposes only. When working with multiple colors, clean hands with soap and water or baby wipes (we have found that baby wipes work best) before switching colors. Shape clay, pressing pieces firmly together. Wash hands after use.
- Baking:
Roll 1/4 bar each Opal, Peacock Pearl, and Galaxy Glitter into ropes. Position them side by side and pinch them together so they stick to each other.

Press the ropes, short end first, through the Clay Conditioning Machine on the thickest setting.

Fold the sheet matching like color to like color and press through the machine again. Continue this process until the colors are slightly blended to your liking. Look how the Opal at the top blends into the Peacock Pearl and makes that fantastic glow! Set the Clay Conditioning Machine setting to the second thickest setting and thin the sheet placing the stripes through perpendicular to the rollers.

From the remainder of the unconditioned bar of Galaxy Glitter, cut some crystal shapes with the clay blades. I didn’t even condition the clay. I just laid the bar on its side and cut these out so they would be nice and angular. Make five of the crystal shapes in different heights and thicknesses.

Wrap each crystal shape in the sheet of striped clay. Smooth the seams with your fingers and wrap extra around the bottom. Trim as needed. Pinch the corners so the pieces still look angular.

Here’s a look at my wrapped crystals. I used different areas of my striped sheet so they all look a little unique.

Condition 1/4 bar of each color and some of the left over Galaxy Glitter into a marbled ball.

Flatten the ball into a pancake. Make the surfaces of the pancake smooth and even by pressing on it with a glass plate.

Pinch up the edges of the pancake with your fingertips to make a little saucer shape.

Stand the crystals up in the center of the saucer. Position them at little angles so they kind of appear to be growing out of the saucer.

Using tiny metal tubes, or a needle tool, make little impressions in the saucer and on the sides of the crystals.

Bake the crystal dish following the baking instructions in Step 1. Allow the piece to cool completely. Smear Silver Liquid Sculpey® (LS) into the little impressions that you’ve made so they will stand out from the background. Wipe away excess with a paper towel. Bake again for 20 minutes at 275° F to set the Silver LS.

Paint Sculpey® Glossy Glaze all over the surface of the piece if you want it to shine.

Allow the glaze to dry completely before loading your little crystal formation with your favorite jewelry.
