
Liquid Sculpey® Circular Motion Necklace
Liquid Sculpey® Circular Motion Necklace
Designed by Amy Koranek
Read More
Read Less
The Sculpey Tools™ Silicone Bezel Mold makes it easy for you to frame a Liquid Sculpey® technique.
TIME TO COMPLETE: 60 minutes
ADDITIONAL SUPPLIES
- Paper towels
- 12 mm Bright gold tone heavy jump rings (4)
- 6 mm Bright gold tone jump rings (2)
- 4 mm Bright gold tone jump rings (2)
- 20” Bright gold tone chain with clasp
- Wire cutters
- Jewelry pliers - flat nose
Project Instructions
- Getting Started:
- Baking:
Preheat the oven to 275F degrees and place the mold inside. While the mold is pre-heating, make sure the Gold Liquid Sculpey® is thin and flowing. Thin with Sculpey® Liquid Clay softener so that it is slightly runny. Always stir the liquids completely, especially when mixing softener or tints into them. Remove the heated mold from the oven and allow it to cool for 2 minutes. Carefully touch the mold with your hand. If you can touch the mold comfortably with your hand and feel that it is still quite warm, it is ready to fill. Pour the thinned Gold Liquid Sculpey® into the mold starting with the frame area but don’t overfill. Tap the filled mold on a flat smooth surface to release air bubbles. Place the filled silicone mold in the preheated oven and cure for 20 minutes. For this project we will need one each of the circle shaped bezels in Gold.
When the bezels are completely cool release them from the mold by gently flexing it. This project will work best if the Bronze, White, and Rose Gold liquids are the same consistency. Stir each one to check consistency. If one is thicker than the others it can be thinned with Sculpey® Liquid Clay Softener added one drop at a time. Make sure the softener is stirred in completely.
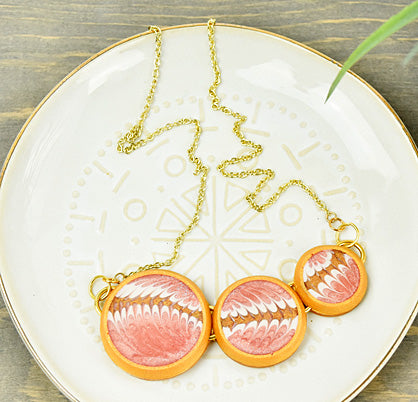
Lay the large bezel in front of you and add an arching line of Bronze Liquid Sculpey® (LS) as shown
When the bezels are completely cool release them from the mold by gently flexing it. This project will work best if the Bronze, White, and Rose Gold liquids are the same consistency. Stir each one to check consistency. If one is thicker than the others it can be thinned with Sculpey® Liquid Clay Softener added one drop at a time. Make sure the softener is stirred in completely.
Lay the large bezel in front of you and add an arching line of Bronze Liquid Sculpey® (LS) as shown

Immediately add a line above and below of White LS.

Finally fill in the remaining areas with Rose Gold LS. Do not overfill.

Poke the needle tool tip into the Bronze stripe and drag it out through the other colors to one side. Lift the needle out and poke it back into the Bronze again and drag another line 1/16” from the first line. Continue dragging both sides to make a pattern as shown.

Repeat for the medium and small bezels. I positioned my starting Bronze line a little differently in each circle. Bake the circle bezels following the baking instructions for LS.

Sheet Gold Premo through the clay conditioning machine on the thickest setting. When it is conditioned well, sheet it through one more time to the second thickest setting. Cut out a circle to match each size bezel.

Turn the design pieces over and arrange them close together. Place 12 mm jump rings hanging off of each end and place two between the circles as shown

Sandwich the jump rings into place with the Premo circles. Carefully use finger pressure to make sure the Premo circles are joining with the baked LS bezel backs and holding the jump rings in place.

Texture the backs of the circles with the texture sheet using hand pressure

Bake the piece once again following the baking instructions for Premo. When the piece is completely cool, assemble it into a necklace. Cut the chain in half opposite the clasp and connect the cut ends of the chain to the decorative piece with jump rings as shown.
