
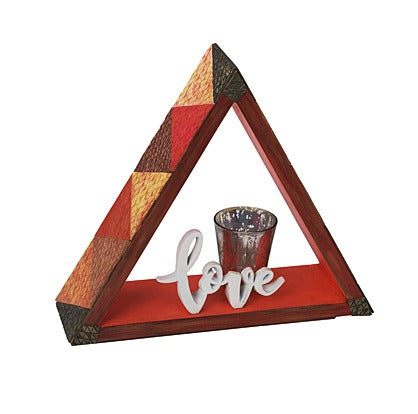
Sculpey Soufflé™ Texture Tiled Triangle Shelf
Sculpey Soufflé™ Texture Tiled Triangle Shelf
Designed by Lynn Yuhr
Read More
Read Less
Covering objects with polymer clay is nothing new, but it is usually a smallish item that can be baked in your toaster oven for curing. This project covers a larger item with polymer clay tiles that are adhered to the piece after baking. This approach gives you loads of design options and project possibilities!
ADDITIONAL SUPPLIES
- Metal ruler
- Pencil
- Cardstock – to make a shape template
- Cornstarch – as a release for the texture sheet
- Scrap clay – to make a larger texture sheet
- Mica powder (gold, yellow and pink were used for this project)
- Dense clean cosmetic sponge (to apply mica powders, one for each color)
- Strong craft glue
- Sand paper (about 400 grit)
- Acrylic paint (Colors of your choice, I used white, orange, magenta, burnt umber and gold)
- Paint brush
- Craft knife
- Several smooth ceramic tiles (4x4-inches)
Project Instructions
- Getting Started:
Start with clean hands, unwrap and knead clay until soft and smooth, or condition by running clay though a Pasta Machine. We recommend using a designated machine for clay purposes only. When working with multiple colors, clean hands with soap and water or baby wipes (we have found that baby wipes work best) before switching colors. Shape clay, pressing pieces firmly together. Wash hands after use.
- Baking:
Create a Shape Template
We are starting with a decorative wooden shelf in the shape of a triangle. After playing with the dimensions of the shelf, I decided on interlocking triangles down each side would look great and repeat the triangle design element. I created a template using cardstock to use as a guide for cutting all of my triangle tiles
We are starting with a decorative wooden shelf in the shape of a triangle. After playing with the dimensions of the shelf, I decided on interlocking triangles down each side would look great and repeat the triangle design element. I created a template using cardstock to use as a guide for cutting all of my triangle tiles

Condition Clay and Mix Colors
The clays used for this project include poppyseed, igloo, cherry pie, canary and pumpkin. Some of these colors were used directly out of the package, but additional colors were needed. I spent some time mixing colors. Below are a few of the color recipes used for this project:•red orange: 1 part Pumpkin and 1 part Cherry Pie
•pink: 1 part Cherry Pie and 1 part Igloo
•dark red: 1 part Cherry Pie and 1/16 part Poppy Seed
•coral: 2 parts Pumpkin and 1 part Igloo
•orangey pink: 1 part Cherry Pie, 1 part Canary and 1 part Igloo
•light yellow: 1 part Canary and 1 part Igloo
•dark yellow: 2 parts Canary and 1 part Pumpkin
•light green: 1 part Canary and 1/16 part Poppy Seed
Using the three base colors (cherry pie, canary and pumpkin) to create a color palette ties them all together. Tip: this approach can be used to bring your colors together on any project!


Create Larger Texture Sheet
If your texture is smaller than the size of the tiles you want to make, then you will have to make a larger texture sheet! Make four good impressions of the texture you want to use into well-conditioned scrap clay. Place them together, matching the design at the edges, on top of a sheet of scrap clay and then bake. You now have a larger texture sheet of the design you love.
If your texture is smaller than the size of the tiles you want to make, then you will have to make a larger texture sheet! Make four good impressions of the texture you want to use into well-conditioned scrap clay. Place them together, matching the design at the edges, on top of a sheet of scrap clay and then bake. You now have a larger texture sheet of the design you love.

Creating the Triangle Tiles
Sheet your clay at the thickest setting on your clay conditioning machine. Lay it on a smooth ceramic tile. Dust the larger texture sheet you made in Step 4 with cornstarch, which acts as a release, prior to making each impression. Press the texture firmly into the raw clay using your acrylic roller or place it on the floor covering with a cloth and gently press down with your foot. Gently peel your texture sheet from the clay, which should stick to the tile.
Note: some textures, like the one I am using, has a direction. I am lining up the base of my triangle template to the base of the triangles in the texture. I will keep this orientation the same on all of my triangle tiles.
Place your triangle template over the clay and trim to size.


Adding A Splash of Mica
I chose three colors of mica powders and used them in random areas of each tile. A dense cosmetic sponge is a good tool to apply the mica powders, although a finger works too.
Bake the triangle on the ceramic tile to assure that it stays nice and flat.
I chose three colors of mica powders and used them in random areas of each tile. A dense cosmetic sponge is a good tool to apply the mica powders, although a finger works too.
Bake the triangle on the ceramic tile to assure that it stays nice and flat.

Prepping the shelf
Lightly sand the wooden shelf and prime with white paint. After drying, I lightly sanded again and painted my final color that was a coral (orange with a touch of white and magenta) then added a wash of magenta over it. Let dry completely. I then added a wash of burnt umber with a light brush of gold paint, giving the front edge an antiqued look. Let dry completely.
Lightly sand the wooden shelf and prime with white paint. After drying, I lightly sanded again and painted my final color that was a coral (orange with a touch of white and magenta) then added a wash of magenta over it. Let dry completely. I then added a wash of burnt umber with a light brush of gold paint, giving the front edge an antiqued look. Let dry completely.


Finishing the tiles
Check all of your tiles and, if needed, sand the edges and assure they are all straight. I did a final wash of watery gold paint over all tiles, which tied all of the colors together and sealed in the mica powders.
Check all of your tiles and, if needed, sand the edges and assure they are all straight. I did a final wash of watery gold paint over all tiles, which tied all of the colors together and sealed in the mica powders.


Adhering the tiles
I made many more tiles than I actually needed so that I could play with the colors. Yeah, I went overboard here!
I decided on the black tiles for the points of the triangle shelf. I needed to cut these tiles in half to fill in at the peaks of the triangle. To cut the tiles I used a metal ruler and craft knife. Go slow and make multiple passes with the craft knife.
Once you have your tile order, glue down the tiles one side at a time. Allow glue to fully dry before moving onto the next side.

Embellishing the Front Edge
The final step is to embellish the front edge of the shelf. Three diamond shaped tiles were created using black clay and the triangle texture. A layer of mica powder was added before baking. These tiles were added to each of the three points of the triangle for a finishing touch.
The final step is to embellish the front edge of the shelf. Three diamond shaped tiles were created using black clay and the triangle texture. A layer of mica powder was added before baking. These tiles were added to each of the three points of the triangle for a finishing touch.


