
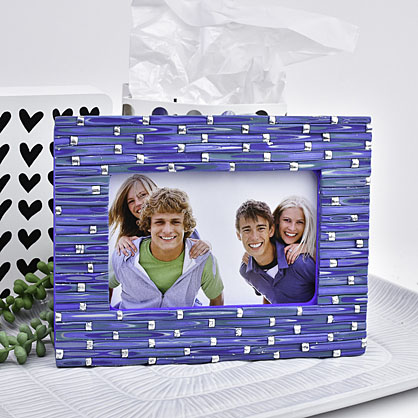
Sculpey® Soufflé Bam-Blue Frame
Sculpey® Soufflé Bam-Blue Frame
Designed by Amy Koranek
Read More
Read Less
If bamboo was blue, and I wish it was, it would look like this! Use an extruder to get these simple shapes that are loaded with color.
ADDITIONAL SUPPLIES
- Wood frame
- Sandpaper
- Paper towel
- Coordinating blue acrylic paint
- Paintbrush
- Deli paper or wax paper
- 3/4” Extruder with 1/4” dye
- Silver composite leaf
Project Instructions
- Getting Started:
Start with clean hands, unwrap and knead clay until soft and smooth, or condition by running clay though a Pasta Machine. We recommend using a designated machine for clay purposes only. When working with multiple colors, clean hands with soap and water or baby wipes (we have found that baby wipes work best) before switching colors. Shape clay, pressing pieces firmly together. Wash hands after use.
- Baking:
Prepare the frame. Sand any rough edges with sandpaper. Paint the edges and the entire back with coordinating blue acrylic paint. Allow the paint to dry.

Remove the lid from the Translucent Liquid Sculpey® (TLS) and stir the liquid completely. Replace the cap and squirt a bead of the TLS on the front surface of the frame.

Spread the TLS in a thin layer over the entire front surface of the frame with fingertips. Wipe hands with paper towel to clean. Set the frame aside while we work on the clay pieces. The TLS will soak slightly into the grain of the wood creating the perfect texture for clay pieces to stick to.

Mix Cornflower Soufflé with Pearl Premo 3:1 to make Pearl Cornflower. Sheet each color, Midnight Blue, Sea Glass, Pearl Cornflower, and the remainder of the Pearl through the pasta machine on the thickest setting or sheet with the Acrylic Clay Roller to about 1/8”. Cut out as many 3/4” circles using a circle cutter as you can. Organize the cut pieces on a piece of wax paper or deli paper so they are easy to handle.

Randomly stack the colors as shown.

Roll the stack on its side so that it will fit easily into the barrel of your extruder. Trim as needed to fit your extruder. Small pieces can be combined with other pieces to make another rod.

Load your extruder with the rod of stacked colors and extrude a 1/4” circle shaped rope.

Cut the rope into as many 2” sections as you can. You will need to stack, roll, and extrude all of the clay circles that you cut out, so repeat Steps 6-9 until you have extruded all of stacked rods.

Take a thin sliver off the side of each piece so that some of the interior colors show. Just shave off a very thin piece leaving most of each little rod intact.

Condition all the scraps together. Form a rod that will fit into your extruder and extrude it again through the 1/4” circle. Roll the scrap clay rope in a sheet of silver composite leaf.

Use the Super Slicer to cut 1/4” thick disks from the clay wrapped in leaf. These will be the divider pieces between the Bam-Blue pieces.

Place the frame in front of you. Starting along the inside edge, place Bam-Blue and silver pieces alternating them from top to bottom.

Continue adding rows of Bam-Blue and silver as shown. Make sure they are sitting nicely into the TLS on the frame so they will bake on permanently. Double check that all the pieces are connecting to each other side by side with no gaps.

Here is a close up of the pieces showing the cool colors that appear from the insides of the Bam-Blue.

Keep going until you get the entire frame face covered. Trim all the edges very neatly with the Super Slicer. When the frame is completely covered, bake it following the baking instructions for Soufflé. Allow to cool completely before handling.
