Sculpey Premo™ Pale Blue Striped Knob Backs
Sculpey Premo™ Pale Blue Striped Knob Backs
Designed by syndee holt
Read More
Read Less
Simple knobs, hooks and drawer pulls can be easily dressed up by adding a Sculpey clay back to them!
TIME TO COMPLETION: 60 minutes
ADDITIONAL SUPPLIES
- Knobs, drawer pulls or hooks - they do NOT have to be bakeable

Project Instructions
- Getting Started:
Start with clean hands, unwrap and knead clay until soft and smooth, or condition by running clay though a Pasta Machine. We recommend using a designated machine for clay purposes only. When working with multiple colors, clean hands with soap and water or baby wipes (we have found that baby wipes work best) before switching colors. Shape clay, pressing pieces firmly together. Wash hands after use.
- Baking:
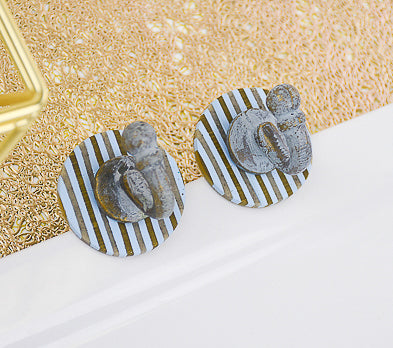
I wanted to match the colors in the knobs that I found, so I selected these 3 colors. Take the color of your knobs and home décor into mind when creating your back pieces. Create a 3x4 inch layer on the second from widest setting. Repeat for each of the colors.

Stack the colors together as shown.

Cut the stack in half across the long edge and restack the layers. Lightly press the layers together.

Cut slices as evenly as possible as shown.

Place the cut layers onto another sheet of the Gray Granite created on the next thinner layer.

Lightly roll over the strips to level them and bond to the bottom sheet.

Cut out two circles using the 2-inch circle cutter and then use the largest Etch n’ Pearl to cut out the center.
NOTE: I lined up my stripes before I cut out my circles so that I could match them easier – and it made it easier to find the center for the hole!
NOTE: I lined up my stripes before I cut out my circles so that I could match them easier – and it made it easier to find the center for the hole!

Bake according to the directions in Step 1. Allow the clay to cool and add to the back of your knob for a cool custom look.

- Choosing a selection results in a full page refresh.
- Opens in a new window.