
Sculpey Premo™ Lace Cane Earrings
Sculpey Premo™ Lace Cane Earrings
Designed by Amy Koranek
Read More
The Sculpey Premo™ team of Apricot, White and Pale Blue create a great Spring/Summer color palette for this easy “canework” design.
COMPLETION TIME:
75 Minutes to make, bake, and assemble
Read Less
ADDITIONAL SUPPLIES
- 9 mm Silver-toned jump rings (2)
- Silver-toned ear posts with backs (2)
- Flat nose pliers
- E-6000 Silicone glue

Project Instructions
- Getting Started:
Start with clean hands, unwrap and knead clay until soft and smooth, or condition by running clay though a Pasta Machine. We recommend using a designated machine for clay purposes only. When working with multiple colors, clean hands with soap and water or baby wipes (we have found that baby wipes work best) before switching colors. Shape clay, pressing pieces firmly together. Wash hands after use.
- Baking:
Make a little log that is about 2” long from 1/4 bar of Premo™ Apricot.

Roll White to a flat sheet about 1/16” thick. Trim a straight edge along one side of the White Sheet. Lay the Apricot log along the straight edge and trim the two perpendicular edges to the length of the log.
Wrap the Apricot log in the White sheet making sure to avoid trapping air bubbles between the layers. Where the lead edge of the White sheet meets itself, make a mark. Trim the sheet just inside this mark and then continue wrapping the Apricot log with White.
Wrap the Apricot log in the White sheet making sure to avoid trapping air bubbles between the layers. Where the lead edge of the White sheet meets itself, make a mark. Trim the sheet just inside this mark and then continue wrapping the Apricot log with White.

Make sure the seam butts up tightly. Smooth the seam with your fingertips.

Carefully roll the log on the work surface to reduce it in diameter and to make it longer. Roll it to a rope so that you have 7 good inches once the scrap ends are removed.

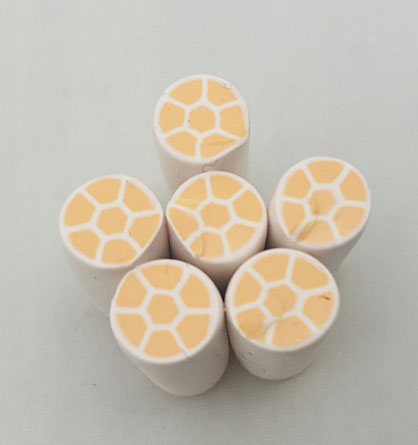
Cut the rope into 7 equal sized logs. Organize the logs as shown in a flower pattern.

Push all the little logs together sides touching.

Roll this log into a rope that is at least 6 inches long once the scrap ends are removed.

Remove the scrap ends and cut the rope into 6 equal sections. Position the little logs as shown.
Pinch the logs together until they resemble a large teardrop.

Flatten the teardrop out just slightly. It should still be about 1/4” thick. It should look similar from both sides.

Lay the fat teardrop on one of its long sides, and slice down through it creating two identical teardrops that are about 1/8” thick.

Work the slices back into symmetry with your fingers. Punch out the positive piece from the largest teardrop shape in the Jewelry Design Template. Set the punched-out piece aside. Then position one of the clay teardrops in the largest teardrop template space.

With the template as a guide, use your fingertips to help the teardrop shape fill up the template space.
Do the same for the other half of the teardrop so that you have identical shapes.
Use the Blunt Point Tool to poke holes in the tip of each teardrop.
Do the same for the other half of the teardrop so that you have identical shapes.
Use the Blunt Point Tool to poke holes in the tip of each teardrop.

Roll 1/4 bar Pale Blue to 1/8” thick with the Acrylic Clay Roller. Use the rectangle shaped template from the Jewelry Design Templates as a guide to first cut out a rectangle.

Cut the rectangle in half to make two squares. Remove scraps.

Position the teardrops and the squares (as diamonds) for your earring layout.
Poke holes in the bottom point of the diamonds with the Blunt Point Tool.
Bake following the baking instructions for Sculpey Premo™.
Allow to cool completely before handling.
Poke holes in the bottom point of the diamonds with the Blunt Point Tool.
Bake following the baking instructions for Sculpey Premo™.
Allow to cool completely before handling.

Connect the teardrops to the diamonds with jump rings using flat nose pliers. Glue ear posts to the backs of the diamonds with silicone glue.

- Choosing a selection results in a full page refresh.
- Opens in a new window.