
Sculpey III® Ribbon Candy Ornaments
Sculpey III® Ribbon Candy Ornaments
Designed by Amy Koranek
Read More
Read Less
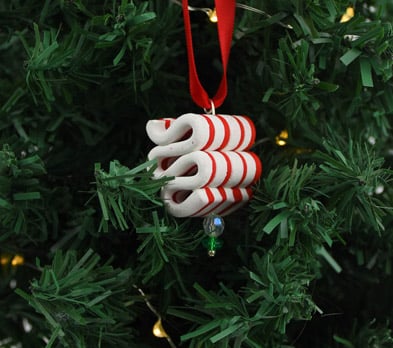
Mimic the look of old-fashioned ribbon candy in an ornament style that is timeless! This tutorial shows you how to make two pieces of nostalgia; but you’ll probably want to make enough to cover the entire tree!
Designer’s Tip- When working with Red Hot Red and White (or White Glitter) together, it’s really important to keep your hands and work surface as clean as possible so that you don’t transfer the red color to the white clay turning your white to pink. Along the way I will give you cues about how to pull this off with minimal transfer.
ADDITIONAL SUPPLIES
- Baby wipes
- Paper towel
- Rubbing alcohol
- Cotton swab
- Knitting needle
- 2” Silver tone head pins (2)
- Silver tone seed beads (2)
- Lentil shape green crystal beads (2)
- Round shape clear crystal beads (2)
- Round nose pliers
- 9” Red ribbon (2)
- Scissors
Project Instructions
- Getting Started:
Start with clean hands, unwrap and knead clay until soft and smooth, or condition by running clay though a Pasta Machine. We recommend using a designated machine for clay purposes only. When working with multiple colors, clean hands with soap and water or baby wipes (we have found that baby wipes work best) before switching colors. Shape clay, pressing pieces firmly together. Wash hands after use.
- Baking:
From 1/4 bar of Red Hot Red, roll out a long skinny rope, about 1/8” in diameter.
From 1/4 bar of White, roll out a long skinny rope, about 1/8” in diameter.
Once the ropes are formed, clean your hands and the work surface with wipes.
Throughout the entire project we will have the White Glitter along the top edge and the Red Hot Red along the bottom edge.
Once the ropes are formed, clean your hands and the work surface with wipes.
Throughout the entire project we will have the White Glitter along the top edge and the Red Hot Red along the bottom edge.

Push the two ropes together sides touching: White Glitter on top and Red Hot Red on the bottom. When you push them together always use your index fingers to touch the White Glitter and your thumbs to touch the Red Hot Red.
Make sure they are joined together all the way along the length of the ropes. Pinch together slightly down the length following the “finger to white” and the “thumb to red” strategy. Pinch and pull slightly on the ends to lengthen both colors at the same time.
Make sure they are joined together all the way along the length of the ropes. Pinch together slightly down the length following the “finger to white” and the “thumb to red” strategy. Pinch and pull slightly on the ends to lengthen both colors at the same time.

Cut the double-colored stripe in half and push the two halves together sides touching. Keep the White Glitter rope on top and the Red Hot Red rope on the bottom.
Make sure they are joined together all the way along the length of the ropes. Pinch together slightly down the length following the “finger to white” and the “thumb to red” strategy. Pinch and pull slightly on the ends to lengthen all four stripes at the same time.
Make sure they are joined together all the way along the length of the ropes. Pinch together slightly down the length following the “finger to white” and the “thumb to red” strategy. Pinch and pull slightly on the ends to lengthen all four stripes at the same time.

Repeat Step 4 to make a total of eight stripes.

If you notice transfer of the red onto the white, you can swipe it away with a cotton swab doused in rubbing alcohol. Blot with paper towel to dry.
Make sure the Acrylic Clay Roller is really clean by wiping it with wipes or a paper towel. Roll over the ropes to flatten them together with the Acrylic Clay Roller.
Trim the short ends straight with a Clay Blade.
Make sure the Acrylic Clay Roller is really clean by wiping it with wipes or a paper towel. Roll over the ropes to flatten them together with the Acrylic Clay Roller.
Trim the short ends straight with a Clay Blade.

Carefully lift the striped piece from the work surface and drape it over a knitting needle at the center point. This will create a nice curve in the middle that we can work off from both sides.

Position the candy on the work surface and gently bend the length of it back and forth working out from the center. Use the knitting needle as needed to keep the curves and loops open and neat. Make sure that the where the candy touches itself becomes a secure attachment so the candy won’t unravel.

Carefully slice the candy into two pieces.

Carefully pierce each candy with a 2” eye pin. Leave the eye pins in the candy as you bake each piece following the baking instructions for Sculpey III®

Allow the pieces to cool completely. Carefully remove the head pins.
String a silver seed bead, a green lentil bead, and the clear crystal bead onto the head pin.
Insert the head pin with the beads on it up through the bottom of the candy going through the same hole.

Repeat for the second piece of candy.

Use round nose pliers to bend the tail of each head pin into a loop at the top of the candy. Add a red ribbon to each and secure with an overhand knot creating a loop for display. Trim the tails as needed with scissors.

- Choosing a selection results in a full page refresh.
- Opens in a new window.