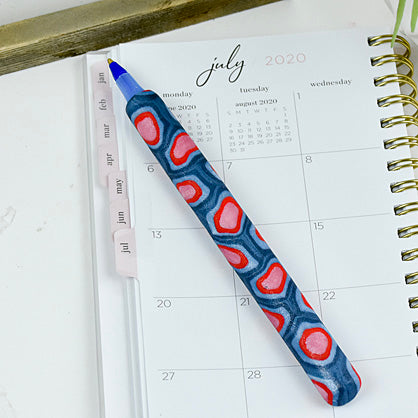
Sculpey®III Bull’s Eye Pen
Sculpey®III Bull’s Eye Pen
Designed by Amy Koranek
Read More
Read Less
The Bull’s Eye is a basic cane that can be done with as few as two colors and with as many colors as desired. The cane is made by starting with a little log shape for the center and wrapping colors around it.
COMPLETION TIME:45 Minutes to make and bake.
ADDITIONAL SUPPLIES
- BIC® Round Stic Ink Pen
- Flat nose pliers

Project Instructions
- Getting Started:
Start with clean hands, unwrap and knead clay until soft and smooth, or condition by running clay though a Pasta Machine. We recommend using a designated machine for clay purposes only. When working with multiple colors, clean hands with soap and water or baby wipes (we have found that baby wipes work best) before switching colors. Shape clay, pressing pieces firmly together. Wash hands after use.
- Baking:
From Princess Pearl make a little stick that is 3/8” thick and 2” long.

Sheet Red Hot Red through the pasta machine on the thickest setting. Wrap the pink stick in the Red Hot Red, trim the edges and make a nice neat butting seam. Smooth the seam with your fingers. You now have the start of a Bull’s Eye Cane.

Sheet Light Blue Pearl through the pasta machine on the thickest setting. Wrap the red cane in the Light Blue Pearl, trim the edges and make a nice neat butting seam. Smooth the seam with your fingers.

Sheet Navy Metallic through the pasta machine on the thickest setting. Wrap the Bull’s Eye in the Navy Metallic, trim the edges and make a nice neat butting seam. Smooth the seam with your fingers.

Roll the cane on your work surface to make it smaller in diameter and longer in length. When it is about 1/2” in diameter you can stop rolling. Slice the cane open in the middle with the Super Slicer.

Carefully remove the ink stick from the pen barrel with finger pressure or using flat nose pliers. Set the ink stick aside for now.

Cut two slices, each 1/8” thick, from the Bull’s Eye Cane using the Super Slicer. Start at the closed end of the empty pen barrel and position the two slices directly across from each other. Wrap the little slices around the sides of the barrel so they just barely touch. If the slices are too big and they overlap each other you will need to reduce your Bull’s Eye Cane just a little more. Reduce it by rolling it gently on the work surface to make it smaller in diameter. When the cane slices just barely touch each other then this is a good diameter. You will need approximately 20 slices from the cane all the same thickness.

Position the cane slices in pairs opposite each other on the barrel. The cane slices should just butt up to each other. There will be gaps in between each slice which is fine. Use half slices at the open end of the barrel if necessary to fill in.

Carefully roll the covered pen barrel on your work surface until it is smooth. The cane slices will spread slightly and fill in all the little gaps. At the open end of the barrel, use the Super Slicer to trim the clay away from the edge neatly.

At the closed end of the barrel, carefully fold the excess clay over the end to meet in the middle. Smooth the seam with your fingers.

Bake the pen following the baking instructions for Sculpey® III. When the pen barrel is completely cool, carefully push the ink stick back in.


