
Premo Sculpey "Shades of Purple" Caned Accessory Bowl
Premo Sculpey "Shades of Purple" Caned Accessory Bowl
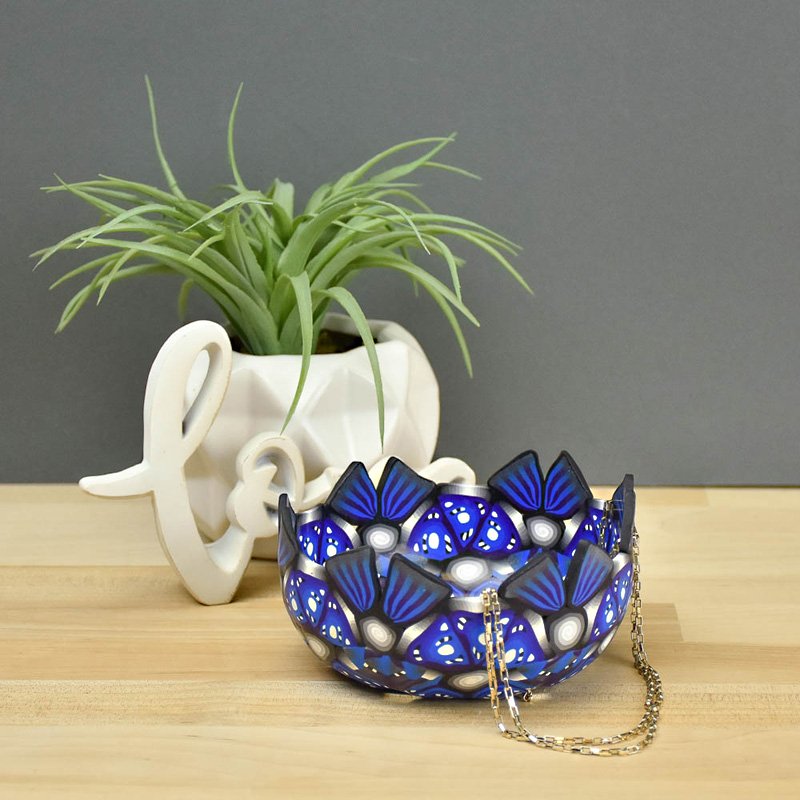
Designed by Patti Kimle
Read More
This gorgeous accessory bowl is created with the lush shades of Sculpey Premo Cobalt Blue, Purple, Silver caned in patterns that please the eye and add a visual motion to the entire bowl.
Read Less
ADDITIONAL SUPPLIES
- Parchment paper
- Metal or glass bowl for form
Project Instructions
- Getting Started:
Start with clean hands, unwrap and knead clay until soft and smooth, or condition by running clay though a Pasta Machine. We recommend using a designated machine for clay purposes only. When working with multiple colors, clean hands with soap and water or baby wipes (we have found that baby wipes work best) before switching colors. Shape clay, pressing pieces firmly together. Wash hands after use.
- Baking:
Condition 1/2 package of each color. Using 1/2 of each piece of conditioned clay, create blended sheets of blue-purple, blue-silver, purple-silver and black and white.


Stack equal sheets of black and white and roll through the pasta machine. Divide in half and stack to create a striped pad

Roll one half of the blue-purple blend to a medium thickness on the pasta machine to create a long, narrow strip. Add solid white or black snakes of clay and some slices off of the striped slab enfolding these additional elements within a roll-up of the blended sheet.

Roll half of the black-white blend into a medium thickness and cut into equal pieces to create a graded stack. Add the gradation to the cane begun in step 4.

Roll pieces of the purple-silver and blue-silver blends into bullseye canes. Cut these canes into 3-5 wedge-shaped pieces

Reassemble the pieces with additional stripe pieces or solid snakes of clay to create a new pattern


Create a bullseye cane with the remaining half of the black-white blend

Create a stripe pattern cane with the remaining half of the blue-purple blend and slices from the stripe slab.

Using the remaining blue-silver and purple-silver blends to create a striped cane.

These steps should result in 4-6 canes each about 2-3” long and varying in size. Compress the more complex patterns into triangles.

Beginning with one of the triangle patterns, cut 6 slices approximately 1/8” thick and arrange on the bottom center of the bowl form.

Add slices from another cane around the first pattern.

Continue to build the design with slices pressed to the form. Allow the cane slice edges to touch in some places and leave some spaces in others.


When the pattern and slices are completed, use a piece of parchment paper about 4” square to lay over the clay and allow all the seams to be blended with even pressure from your fingers without leaving fingerprints and other marks. Press enough to make sure all pieces are firmly joined to adjacent cane slices, but do not distort the pattern or close the spaces intended to be left open and lacy.

Bake according to the instructions in step 1. Cool the form enough to handle, but remove the clay from the form before the clay is completely cooled.
