
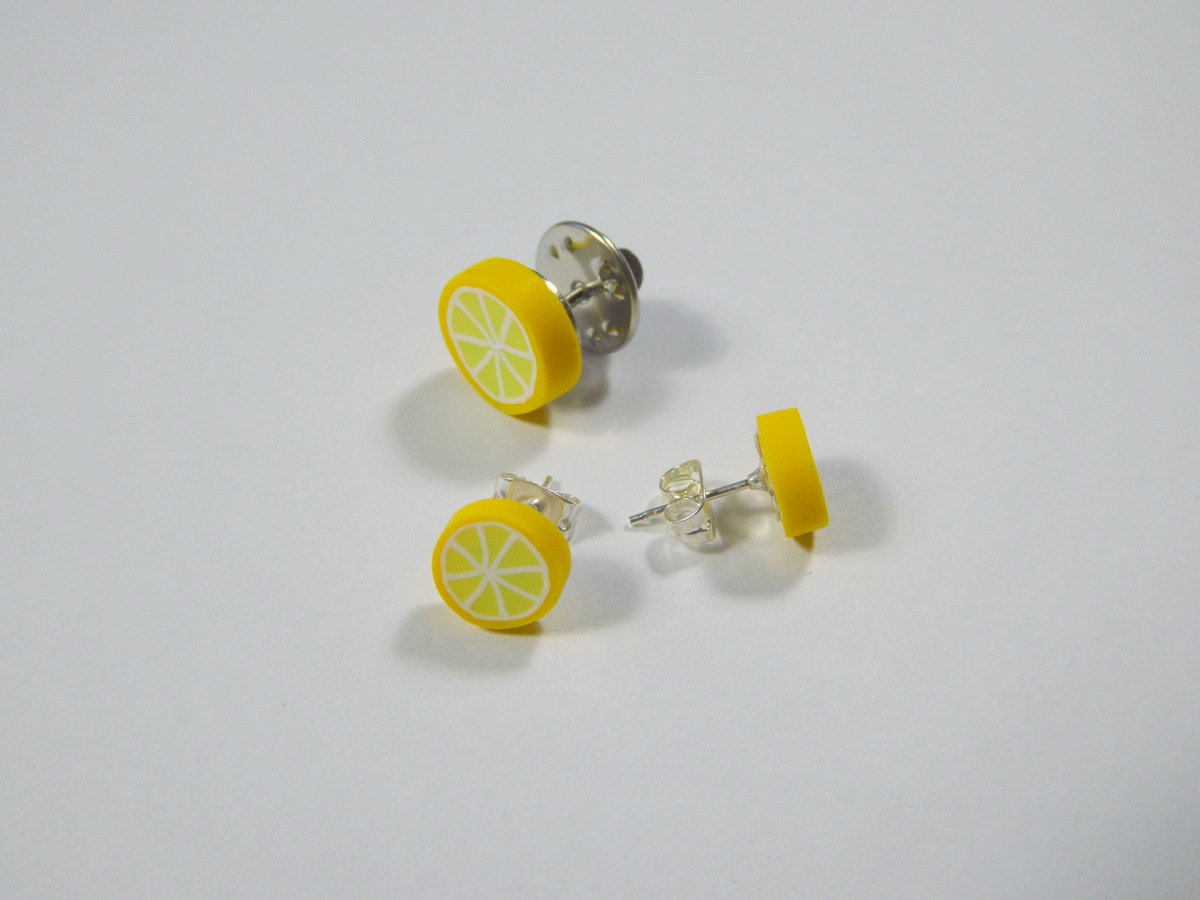
Sculpey Premo™ Lemon Slice Earrings
Sculpey Premo™ Lemon Slice Earrings
Designed by Masha P
Read More
Read Less
Brighten up your outfit with these yummy lemon slice stud earrings and matching lapel pin!
ADDITIONAL SUPPLIES
- Stud earring findings
- Clear fast drying glue
Project Instructions
- Getting Started:
Start with clean hands, unwrap and knead clay until soft and smooth, or condition by running clay though a Pasta Machine. We recommend using a designated machine for clay purposes only. When working with multiple colors, clean hands with soap and water or baby wipes (we have found that baby wipes work best) before switching colors. Shape clay, pressing pieces firmly together. Wash hands after use.
- Baking:
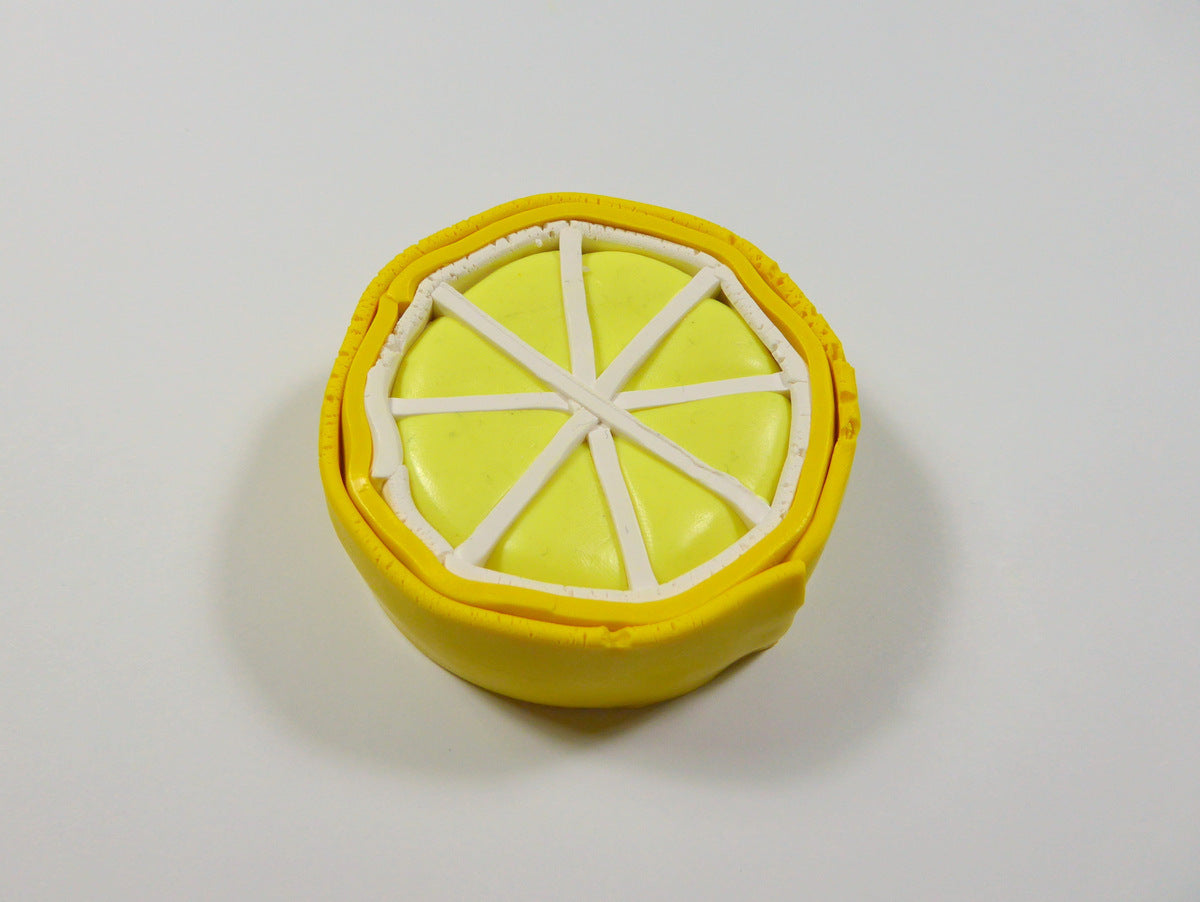
Mix 6 parts Translucent with 1 part Sunshine to create the semi-translucent yellow intended for the fleshy part of the lemon cane. If you find the clay difficult to work with even after conditioning, add a few drops of Sculpey Clay Softener as you mix.

Form the mixed clay into a short, fat cylinder approximately 2” (~5cm) in diameter and 3/4” (~1.9cm) tall. Mix up some more Translucent and Sunshine in the same ratio indicated in step 1 if you find you don’t have enough, or remove some clay if your cylinder is too large. Cut your cylinder in half using the clay blade.

Roll out a sheet of White clay on the thickest setting of your Sculpey Clay Conditioning machine. Cut out a rectangle to the size of the cross section of your cylinder in step 2, and then place the two halves back together with the white clay in the middle.

Cut the cylinder again perpendicular to the first cut, and add another rectangle of rolled out White clay. Repeat the process until your cylinder has 8 sections all separated by white. Finish by wrapping the cylinder fully in white clay of the same thickness as the internal sections.

Roll out a sheet of Cadmium Yellow Hue clay on the thickest setting of your clay conditioning machine. Over the outer white layer you just completed in step 4, wrap the cylinder twice with the Cadmium Yellow Hue clay to act as the thicker, darker lemon rind.
Begin gently squeezing the cylinder around the circumference to stretch it out, taking care to maintain its round shape.


Continue to roll the cylinder out into a log. The edges will distort, but the image inside will remain consistent. Make sure to maintain a universal diameter as you roll the log out.

If it becomes too long to comfortably work with, cut your log into smaller sections and roll them out individually. Here you will preview the design inside.

If you want various sizes of your cane, save a section you cut off before continuing to roll out a smaller size. Here, I have saved a few different sizes before stopping at the smallest cane I want.

Allow your canes to chill in the freezer for at least an hour before slicing off sections, to ensure the blade doesn’t drag and smudge the image inside as you slice. Judge for yourself the thickness of your slices – slighter larger for sturdy items you intend to wear like earrings, thinner for decorating projects like scrap book pages.

If you intend to glue your cane slices to your project (as I did for the stud earrings, and lapel pin), score your slices on the back side with a needle or pin before baking to allow the glue more surface area to adhere. Bake your slices according to the instructions on your clay package.

You now have a variety of lemon slices for a variety of projects! Allow any glue to dry overnight before wearing your earrings or lapel pin. Use Sculpey Gloss Glaze to paint the slices if you would like them to appear shiny.

