
Sculpey Soufflé™ Midnight Blue Dangle Earrings
Sculpey Soufflé™ Midnight Blue Dangle Earrings
Designed by Melissa Piddington
Read More
Read Less
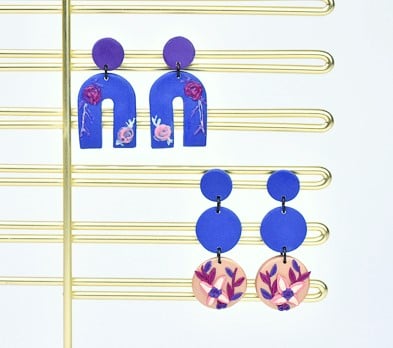
These Midnight Blue cool earrings are sure to be noticed! The combination of the matte surfaces of the Sculpey Soufflé™ and the metallic sheens of the Sculpey Premo™ clays also heighten the drama!
TIME TO COMPLETION: 60 minutes
ADDITIONAL SUPPLIES
- Shape cutters (Blackbird and Violet)
- Dremmel with buff end tool attached
- Baking paper
- Earring posts, backs and jump rings, pliers
- E600 glue
Project Instructions
- Getting Started:
Start with clean hands, unwrap and knead clay until soft and smooth, or condition by running clay though a Pasta Machine. We recommend using a designated machine for clay purposes only. When working with multiple colors, clean hands with soap and water or baby wipes (we have found that baby wipes work best) before switching colors. Shape clay, pressing pieces firmly together. Wash hands after use.
- Baking:
- I Selected all the colours I was going to use that I thought would complement each other and really make the Souffle Midnight Blue blue pop, which is most definitely does.
Conditioning all of the clay, this process means to roll out your clay over and over again to ensure there are no bubbles and that your clay is easy to work with. I roll the clay flat with my rolling pin then fold in half and repeat a few times before moving to my pasta machine and rolling the clay through that roughly around 10 to 15 times folding between each time the clay goes through. For this project I have left the Souffle Midnight Blue, some Premo Copper and Souffle Royalty on the largest setting on my pasta machine to cut the earring shapes out of and the other colours I rolled at setting 2 so that they were quite thin.
Conditioning all of the clay, this process means to roll out your clay over and over again to ensure there are no bubbles and that your clay is easy to work with. I roll the clay flat with my rolling pin then fold in half and repeat a few times before moving to my pasta machine and rolling the clay through that roughly around 10 to 15 times folding between each time the clay goes through. For this project I have left the Souffle Midnight Blue, some Premo Copper and Souffle Royalty on the largest setting on my pasta machine to cut the earring shapes out of and the other colours I rolled at setting 2 so that they were quite thin.

I cut out the shapes that I wanted for each pair of earrings from the thicker clay so that they would be nice and strong, I also use my finger here to flatten the edging left from the cutters, if you smooth it now with your finger it makes the sanding process once they are baked a lot easier and quicker to get that more perfect appearance. I also got all of the other colours rolled thin and ready to cut out some small shapes for one pair of the earrings.

Using the very sharp knife scalpel I cut out some little leaf and petal shapes to go onto the copper bottom of one pair of the earrings, this part is quite tricky because they can be distorted and put out of shape super easily, so I have the thin clay on a piece of baking paper so it can be easily lifted off without getting bent out of shape.

I placed most of the pieces I cut out and gave them some texture using the tools shown. When placing the tiny pieces onto the work I use my scalpel as it lifts them more precisely and doesn’t leave finger prints all over the tiny pieces.

Moving on to the second pair of earrings, I combined a very small amount of each colour clay with a larger amount of Sculpey Oven Bake Adhesive (formerly called Bake and Bond) to make a thick paint type substance. Then using the tool with the small ball like ends I painted on some roses and vines.

Bake the clay following packet instructions, I personally bake all components that do not have 3D components between two tiles to eliminate any air bubbles that I may have missed while conditioning my clay at the beginning and all other pieces are baked on a piece of paper on top of a tile. Once baked I give the edges and the backs a little go over with a buff end on the dremmel and using the dremmel with a 1.8mm drill piece I drill holes into the earrings.

Using my pliers I attach the jump rings and the last step I use E600 glue and glue on the backs leaving for a few hours to dry and then they are ready to go and ready to make you look glamorous.
