
Sculpey Premo™ Carved Slide Bracelet
Sculpey Premo™ Carved Slide Bracelet
Designed by syndee holt
Read More
Read Less
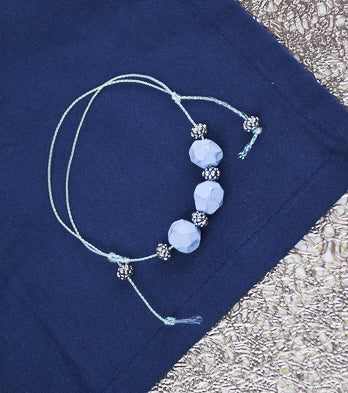
Sculpey Premo™ Pale Blue clay is the star of this stunning little carved bead bracelet. Creating faceted beads is super simple to do and looks so cool!
TIME TO COMPLETION: 60 minutes
ADDITIONAL SUPPLIES
- Small silver-toned metal beads (6)
- Cording – mine is Creatology Knotting Cord
- Silver acrylic paint
- Cotton Swab
Project Instructions
- Getting Started:
Start with clean hands, unwrap and knead clay until soft and smooth, or condition by running clay though a Pasta Machine. We recommend using a designated machine for clay purposes only. When working with multiple colors, clean hands with soap and water or baby wipes (we have found that baby wipes work best) before switching colors. Shape clay, pressing pieces firmly together. Wash hands after use.
- Baking:
Roll a small tube of the conditioned Pale Blue clay out to about 3/8 to 1/2 inch width. Cut a similar length of this tube and roll into balls.

Use the Sculpey Clay Blade to cut small pieces off the edge of the round bead all the way around the bead.
There is not rule that says that these slices have to be even or arranged in any way!
There is not rule that says that these slices have to be even or arranged in any way!

Here is a look at the entire process.
ARTIST NOTE: It is so rewarding to slice of any small dark specs that somehow are attracted to lighter clays!
ARTIST NOTE: It is so rewarding to slice of any small dark specs that somehow are attracted to lighter clays!

Once the beads are faceted, gently twist them onto one of the bead needles from the baking rack. Place the tip of the needle on the metal rack and back as directed in Step 1 above.

When the beads have baked and cooled, add a small amount of Silver acrylic paint to the tip of a cotton swab. I lightly brushed the swab against my worksurface paper to remove excess paint. Then brush the swab over the faceted edges of each bead to highlight the facets. Add paint as needed. Allow the paint to dry (just takes a couple of minutes since there is so little paint).

String the beads alternating with the small silver beads as shown.
I elected to tie a double sliding knot in the knotting cord. If you don’t know how to tie a slide knot, there are several great tutorials on YouTube. This is my favorite one: https://www.youtube.com/watch?v=Wp84IDc8SdU
Alternately, you can tie a small clasp onto the bracelet as well!
I elected to tie a double sliding knot in the knotting cord. If you don’t know how to tie a slide knot, there are several great tutorials on YouTube. This is my favorite one: https://www.youtube.com/watch?v=Wp84IDc8SdU
Alternately, you can tie a small clasp onto the bracelet as well!

- Choosing a selection results in a full page refresh.
- Opens in a new window.