
Sculpey Premo™ Bead Styles
Sculpey Premo™ Bead Styles
Designed by Amy Koranek
Read More
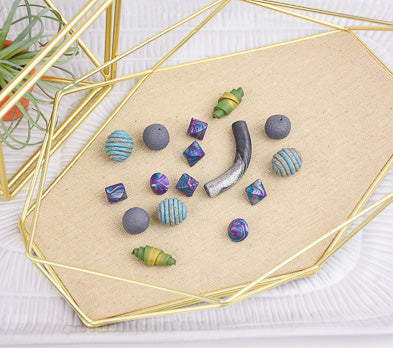
This is just a few of the various styles of beads that can be made with Sculpey Premo™ Bead Styles. You can use whatever colors you want to design your own personal style. Many bead types are also very easily made from scrap clays.
COMPLETION TIME:
60 Minutes to make and bake
NOTE: This tutorial can be done with 1 oz bars of each color
Read Less
NOTE: This tutorial can be done with 1 oz bars of each color
ADDITIONAL SUPPLIES
- Toothpick
- Elastic string
- Salvaged items with texture patterns
Project Instructions
- Getting Started:
Start with clean hands, unwrap and knead clay until soft and smooth, or condition by running clay though a Pasta Machine. We recommend using a designated machine for clay purposes only. When working with multiple colors, clean hands with soap and water or baby wipes (we have found that baby wipes work best) before switching colors. Shape clay, pressing pieces firmly together. Wash hands after use.
- Baking:
For Bi-cone Beads, first start by twisting some colors together. You can easily use up scraps for these beads. In my photo I’m using scraps of Peacock Pearl, Silver, and Fuchsia. If you fold your twist in half and then in half again, and just keep rolling and twisting, you will get a rope with tiny, beautiful stripes.
Make a rope that is even all the way down it’s length. Then use the clay blade to cut off equal lengths of pieces from the rope. By keeping the rope a consistent thickness and by cutting off pieces that are consistent in length, you will be able to make beads that are all consistent in size.
Form balls from each piece by rolling them in the palms of your hands. At this point, you’ve already made beautiful ball beads! Just poke a hole in them with a Needle Tool and bake. Or go on to the next step to make Bi-cone Beads.

To turn a Ball Bead into a Bi-cone Bead takes a little practice. You might not get it exactly right on the first few tries, but once you get the hang of it, you can produce Bi-cones over and over.
Take the Sculpey Tools Lentil Bead Tool from the Bead Making Kit and place a ball bead underneath it. By swirling the Lentil Bead Tool over the top of the Ball Bead against the work surface, you will quickly make the ball change into a bi-cone. Using light pressure with your hands, swirl the Ball Bead between the tool and the work surface around and around in circles. A point will form on the work surface side and a point will form on the tool side. If the points don’t form within just a few circles, try applying a little more pressure on the tool. You can also do this with a clear glass plate if you don’t have the Bead Making Kit.
Take the Sculpey Tools Lentil Bead Tool from the Bead Making Kit and place a ball bead underneath it. By swirling the Lentil Bead Tool over the top of the Ball Bead against the work surface, you will quickly make the ball change into a bi-cone. Using light pressure with your hands, swirl the Ball Bead between the tool and the work surface around and around in circles. A point will form on the work surface side and a point will form on the tool side. If the points don’t form within just a few circles, try applying a little more pressure on the tool. You can also do this with a clear glass plate if you don’t have the Bead Making Kit.

Once you have created the Bi-Cone Bead, you can poke a hole through the points with the Needle Tool. Bake the beads on a soft cloth or on the Baking Pad from the Bead Making Kit so they do not get shiny spots on them from resting on the baking pan. Follow the baking instructions for time and temperature for Sculpey Premo. Allow to cool completely before handling.

For the Coil Beads, I used Gray Granite and Turquoise scraps. Start by making a consistent rope and cut off consistent lengths. Roll the pieces into balls.

For my coils, I partially blended Gray Granite with Turquoise. Roll the blended clay into a really thin consistent rope not more than 1/8” thick. Taper one end of the rope and press the tapered end to the ball. Then really carefully coil the thin rope all around the bead until it is completely covered. When you get to the end, carefully trim the rope, taper the end, and tuck it into place to finish the bead.

Make sure there are no gaps between the coils and that the rope is stuck well to the sides of the ball. Poke a hole through the bead with the Needle Tool. Follow Step 4 above for baking instructions.

To make a Curved Tube Bead, I used scraps of Graphite Pearl and Silver. I started with equal amounts of each color. I pushed the two colors together and rolled them into a thin rope, then rolled the thin rope thicker by pushing on the opposite ends with my palms. If you alternate making a thin rope then a thick rope, the line between the two colors will become increasingly blurred or uneven like mine.
Starting with the clay in the thick rope size, poke the Small Etch ‘n Pearl all the way through it.
Starting with the clay in the thick rope size, poke the Small Etch ‘n Pearl all the way through it.

With the clay on the Small Etch ‘n Pearl, roll the clay to make it longer and thinner and the dimension that you would like your Tube Bead to be.
Slice the rough ends off using the Clay Blade and a rolling motion. If you roll the clay back and forth while you are cutting, you will be able to make a smooth cut all the way down to the Etch ‘n Pearl.
Remove the scrap ends from the Tube Bead. At this point you have a straight Tube Bead which you can bake right on the Etch ‘n Pearl if you wish.

To make a curved Tube Bead, carefully remove the Etch ‘n Pearl from the clay. A hole will remain where the Etch ‘n Pearl was. Carefully string a piece of elastic through the hole. Then gently pull on the ends of the elastic to make the bead curve as much as desired. Carefully pull the elastic out of the bead and refer to Step 4 above to bake the bead.

For Rolled Beads, I started with scraps of Spanish Olive and 18K Gold that were partially blended. Then process the clay into thin sheets with a hand roller or a pasta machine. You will want the sheets to be about 1/16” thick or the third thickest setting for the pasta machine.
Cut triangle shapes from the sheet using a Clay Blade.
Cut triangle shapes from the sheet using a Clay Blade.

Lay the short straight edge of a triangle along the side of a toothpick or Etch ‘n Pearl.

Carefully roll the triangle of clay up around itself.

You can bake the clay on the toothpick or Etch ‘n Pearl, or you can carefully remove the unbaked beads from the tools and then bake. Refer to the baking tips in Step 4 above.

For Textured Beads, I used scraps of Slate. Roll up balls to make Ball Beads first. Then gently roll the Ball Beads onto textured items. In this photo I saved a clean plastic deli tray that had textured dots all over it.

For a rougher texture I’m using a flexible non-slip liner that I’ve saved to texture the bead. Poke holes using the Needle Tool, then refer to Step 4 above for baking tips.
