
Model Air Air Dry Modeling Clay Owl Planter
Model Air Air Dry Modeling Clay Owl Planter
Read More
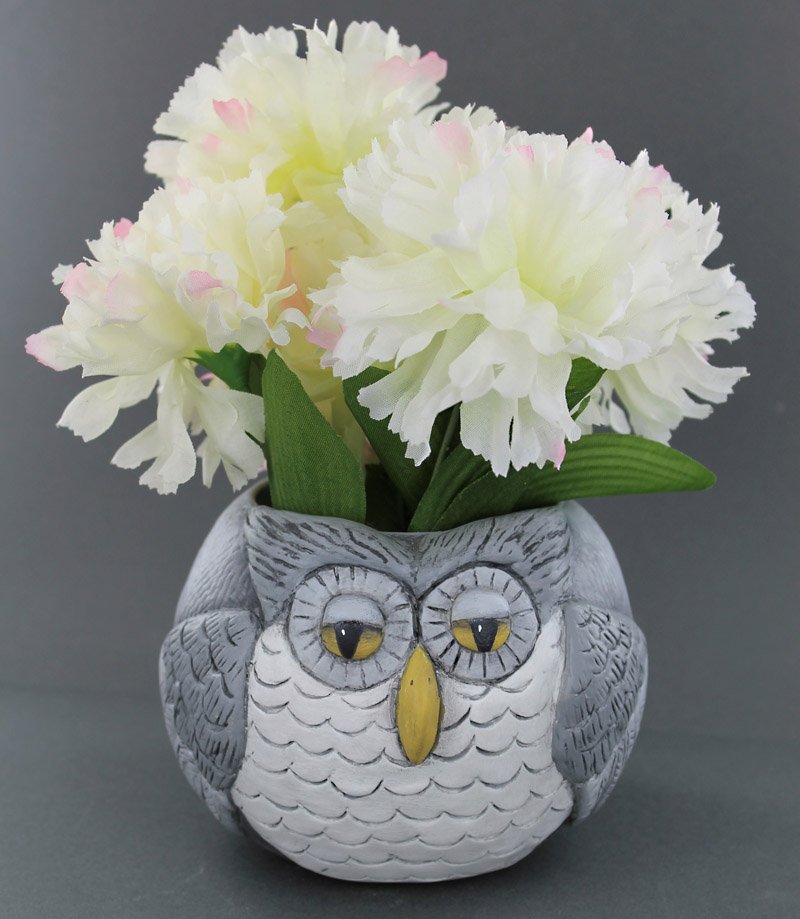
This cute little guy will keep an eye out for your favorite small potted plant!
Design by Linda Hollander
Read Less
ADDITIONAL SUPPLIES
Paints: DecoArt Americana: Dove Grey, Graphite, Grey Sky, Slate Gray, Snow (Titanium) White, Yellow Ochre; Brushes: Royal: Royal Soft-Grip Brushes: Shader Series SG 4590 #12; Round Series SG250 #3; Liner Series SG75L #1; 4” glass fish bowl from the Dollar Tree; DecoArt Multi-Purpose Sealer; DecoArt DuraClear Soft Touch Varnish Matte; DecoArt Staining Antiquing Medium; Misc Supplies: fine grit sand paper sponge, dust mask, hair comb, craft knife
Project Instructions
Tips:•Condition clay to make it more pliable as needed by placing it in a zip lock type plastic bag and knead with hands. •Use water on fingertips to help smooth clay as needed. Use wet brushes to smooth tight spots. •Use a hard surface such as a large tile or piece of glass to roll out clay. •To roll a sheet of clay form a ball of clay then use the clay roller to flatten on your hard surface. Use the super slicer to lift the clay off the surface. •When applying wet clay over dry clay it is helpful to moisten the dry clay with water first. •Use an oven set at 200’ F to speed up drying time of wet clay. •Sand dry clay lightly to smooth out major imperfections. Wear dust mask when sanding dry clay
Remove label and wash jar thoroughly. Roll out a thin sheet of clay and cover outside of bowl. While the clay is wet use the teeth of the comb to add texture (Fig. 1). Let dry.

Roll out a sheet of clay 1/8” or more in thickness for the breast. Cut out pattern and lay on clay. Use craft knife to cut out. Lift the cutout and line up the bottom with the bottom of the bowl. Press into place firmly beginning in the center and work outward toward edges to avoid air bubbles from forming. Once adhered use finger pressure to smooth edges. Use the cutter to make rows of scallops.


Roll out two logs approximately 2” long for eyebrows. Use fingers to shape the brows. Adhere to top center of bowl. Use knife to remove any clay from the eye socket area. Use rubber tool to bevel edges. Use the needle tool to create the texture


5.Roll then flatten two ½” balls of clay for eye sockets. Press onto face then use the needle tool to create spokes. Roll three small balls for eyeballs. Cut one ball in half for eyelids. Apply the eye balls to center of eye sockets. Carefully shape and apply lids. Roll small ball of clay then shape into football like shape for the beak. Press onto face. Use the needle tool to indent two nostrils

Roll out sheet of clay large enough for wing patterns. Use craft knife to cut out wings. Carefully adhere to sides of owl. Use cutter to make scallops and needle tool to indent feather details


Let dry. Carefully sand detail areas as needed. Apply a coat of Multi-Purpose Sealer to all areas. Let dry.
Basecoats: Use Gray Sky to paint the combed texture area (back of owl). Use Snow White to paint the breast. Use Gray Sky + Snow White (1:1) to paint the eye sockets and lids as well as and lower area of wings. Use Yellow Ochre to paint eyeballs and beak. Use Slate Gray to paint upper wings and eyebrows. Repeat basecoats until opaque.
Mix Staining Antiquing Medium with Graphite (2:1). Apply this mix over owl features except the combed area. Let dry. Use damp cloth to remove unwanted antiquing. Use the shader and more antiquing mix to shade along eyebrows and wings on combed areas.
Use Graphite to paint pupils. Use Snow White to add a reflected highlight.
Apply a coat of matte varnish to protect your creation.
